## API Design Basics
Start with these foundational concepts to build a solid API.
## Advanced Considerations
Once you've mastered the basics, these topics will help you build more sophisticated APIs.
## Productizing APIs
Turn your API into a polished product with these guides on documentation, security, and more.
Render bytes as [Secret Key] API->>Authorization Server: Store [Bob, [Secret Key]] Authorization Server-->>API: Success API-->>API Consumer[Bob]: [Secret Key] end rect rgba(0, 0, 0, 0.05) note over API Consumer[Bob],Authorization Server: Authorized API Request API Consumer[Bob]->>API: [Req] with [Secret Key] API->>Authorization Server: Who is this? [Secret Key] Authorization Server-->>API: Bob Note right of API: Process Request under context Bob API-->>API Consumer[Bob]: [Resp] end ``` * **Time to API Call**: As Fast as it gets. * **Ease of API Consumer Integration**: Very Easy * **Ease of API Producer Implementation**: Very Easy * **Other Considerations**: * Often Difficult to integrate into an API Gateway * Any validation requires a lookup where-ever these are stored. If you solely store them in the DB, this means that all lookups require a DB Read, which can cause additional latency to every request. ### OAuth 2.0 Secrets ```mermaid sequenceDiagram participant API Consumer[Bob] participant API participant Authorization Server rect rgba(0, 0, 0, 0.05) note over API Consumer[Bob],Authorization Server: Configure Key API Consumer[Bob]-->>API: AUTHORIZED SESSION [Bob] with [API] API-->>API Consumer[Bob]: API Consumer[Bob]->>API: Request New oAuth Application Note left of API: Generate some random bytes.
Render bytes as [Client ID], [Client Secret]
(AKA Secret Key). API->>Authorization Server: [Bob, [Secret Key]] Authorization Server-->>API: Success API-->>API Consumer[Bob]: [Secret Key] end rect rgba(0, 0, 0, 0.05) note over API Consumer[Bob],Authorization Server: Authorized API Request API Consumer[Bob]-->>Authorization Server: SECURE SESSION [Unknown] with [Authorization Server] Authorization Server-->>API Consumer[Bob]: API Consumer[Bob]->>Authorization Server: GET /oauth/token with [Secret Key] Note left of Authorization Server: Lookup [Secret Key] as Bob
Generate short-lived JWT with {"sub":"Bob"} claims Authorization Server-->>API Consumer[Bob]: JWT["Bob"] API Consumer[Bob]-->>API: SECURE SESSION [Unknown] with [API] API-->>API Consumer[Bob]: API Consumer[Bob]->>API: [Req] with header "Authorization Bearer \${JWT["Bob"]}" Note left of API: Process Request under context Bob API-->>API Consumer[Bob]: [Resp] end ``` OAuth is commonly associated with user authentication through a social login. This doesn't make sense for API applications, as the system authenticates and authorizes an application rather than a user. However, through the Client Credentials Flow ([OAuth 2.0 RFC 6749, section 4.4](https://tools.ietf.org/html/rfc6749#section-4.4])), a user application can exchange a **Client ID**, and **Client Secret** for a short lived Access Token. In this scenario, the **Client ID** and **Client Secret** pair are the **Shared Secret** which would be passed to the integrating developer to configure in their application. In the OpenID Connect (OIDC) protocol, this happens by making a request to the **/oauth/token** endpoint. ```sh TOKEN=$(curl --header "Content-Type: application/x-www-form-urlencoded" \ --request POST \ --data "grant_type=client_credentials" \ --data "client_id=CLIENT_ID" \ --data "client_secret=CLIENT_SECRET" \ https://auth.example.com/oauth/token | jq -r '.access_token') curl --header "Authorization Bearer $TOKEN" \ https://api.example.com/v1/endpoint ``` * **Time to API Call**: Slow. * **Ease of API Consumer Integration**: Difficult * **Ease of API Producer Implementation**: Difficult * **Other Considerations**: * Can enable additional use-cases, such as granting third party systems the capability to make API calls on behalf of your users. ### Public/Private Key Pairs A Public Private Key Pair allows for a user to hold a secret and the server to validate that the user holds a secret, without the server ever holding the secret. For the purpose of authenticating users, this mechanism has the lowest attack surface : i.e. it is the most secure. ```mermaid sequenceDiagram participant API Consumer[Bob] participant API participant Authorization Server rect rgba(0, 0, 0, 0.05) note over API Consumer[Bob],Authorization Server: Configure Key API Consumer[Bob]-->>API: AUTHORIZED SESSION [Bob] with [API] API-->>API Consumer[Bob]: Note right of API Consumer[Bob]: Generate Public/Private Key Pair API Consumer[Bob]->>API: Send Public Key API->>Authorization Server: Store [Bob, [Public Key]] Authorization Server-->>API: Success API-->>API Consumer[Bob]: Success end rect rgba(0, 0, 0, 0.05) note over API Consumer[Bob],Authorization Server: Authorized API Request API Consumer[Bob]-->>API: SECURE SESSION [Unknown] with [API] API-->>API Consumer[Bob]: API Consumer[Bob]->>Authorization Server: Hello, I am Bob Note left of Authorization Server: Generate Random Number [NONCE] Authorization Server-->>API Consumer[Bob]: Hello Bob, please sign [NONCE] Note right of API Consumer[Bob]: Sign [NONCE] with Private Key as [PROOF] API Consumer[Bob]->>Authorization Server: [PROOF] Note left of Authorization Server: Validate [NONCE] signature using [Public Key[Bob]] Authorization Server-->>API Consumer[Bob]: Success. [Session Token] API Consumer[Bob]-->>API: AUTHORIZED SESSION [Bob] with [API] via [Session Token] API-->>API Consumer[Bob]: end ``` The cost and complexity of building and maintaining a Public/Private Key Authentication mechanism, without exposing the Private Key, opening up replay attacks, or making a mistake in implementation somewhere can be high. If you're selling an API to multiple consumers, it's unlikely that it will be as trivial as the following `curl` to invoke the API that you want; as the integrating system will need to understand the protocol you choose. There are also complexities regarding the certificate lifecycle, and the need to either manage certificate rotation, or pin (hardcode) each certificate into the system. ```sh # this can usually be configured by some API Gateway products in infrastructure configuration. curl --cacert ca.crt \ --key client.key \ --cert client.crt \ https://api.example.com/v1/endpoint ``` * **Time to API Call**: Slow. * **Ease of API Consumer Integration**: Difficult * **Ease of API Producer Implementation**: Difficult * **Other Considerations**: * Severity of the public key being leaked is functionally zero -- no intermediary system holds enough data to make/replay requests except the original sender. ### Signed Tokens as API Keys A Signed Token is secret; in the same way that a Shared Secret is secret. However, due to standardization of technologies, it is starting to become commonplace to use long-lived Signed Tokens, in the form of JWTs (JSON Web Tokens), as API Keys. This enables the following pattern: ```sh curl --header "Authorization Bearer ${API_KEY}"\ http://api.example.com/v1/endpoint ``` ```mermaid sequenceDiagram participant API Consumer[Bob] participant API participant Authorization Server rect rgba(0, 0, 0, 0.05) note over API Consumer[Bob],Authorization Server: Configure Key API Consumer[Bob]-->>API: AUTHORIZED SESSION [Bob] with [API] API-->>API Consumer[Bob]: API Consumer[Bob]->>Authorization Server: Request New Secret Key Note left of Authorization Server: Make JWT[Secret Key] with Signing Key [K] via:
SIGN({"sub": Bob, "exp": 3 months}, K). Authorization Server-->>API Consumer[Bob]: [Secret Key] end rect rgba(0, 0, 0, 0.05) note over API Consumer[Bob],Authorization Server: Authorized API Request API Consumer[Bob]-->>API: SECURE SESSION [Unknown] with [API] API-->>API Consumer[Bob]: API Consumer[Bob]->>API: [Req] with header "Authorization Bearer \${JWT["Bob"]} API->>Authorization Server: Check JWT["Bob"] Note left of Authorization Server: Validate JWT[Secret Key] with Signing Key [K] Authorization Server-->>API: Success Note left of API: Process Request under context Bob API-->>API Consumer[Bob]: [Resp] end ``` * **Time to API Call**: Fast. * **Ease of API Consumer Integration**: Simple * **Ease of API Producer Implementation**: Simple * **Other Considerations**: * Difficult to revoke tokens: either a whitelist/blacklist is used (in which case, little advantage exists over shared secrets), or the signing key must be rotated. * Easy to add complexity through custom claims into the token, which can lead to complexity migrating tokens into a new form. * Easy to block requests from reaching application servers through an API Gateway and Asymmetric Keys (split into Private JWTs and Public JWKs). ### Our Approach: Signed Tokens as API Keys, but 1-Signing-Key-Per-API-key There are 3 problems with the Signed Tokens as API Keys pattern: 1. Revoking a key is hard: it is very difficult for users to revoke their own keys on an internal compromise. 2. Any compromise of the Signing Key is a compromise of all keys. 3. API Gateways can't usually hook into a whitelist/blacklist of tokens. To tackle these, we can do three things: 1. Use Asymmetrically Signed JWTs, storing and exposing a set of Public Keys via a JWKS (JSON Web Key Set) URI. 2. Sign each Token with a different Signing Key; burn the Signing Key immediately afterwards. 3. Ensure that API Gateways only retain a short-lived cache of JWKS (the Public Key to each Signing Key). ```mermaid sequenceDiagram participant API Consumer[Bob] participant Authorization Server participant API rect rgba(0, 0, 0, 0.05) note over API Consumer[Bob],API: Configure Key API Consumer[Bob]-->>Authorization Server: AUTHORIZED SESSION [Bob] with [Authorization Server] Authorization Server-->>API Consumer[Bob]: API Consumer[Bob]->>Authorization Server: Request New Secret Key [K] Note left of Authorization Server: Create a new Signing Key Pair [K]
(e.g. EdDSA Certificate with High Entropy)
Sign [Bob] with [K["PrivateKey"]] as [Secret Key]
Store [Bob, K["PublicKey"]]
Burn K["Private Key"] Authorization Server-->>API Consumer[Bob]: [Secret Key] end rect rgba(0, 0, 0, 0.05) note over API Consumer[Bob],API: Authorized API Request API Consumer[Bob]-->>Authorization Server: SECURE SESSION [Unknown] with [Authorization Server] Authorization Server-->>API Consumer[Bob]: API Consumer[Bob]->>Authorization Server: [Req] with header "Authorization Bearer \${JWT["Bob"]}" Note left of Authorization Server: Decode["Secret Key"] into JWT
Lookup Bob["Public Key"] via JWT.KID
Validate ["Secret Key"] matches Public Key["KID"] Authorization Server->>API: [Req], [Bob] Note left of API: Process Request under context Bob API-->>Authorization Server: [Resp] Authorization Server-->>API Consumer[Bob]: [Resp] end ``` This gives us a flow that's very similar to a shared secret, but with the advantage that: * Revoking a key is easy: the Public Key just needs to be removed from the JWKS and caches invalidated. * There is no Signing Key to compromise ; all Authorization Server state can be public. With the tradeoff: * Any API Gateway that validates a JWT must be able to regularly fetch JWKS (and cache them) from the Authorization Server. * After creating/revoking a key, there will be a short time delay (we generally configure this to be 15 seconds) whilst the key propagates into all API Gateway JWK caches. * More compute is required when constructing the Initial API Key; due to the generation of a public/private key pair. * You need to give the API Gateway application cluster slightly more memory to keep all Public Keys (1 per API key) in memory. #### In Practice: Envoy / Google Endpoints / EspV2 Envoy is a proxy server that is used to route traffic to a backend service. We ran extensive tests with ESPV2 (Envoy Service Proxy V2) and Google Endpoints, and found/validated the following performance characteristics as the number of keys increased. ```yaml # Espv2 is configured with an OpenAPI specification to use an external JWKs URI to validate incoming API Keys securityDefinitions: speakeasy_api_key: authorizationUrl: "" flow: "implicit" type: "oauth2" x-google-issuer: "https://app.speakeasy.com/v1/auth/oauth/{your-speakeasy-workspace-id}" x-google-jwks_uri: "https://app.speakeasy.com/v1/auth/oauth/{your-speakeasy-workspace-id}/.well-known/jwks.json" x-google-audiences: "acme-company" ``` We ran benchmarks of up to 1138688 API keys, structured as public/private 2048-bit RSA keypairs with a single RS256 Signed JWT-per-JWK, using a 8GiB Cloud Run managed Espv2 instance. At this key size and at ~100 requests/second, we observed a peak of ~37% utilization of memory, with ~7% utilized at no API keys. This implies an 8GiB EspV2 instance should scale to ~3M API Keys at this request rate. This also implies that this mechanism will scale with Envoy RAM with a minor deviation in maximum latency, to the degree of ~3.5ms additional maximum request latency every 8192 API keys. The average additional latency introduced by large numbers of API keys is affected to a much lesser degree, ~0.2ms every 8192 API Keys.  Given most API Applications have less than 3M API Keys active at any given time, this approach, in our belief, combines the best of both worlds: Public/Private Key Crypto, with the ease of an API Key. # api-change-detection-open-enums Source: https://speakeasy.com/blog/api-change-detection-open-enums import { Callout, ReactPlayer } from "@/lib/mdx/components"; Two exciting new features are coming to Speakeasy this week: API Change Detection and Open Enum support. Let's get into it 👇
If you're looking for a more comprehensive guide to API design, you can read our REST API Design Guide.
Order 123
Status: Shipped
View Order View Customer ``` In this case, the links are clickable, allowing users to navigate the API by following them. This is the essence of HATEOAS. Contrast this with a JSON response: ```bash curl --header "Accept: application/json" https://api.example.com/orders/123 ``` ```json { "id": 123, "status": "shipped", "links": [ { "rel": "self", "href": "/orders/123" }, { "rel": "customer", "href": "/customers/456" } ] } ``` In this example, the response includes links to the order itself and the customer who placed the order. By following these links, a client can navigate the API without prior knowledge of its structure. In practice, an SDK or client library would need to be aware of these links to provide a similar experience. From a developer experience perspective, this can be challenging to implement and maintain. Instead of implementing HATEOAS, many APIs rely on documentation to inform developers how to interact with the API. While this approach is more common, it lacks the dynamic nature of HATEOAS. ### ✅ Layered system: Followed by most REST-like APIs The layered system constraint allows for intermediaries between the client and server, such as proxies or gateways. This separation enhances scalability and security by isolating components and simplifying communication. Most APIs follow this constraint by permitting intermediaries between the client and server. ```mermaid sequenceDiagram participant Client participant Proxy participant Server Client->>Proxy: Request Proxy->>Server: Request Server->>Proxy: Response Proxy->>Client: Response ``` Since API requests are stateless and contain all the information needed to fulfill them, intermediaries can forward requests without needing to maintain session state. This is especially useful for load balancing and security purposes. ### ⚠️ Resource-oriented architecture: Followed by some REST-like APIs Each of the constraints above contributes to a resource-oriented architecture, where resources are identified by URIs and manipulated through representations. This architecture makes APIs more predictable and easier to use by following standard resource interaction patterns. Most APIs follow this constraint by organizing their resources into collections and items, with standard methods for interacting with them. This pattern is often reflected in an API's URL structure, where resources are presented as nouns, and instead of using verbs in the URL, API actions are represented by HTTP methods. For example: - `GET /orders`: Retrieve a list of orders. - `POST /orders`: Create a new order. - `GET /orders/123`: Retrieve order 123. - `PUT /orders/123`: Update order 123. - `DELETE /orders/123`: Delete order 123. Many API design guidelines recommend using resource-oriented URLs to make APIs more intuitive and easier to use. We'll explore this in more detail later in the article. ### ❌ Code on demand: Rarely used in the context of APIs We'll skip this constraint for now, as it's optional and rarely implemented in practice outside hypermedia-driven APIs. ## Why adherence matters Is this a cargo cult, or do these constraints actually matter? They do, and here's why: ### The principle of least astonishment There is a big difference between delighting users and surprising them. The principle of least astonishment states that the behavior of a system should be predictable and consistent. When your API behaves in a predictable way, like sticking to the standard ways of using HTTP methods and formats, you're making it easy for developers to use. They shouldn't have to spend hours figuring out quirky behaviors or unexpected responses - that just leads to headaches and wasted time. ### Scalability Scalability is essential when designing APIs that need to handle varying loads and growth over time. Adhering to REST principles inherently supports scalability in several ways: - **Statelessness**: Without the need to maintain session state, servers can handle requests independently, making it easier to scale horizontally. - **Cacheability**: REST APIs explicitly label responses as cacheable. This reduces the server load, as cached responses can be reused from previous requests. - **Layered system**: REST architecture allows the deployment of intermediary servers, such as load balancers and cache servers, which isolate client requests from direct backend processing. ### Maintainability The constraints of the REST model naturally lead to a design that is easier to update and manage: - **Resource-oriented design**: By focusing on resources rather than actions, APIs become more modular and logically structured. - **Independent client and server evolution**: The client-server separation supported by REST allows both sides to evolve independently. ## Quantifying REST adherence [The Richardson Maturity Model](https://martinfowler.com/articles/richardsonMaturityModel.html) provides a framework for evaluating an API's compliance with RESTful principles. This model outlines four levels of RESTfulness, each building on the previous one, allowing you to assess and improve your API's design objectively: ### Level 0: The swamp of POX (Plain Old XML) At this base level, APIs typically rely on a single URI and use HTTP merely as a transport protocol. There is little to no differentiation in the use of HTTP methods, and operations tend to be defined solely by the payload. This resembles the remote procedure call over HTTP (RPC over HTTP) protocol, where the rich set of HTTP features, like methods and status codes, are underutilized. An example of a Level 0 API might be: ```bash curl -X POST https://api.example.com/api.aspx?method=createOrder -d "..." ``` ### Level 1: Resources The first step towards RESTfulness is exposing resources via distinct URIs. At Level 1, APIs start organizing data into resources, often with a collection-item structure, making the API more resource-oriented. Each resource, such as `/orders` or `/customers`, typically represents a collection of items, with individual resources accessible by identifiers like `/orders/{orderId}`. An example of a Level 1 API might be: ```bash # Retrieve a list of orders curl -X POST https://api.example.com/orders # Retrieve order 123 curl -X POST https://api.example.com/orders/123 ``` Note how the API is starting to use URIs to represent resources, but the use of POST for retrieval is not ideal. ### Level 2: HTTP verbs At this level, RESTful APIs progress by using HTTP methods (like GET, POST, PUT, and DELETE) to perform operations on resources. Level 2 APIs respect the semantics of these verbs, leveraging the full power of HTTP to perform operations that are predictable and standardized. For example, GET retrieves data, POST creates new resources, PUT updates existing resources, and DELETE removes them. An example of a Level 2 API might be: ```bash # Retrieve a list of orders curl -X GET https://api.example.com/orders # Retrieve order 123 curl -X GET https://api.example.com/orders/123 # Create a new order curl -X POST https://api.example.com/orders -d "..." # Update order 123 curl -X PUT https://api.example.com/orders/123 -d "..." # Delete order 123 curl -X DELETE https://api.example.com/orders/123 ``` ### Level 3: Hypermedia controls (HATEOAS) HATEOAS distinguishes Level 3 APIs from the rest. At Level 3, responses include hypermedia links that offer clients dynamic navigation paths within the API. This allows for discoverability directly embedded in API responses, fostering a dynamic interaction model in which clients can follow links to escalate through states or access related resources. ## Evaluating your API's RESTfulness To evaluate the RESTfulness of your API, consider the following questions: 1. Level 1: Are resources uniquely identified by URIs? For example, `/orders/123` uniquely identifies an order resource. 2. Level 2: Are all URLs resource-oriented, and do they use standard HTTP methods? For example, URLs should use GET to retrieve resources, POST to create new resources, PUT to update existing resources, and DELETE to remove resources. None of your endpoint URLs should contain verbs or actions. For example, neither `/cancelOrder` nor `/orders/123/cancel` is resource-oriented,. 3. Level 3: Do responses include hypermedia links for dynamic navigation? For example, a response might include links to related resources, allowing clients to navigate the API without prior knowledge of its structure. ## The RESTful sweet spot We believe the RESTful sweet spot lies somewhere between Level 1 and Level 2 of the Richardson Maturity Model. This is where most APIs can find a balance between adhering to RESTful principles and practicality. In case it wasn't crystal clear from the previous sections, we think HATEOAS isn't practical or relevant for most APIs. It was a powerful concept when the web was young, and APIs were meant to be consumed by humans. Here's what we recommend: 1. **Embrace resource-oriented design**: Think in terms of resources rather than actions. Identify the key resources in your API domain and structure your endpoints around them. This ensures your API is predictable and intuitive, making it easier for developers to understand and use. ✅ Good: Use resource-oriented URLs like `/orders` and `/customers`. ```yaml filename="openapi.yaml" paths: /orders: # Resource-oriented get: summary: Retrieve a list of orders post: summary: Create a new order /orders/{orderId}: # Resource-oriented get: summary: Retrieve order details patch: summary: Update an order put: summary: Replace an order delete: summary: Delete an order ``` ❌ Bad: Don't use action-based URLs like `/cancelOrder`. ```yaml filename="openapi.yaml" paths: /cancelOrder: # Not resource-oriented post: summary: Cancel an order ``` ✅ Compromise: Use sub-resources like `/orders/{orderId}/cancellations`. If you must include actions in your URLs, consider using sub-resources to represent them as resources in their own right. ```yaml filename="openapi.yaml" paths: /orders/{orderId}/cancellations: # Resource-oriented post: summary: Create a cancellation for an order ``` ✅ Less ideal compromise: Use top-level actions like `/orders/{orderId}/cancel`. ```yaml filename="openapi.yaml" paths: /orders/{orderId}/cancel: # Resource-oriented with action post: summary: Cancel an order ``` 2. **Use standard HTTP methods wisely**: Choose the appropriate method for each operation - GET for retrieval, POST for creation, PATCH for partial updates, PUT for complete updates or replacement, and DELETE for removal. Ensure your API follows the semantics of these methods. This allows developers to predict how operations will behave based on the HTTP method. It also implies idempotency, safety, and cacheability where applicable. An operation is considered **safe** if it doesn't modify resources. It is **idempotent** if the result of performing it multiple times is the same as performing it once. It is **cacheable** if the response can be stored and reused. ```yaml filename="openapi.yaml" paths: /orders: get: # Safe, idempotent, cacheable summary: Retrieve a list of orders post: # Unsafe, potentially idempotent, not cacheable summary: Create a new order /orders/{orderId}: get: # safe, idempotent, cacheable summary: Retrieve order details patch: # unsafe, potentially idempotent, not cacheable summary: Update an order put: # unsafe, idempotent, not cacheable summary: Replace an order delete: # unsafe, idempotent, not cacheable summary: Delete an order ``` 3. **Document thoroughly with OpenAPI**: Instead of relying on HATEOAS for dynamic navigation, use OpenAPI to provide comprehensive documentation for your API. OpenAPI allows you to define your API's structure, endpoints, methods, parameters, and responses in a machine-readable format. This ensures clarity and type safety for developers using your API. ### How targeting SDK generation enables better API design While you're designing your API, consider how it will be consumed by developers. If you're providing an SDK or client library, you can optimize your API design to make SDK generation easier and more effective, and you may find the optimized design also leads to a more RESTful API. We often see APIs with action-based URLs like `/orders/{orderId}/cancel` or `/orders/{orderId}/refund`. While partially resource-oriented, these URLs include actions as part of the URL. Firstly, these URLs are not as maintainable as resource-oriented URLs. If you decide to allow multiple cancellations for an order - for example, when an order is restored after being canceled and then canceled again - you may wish to represent cancellations as resources in their own right. This would lead to URLs like `/orders/{orderId}/cancellations/{cancellationId}`. Alternatively, you may wish to allow partial refunds, leading to URLs like `/orders/{orderId}/refunds/{refundId}`. Secondly, these URLs are not as predictable as resource-oriented URLs. Developers may not know which actions are available for a given resource, leading to a reliance on documentation or trial and error. From a design perspective, this could look like the following: ```yaml filename="openapi.yaml" paths: /orders/{orderId}/cancellations: post: summary: Set the order status to cancelled /orders/{orderId}/refunds: post: summary: Create a refund for the order requestBody: content: application/json: schema: type: object properties: amount: type: number minimum: 0 maximum: 100 ``` Then, in a future version of your API, you could introduce cancellations and refunds as resources in their own right: ```yaml filename="openapi.yaml" paths: /orders/{orderId}/cancellations: get: summary: Retrieve a list of cancellations for the order post: summary: Create a new cancellation for the order /orders/{orderId}/cancellations/{cancellationId}: get: summary: Retrieve a specific cancellation for the order /orders/{orderId}/refunds: get: summary: Retrieve a list of refunds for the order post: summary: Create a new refund for the order /orders/{orderId}/refunds/{refundId}: get: summary: Retrieve a specific refund for the order ``` This approach allows you to evolve your API over time without breaking existing clients. ## Going beyond RESTful principles While adhering to RESTful principles is essential, it's also important to consider the practicalities of API design. Here are some detailed topics we'll explore in future articles: 1. [**Pagination**](/api-design/pagination): How to handle large collections of resources. Should you use offset-based pagination, cursor-based pagination, or something else? 2. [**Filtering and searching**](/api-design/filtering-responses): How to allow clients to filter and search resources efficiently. 3. [**Error handling**](/api-design/errors): How to communicate errors effectively and consistently. 4. **Versioning**: How to version your API while maintaining backward compatibility. 5. **Security**: How to secure your API using authentication and authorization mechanisms. 6. **Rate limiting**: How to protect your API from abuse by limiting the number of requests clients can make. 7. **Webhooks**: How to implement webhooks for real-time notifications. Be sure to check back for more insights on API design. # api-experts-akshat-agrawal Source: https://speakeasy.com/blog/api-experts-akshat-agrawal ### TL;DR - Spend time thinking about your API taxonomy. Talk to users to make sure the language you use matches with how they understand your product. - Sometimes you need to build endpoints that deviate from the long-term vision of your API to deliver value to clients. That's okay, just always have a plan to bring things back into alignment down the road. - Even if you're building an API product, some tasks are more easily solved with a UI, be strategic about what you ask user's to do via API and know where a UI is important. - For a good DevEx, relentlessly focus on minimizing your time to ‘wow'. - If you're PM'ing an API product, you need to build with your API to uncover the points of friction. ## Introduction _Akshat Agrawal, is an MBA candidate at Harvard Business School. Prior to pursuing an MBA, Akshat worked as a senior product manager at_ [_Skyflow_](https://www.skyflow.com/)_. Skyflow is a data vault accessible via an API interface. Akshat was an early product hire at the company and was tasked with building and refining the MVP of Skyflow's API interface._ _Prior to joining Skyflow, Akshat worked as a PM for Google Stadia, Google's next generation cloud gaming platform._ **_Can you let people know what Skyflow does?_** Of Course. So, Skyflow is a Data Vault delivered as an API. There's a lot packed in that sentence, so let me break it down a little bit. First of all, what is a Data Vault? This is an emerging category of data infrastructure. Instead of sticking your sensitive and non-sensitive data into the same database, which is traditionally how companies have been operating, the emerging paradigm is to create a separate construct called a Data Vault, specifically designed for you to store and compute sensitive data. Sensitive data includes things like PII and KYC (know your customer data), basically anything you wouldn't want breached. Skyflow provides data vaults that have all the bells and whistles you'd want: encryption, key rotation, data governance, data redaction, field masking, all of that is baked in. It is a totally managed service that we deploy within our cloud for most of our customers. Then the way that developers interact with the data stored in the vault is through an API. So at Skyflow the API is a big part of the product, in some sense it is the product. The API is used for the entire lifecycle of interaction with your data vault, from creating the data vault, to specifying the schema to actually reading, writing, deleting data from the vault, as well as computing on that data, sharing that data, configuring governance rules. It's all meant to be done via API. **_What does API development look like at Skyflow? Who is responsible for releasing APIs publicly?_** Yeah, that's a good question. Well as you might expect, as a startup the API development process isn't perfect. When I was at Skyflow, we were definitely still figuring it out. But in general, there are a couple of key steps. First is designing the taxonomy (structure) of the API. This is a bit of a nuance to Skyflow's business, but because we are a data platform, we actually don't have a fixed schema. It's up to the customer to define what their schema looks like. You know, how they want to arrange their tables and columns. And that makes it very different from your typical REST-based API. We had to design an API that was generic enough to be able to serve whatever data schema our customers designed. And so this really exacerbates the taxonomy problem. We had to make sure that we were really thoughtful with the terms we used to describe our resources. We had to make sure that the structure of the API made intuitive sense and that whenever we add a new endpoint it's a natural extension of the existing taxonomy. So step 1 was getting the right structure for the endpoints and parameters. Then step 2 would be the actual development, including testing and telemetry for the API. Then step 3 would be rollout. Depending on the nature of the API, we might offer it as a beta; and test with certain customers. We'd assess whether there were any back-compat issues that needed to be accounted for. Then last step, we would prepare the documentation. That is super important. We were rigurious with making sure that the documentation is up to date. There's nothing worse than stale documentation. And that, roughly, is the full scope of the API development process. **_How does Skyflow ensure that publicly released APIs are consistent?_** It starts with establishing a literal rulebook for API development, and getting the whole team to buy into using it. We created guidelines which contained rules about how APIs are named, how parameters are named, standard semantics, expected functionality, all that kind of stuff. Ironing out those rules enables developers building new endpoints to get it mostly right on the first go. That's really important for development velocity. Building the rulebook isn't a one-time activity, our API best practices document was ever-evolving. As time has gone on, we've gotten to something pretty prescriptive. So now, if you want to add a new endpoint, you should be able to get it pretty close to perfect just by adhering to the things in the document. And that rulebook is actively maintained by our API excellence committee. **_If I were to ask a developer building public APIs at Skyflow what their biggest challenge was, what do you think they would say?_** Well like I said. I think how you describe your API resources is important. And one specific challenge for Skyflow was maintaining intelligibility across clients and user personas. As an example, some users might call it consistency, while other user's called it quorum, and still other people might call it something else. It can be really challenging for them to understand the product when it's presented in unfamiliar terms. That challenge is not technical. It's more organizational and logistical, and it's especially hard when you're in startup mode. You've got tight deadlines and customers asking for endpoints that need to be shipped quickly. So really balancing the cleanliness and excellence of the API against time constraints and organizational constraints is really hard. And it's all compounded by the fact that your APIs can't really change easily once you launch them. **_What about the challenges facing the developers who consume Skyflow's APIs?_** We are a security and privacy product and there's some problems that can create for the developer experience. As an example, a lot of APIs can afford giving users a static key, but for Skyflow that's not the case. We have to take extra steps to make sure interactions with the API are safe. We use a jwt token, which you have to dynamically generate and that jwt token contains all the scopes and permissions that define what data you can interact with.The whole process of generating that token, and getting authenticated to the API is non trivial. You have to get a credentials file with a private key, then run a script on it to generate a token, then you include that token in your API requests. Asking users to perform all those steps creates friction. We saw we had a lot of drop off along the usage path, especially for developers who were just trying the API for the first time. To address that issue, we built a trial environment into our dev portal. We autogenerate a personal access token that users can use to experiment with the API. But in production, we want to stick with that really robust, secure mechanism. ## API architecture Decisions **_Skyflow's public APIs are RESTful, Can you talk about why you decided to offer Restful APIs over say, GraphQL?_** I think for our use case, specifically, GraphQL is actually a good option, we are trying to appeal to developers at other tech companies. But ultimately it's still a bit ahead of the market. I think GraphQL is really cool, but you know, compared to REST, it's not as easy to understand or as commonly known by developers. So REST still felt like a natural starting point. GraphQL could always be added in the future. **_If someone was designing their API architecture today, what advice would you give them?_** Yeah, totally. I think API security is something everyone should spend more time on. APIs are the attack vector for a lot of the data breaches which are happening today. It's really hard to secure the entire surface of your API because unlike traditional services, which are running in a confined environment, APIs try to be universally accessible. I wish I had some more concrete advice, but if you're a startup, spend time discussing it as a team. ## PM'ing APIs **_What's it like being a product manager working on an API product?_** I do think, relative to other PM roles, you need to be more technical. That being said, it shouldn't be a barrier for most people. If you're at the point where you can make an API request, then you can probably develop and grow into the role. So I definitely would tell people to not let the fear of not being an engineer discourage you. Like any good PM, you should be a consumer of your own product. And for an API product, that means you need to use your API. That's the real way that you figure out where the friction points are. And when I say use, I mean really build with your product. Of course, you can get out Postman, get an API token and make an API call. But when you actually go to build something, you start to discover all these little thorns. I built with our API from day one.I had little side projects. In the case of Skyflow, that helped me identify that the definition of the schema was a pain. It was quite difficult to do via API. So we actually built a web UI that could do the schema definition. So, yeah, the TLDR is you have to build stuff with your API. And of course not specific to an API per say, but at the end of the day, making your early customers and partners successful is the most important thing, so let that guide you. Oftentimes, we would have to make hard trade-offs, keeping the shape of the API completely standard vs. giving a client specific functionality they needed. If you're PM'ing an API, your challenge will lie in eventually bringing everything back into a state of alignment. You're managing an ever expanding body of endpoints and functionality and so you really need to be thinking about the long-term. How will we hurtle the cattle and bring the endpoints back into a clean shape as a cohesive product? **_What were the KPIs that you tracked against for your product area?_** I focused a lot on developer experience. The most important metric that I tracked was our user's average time to ‘wow'. For a lot of API products, ‘wow' will be the first successful API request. The time from when you click ‘get started' to when you make that first successful API request, we put a lot of effort into trimming that time down. And it can't just be the sum of every step of the process: getting your credentials to the account, setting up your data vault, authenticating a token, creating a well formed API request, sending it debugging. You also need to account for the time where your user is stuck or inactive. They don't see anything in the documentation, so they give up and come back to it in a day. Because the documentation is part of your product. Reaching out to support and waiting for support to get back to me, that counts against time to wow. Through a combination of working on authentication, onboarding, documentation, API design, we were actually able to get that down to minutes. For developers, short time to ‘wow' inspires confidence. And it has a sort of dopamine effect. We feel good when we get that 200 after sending the API request. I don't know about you, but anytime I start to use a new API. I have this sense of foreboding. I'm just waiting to run into an error or stale docs or something like that. And when it just works the first time, it's an amazing feeling. ## _DevEx for APIs_ **_What do you think constitutes a good developer experience?_** There's a lot of things that go into creating a good developer experience, but I would say that at the end of the day it boils down to productivity. A good developer experience is when developers can be productive. This is not just for APIs, this is for all dev tools. It's all about productivity. A lot of studies show with the proliferation of SaaS tools, Cloud Tools, microservices, new architectures, developer productivity has kind of hit rock bottom. There's just so much to account for. The amount of hours that developers spend doing random stuff besides just writing and testing good code is way off the mark. The proliferation of APIs should have big benefits in the long term, but currently developers are losing a lot of time understanding partner APIs, looking for documentation, debugging, dealing with authentication. So when it comes to APIs, a good developer experience is one that makes developers maximally productive when developing atop your API. Unlike most products, with an API you want your users spending as little time as possible with your API. It's not their job to spend a lot of time on your API. They're just using your API to get something done. So you really want them kind of in and out the door, so to speak. ## Closing **_A closing question we like to ask everyone: any new technologies or tools that you're particularly excited by? Doesn't have to be API related._** That's a good question. And I think a big part of being at grad school is my desire to explore that fully. I've been really deeply in the world of security, privacy, data and fraud for the last few years. I'm excited to see what else is out there. One thing that's really interesting to me right now is climate tech. I think there's just so much scope for software to make an impact in mitigating climate change and so I'm really excited to explore that space more. # api-experts-clarence-chio Source: https://speakeasy.com/blog/api-experts-clarence-chio ### TL;DR - Tech writing teams are often papering over the gaps created by immature API development processes. - As businesses grow, the complexity of managing even simple API changes grows exponentially. - Designing an API is no different from building any product. The question of what framework you use should be dictated by the requirements of your users. - Don't build an API just to have one. Build it when you have customer use cases where an API is best suited to accomplishing the user's goal. - Good devex is when your services map closely to the intention of the majority of your users. - The mark of good devEx is when you don't have to rely on documentation to achieve most of what you're trying to do. ## Introduction [_Clarence Chio_](https://www.linkedin.com/in/cchio/)_, is the CTO and one of the co-founders of Unit21._ [_Unit21_](https://www.unit21.ai/) _is a no-code platform that helps companies fight transaction fraud. Since the company started in 2018 it has monitored over $250 billion worth of transactions, and been responsible for preventing over $1B worth of fraud and money laundering._ _In addition to his work on Unit21, Clarence is a Machine Learning lecturer at UC Berkeley and the author of_ [_“Machine Learning & Security”_](https://www.oreilly.com/library/view/machine-learning-and/9781491979891/) ## API Development @ Unit21 **_What does API development look like at Unit21? Who is responsible for releasing APIs publicly?_** API development is a distributed responsibility across the different product teams. Product teams build customer-facing features which take the form of dashboards in the web interface, API endpoints, or both. So generally, every product team maintains their own sets of API endpoints defined by the scope of the product vertical that they're working on. But the people that make the decisions defining best practices and the consistency of how our APIs are designed is typically the tech leads working on our data ingestion team. As for who maintains the consistency of how APIs are documented and presented to our customers, that is our technical writing team. **_How come the data ingestion team owns API architecture is that just a quirk of Unit21 engineering? Is there any resulting friction for API development in other parts of the engineering organization?_** Yeah, the reason for this is pretty circumstantial. Most of the API usage that customers engage with are the APIs owned by our data ingestion team. We're a startup and we don't want too much process overhead, therefore we just let the team that owns the APIs with the most engagement, maintain the consistency and define what the API experience should be. As for friction with other parts of the org, it's largely been okay. I think the places of friction aren't specifically related to having designated a specific product team to be the owner. A lot of the friction we've had was down to lack of communication or immature processes. A common example is when the conventions for specific access patterns, or query parameter definitions aren't known across the org. And if the review process doesn't catch that, then friction for the user happens. And then we have to go back and clean things up. And we have to handle changing customer behavior, which is never fun. However, it's fairly rare and after a few incidents of this happening, we've started to nail down the process.. **_What is Unit21's process to ensure that publicly released APIs are consistent?_** There is a strenuous review process for any customer facing change, whether it's on the APIs or the dashboards in the web app. Our customers rely on us to help them detect and manage fraud so our product has to be consistent and reliable. The API review process has a couple of different layers. First we go through a technical or architectural review depending on how big the changes; this happens before any work is done to change the API definitions.. The second review is a standard PR review process after the feature or change has been developed. Then there's a release and client communication process that's handled by the assigned product manager and our technical writing team. They work with the customer success team to make sure that every customer is ready if there's a breaking change. **_If I were to ask a developer building public APIs at Unit21 what their biggest challenge was, what do you think they would say?_** It's probably the breadth of coverage that is growing over time. Because of the variance in the types of things that our customers are doing through our API and all the other systems and ecosystems that our customers operate in, every time we add a new API the interactions between that API and all the other systems can increase exponentially. So now the number of things that will be affected if, for example, we added a new field in the data ingestion API is dizzying. A new field would affect anything that involves pulling this object type. Customers expect to be able to pull it from a web hook from an export, from a management interface, from any kind of QA interface, they want to filter by it, and be able to search by it. All those things should be doable. And so the changing of APIs that customers interact with frequently cause exponentially increasing complexity for our developers. **_What are some of the goals that you have for Unit21's API teams?_** There's a couple of things that we really want to get better at. And by this, I don't mean a gradual improvement on our current trajectory, but a transformational change. Because the way we have been doing certain things hasn't been working as well as I'd like. The first is the consistency of documentation. When we first started building our API's out, we looked at all the different types of spec frameworks, whether it was Swagger or OpenAPI, and we realized that the level of complexity that would be required if we wanted to automate API doc generation support would be too much ongoing effort to be worthwhile. It was a very clear answer. But as we continue to increase the scope of what we need to document and keep consistent, we realized that now the answer is not so clear. Right now this issue is being covered over by our technical writing team working very, very closely with developers. And the only reason this work is because our tech writer is super overqualified. She's really a rock star that could be a developer if she wanted to. And we need her to be that good because we don't have a central standardized API definition interface; everything is still defined as flask routes in a Python application. She troubleshoots and checks for consistency at the time of documentation because that's where you can never hide any kind of inconsistency. But this isn't the long term solution, we want to free up our tech writers for differentiated work and fix this problem at the root. We're still looking into how to do this. We're not completely sold on Swagger or OpenAPI, but if there are other types of interfaces for us to standardize our API definition process through, then potentially, we could find a good balance between achieving consistency in how our APIs are defined & documented and the efforts required from our engineering team. But yeah, the biggest goal is for more documentation consistency. ## API architecture Decisions **_When did you begin offering APIs to your clients, and how did you know it was the right time?_** When we first started, we did not offer public APIs. We first started, when we realized that a lot of our customers were evolving use cases that needed a different mode of response from our systems. Originally, we would only be able to tell them that this transaction is potentially fraudulent at the time of their CSV, or JSON file being uploaded into our web UI, and by then the transaction would have been processed already. In many use cases this was okay, but then increasingly, many of our customers wanted to use us for real time use cases. We developed our first set of APIs so that we could give the customer near real time feedback on their transactions, so that they could then act on the bad event and block the user, or block the transaction, etc. That was the biggest use case that pushed us towards the public API road. Of course, there's also a bunch of other problems with processing batch files. Files are brittle, files can change, validation is always a friction point. And the cost of IO for large files is a big performance consideration. Now we're at the point where more than 90% of our customers use our public APIs. But a lot of our customers are a hybrid; meaning they are not exclusively using APIs. Customers that use APIs also upload files to supplement with more information. And we also have customers that are using our APIs to upload batch files; that's a pretty common thing for people to do if they don't need real time feedback. **_Have you achieved, and do you maintain parity between your web app and your API suite?_** We don't. We actually maintain a separate set of APIs for our private interfaces and our public interface. Many of them call the same underlying back end logic. But for cleanliness, for security, and for just a logical separation, we maintain them separately, so there is no parody between them in a technical sense. **_That's a non-standard architecture-choice, would you recommend this approach to others?_** I think it really depends on the kind of application that you're building. If I were building something where people were equally likely to interact through the web as through the API, then I think I would definitely recommend not choosing this divergence. Ultimately, what I would recommend heavily depends on security requirements. At Unit21 we very deliberately separate the interfaces, the routes, the paths between what is data ingestion versus what is data exfiltration. That gives us a much better logical separation of what kinds of API routes we want to put into a private versus public subnet, and what exists and just fundamentally does not exist as a route in a more theoretically exposed environment. So ultimately, it's quite circumstantial. For us, I would make the same decision today to keep things separate. Unless there existed a radically different type of approach to API security. I mentioned earlier there were a couple of things that we would like to do differently. One of them is something along this route. We are starting to adopt API gateways and using tools like Kong to to give us better control over API access infrastructure, and rate limiting. So it's something that we're exploring doing quite differently. **_Unit21's public APIs are RESTful, Can you talk about why you decided to offer Restful APIs over say, GraphQL?_** I think that designing an API is very similar to building any other product that's customer facing, right? You just need to talk to users. Ask yourself what would minimize the friction between using you versus a competitor for example. You should always aim to build something that is useful and usable to customers. For Unit21 specifically, the decision to choose REST was shaped by our early customers, many of whom were the initial design partners for the API. We picked REST because it allowed us to fulfill all of what the customers needed, and gave them a friendly interface to interact with. I've been in companies before where GraphQL was the design scheme for the public facing APIs. And in those cases the main consumer persona of the APIs were already somewhat acclimatized to querying through GraphQL. Asking people that haven't used GraphQL to start consuming a GraphQL API is a pretty big shift. It's a steep learning curve, so you need to be really thoughtful if you're considering that. **_Also, you've recently released webhooks in beta, what was the impetus for offering webhooks, and has the customer response been positive?_** That's right. Actually, we've had webhooks around for a while, but they hadn't always been consistent with our API endpoints. We recently revamped the whole thing to make everything consistent, and that's why it's termed as being ‘beta'. Consistency was important to achieve because, at the end of the day, it's the same customer teams that are dealing with webhooks as with the push/pull APIs. We wanted to make sure the developer experience was consistent. And since we made the shift to consistency, the reaction has been great, customers were very happy with the change. ## Developer Experience **_What do you think constitutes a good developer experience?_** Oof this is a broad question, but a good one. All of us have struggled with API Docs before; struggled with trying to relate the concept of what you're trying to do with what the API allows you to do. Of course, there are some really good examples of how documentation can be a great assist between what is intuitive and unintuitive. But I think that a really good developer experience is when the set of APIs maps closely to the intention of the majority of the users using the API, so that you don't have to rely on documentation to achieve most of what you're trying to do. There are some APIs like this that I've worked with before that have tremendously intuitive interfaces. In those cases, you really only need to look at documentation for exceptions or to check that what you're doing is seen. And I think those APIs are clearly the result of developers with a good understanding of not only the problem you're trying to solve, but also the type of developers who will be using the API. ## Closing **_A closing question we like to ask everyone: any new technologies or tools that you're particularly excited by? Doesn't have to be API related._** Yeah, I think there's a bunch of really interesting developments within the datastream space. This is very near and dear to what we're doing at Unit21. A lot of the value of our company is undergirded by the quantity and quality of the data we can ingest from customers. We're currently going through a data architecture, implementing the next generation of what data storage and access looks like in our systems, and there's a set of interesting concepts around what is a datastream versus what is a database. And I think we first started seeing this become a common concept with K sequel, in confluent, Kafka tables etc. But now with concepts like rocks set with, snowflake and databricks all releasing products that allow you to think of data flowing into your system as both a stream and a data set. I think this duality allows for much more flexibility. It's a very powerful concept, because you no longer have to think of data as flowing into one place as either, but it could be both supporting multiple different types of use cases without sacrificing too much of performance or storage. # api-experts-jack-reed Source: https://speakeasy.com/blog/api-experts-jack-reed ## TL;DR - It's great to have an industry standard like OpenAPI for API development, but the flexibility in the spec has made true consensus elusive. - If you're building an SDK, the goal is to make it as easy as possible for users to make their first request. - When you're building in a regulated space, it's important to offer a sandbox to help customers build quickly and safely. - At Stripe, maintaining the [API platform](/post/why-an-api-platform-is-important/) required a large team. In the last couple years this API DevEx space has started to take off and democratize API product quality. It's a welcome development for people who care about this type of stuff. ## Introduction _Jack Flintermann Reed is an engineer at [Increase](https://increase.com/), a company that provides an API which enables developers to build a bank. Jack spends his time thinking about how to make the [Increase API](https://increase.com/documentation/api#api-reference) enjoyable for customers to use, and scalable for the Increase team to develop. Before he joined Increase, Jack was a staff engineer at Stripe._ ## APIs at Increase **Increase offers a REST API to developers, how did you decide that was the right interface?** At one point we tried offering both a REST API and a GraphQL API but we found operating the GraphQL API to be challenging and ended up winding it down. There was a cognitive overhead for the user that was hard to overcome: like, welcome to our GraphQL API, here are all the libraries you're gonna have to install before you get started. And you know, GraphQL libraries across different programming languages have really varying quality. The Ruby GraphQL client is okay for example, but other languages not so much. And then, client aside, you need to learn all these new concepts before you can even do what you want. For users it's like, “I just want to make an ACH transfer here.” And that's the really nice thing about REST. Every single language has an HTTP client built into it. There is no stack required to get started. It is really simple. You can play with a lot of REST APIs in the browser's URL bar if you want to. And that makes getting started with documentation and integration a lot simpler. So the barrier to entry is lowest on REST. And, that's not to say it doesn't come with plenty of issues of its own, which I'm sure we will get into. But we think it's what is right for us right now. Ultimately, one of the reasons we had to give up on GraphQL is we realized that because of the level of DevEx we wanted to give users, we only had the bandwidth to do one public API really well, and so we were forced to pick. I suppose that is one of the main reasons Speakeasy exists, right? **Yes it is. And to explicitly state something that I think you're implying, the developer tools that are needed to support a REST API and a Graph QL API, are fairly distinct?** I think so. And again it's partially down to the maturity of the technology. For example, when we think about the SDKs that we want to offer to our users, one of the things that we feel pretty strongly about is not having any dependencies. And that's just not possible with a GraphQL API. Like, you're not going to write your own GraphQL client, you're going to bundle something in. But that exposes you to problems where there could be a version conflict with the client you've pinned yourself to. And with REST, it's at least possible to avoid that problem. We've recently written a Ruby SDK for our API, and we're pretty happy that it's got no external dependencies. **Are you versioning your API, do you plan to?** We don't version the API yet. We are small enough that we just haven't had to do it. We inevitably will have to, but I'm trying to delay it for as long as possible. It's a lot of work, and there's just not a canonical way to do versioning. So I'm cheating by just making it a problem for my 2023 self. We do occasionally deprecate things, but we're close enough to our users right now that we can just reach out to them. And for us right now, we're in a phase where the API is mostly additive, we're still building out the core resources. The deprecations we've done have been at the API method level. It's easy enough for us to handle. The real nightmare is when you want to take out this field from this API response. And you have no idea if anyone is relying on it or not. That's the one that sucks. And fortunately, we haven't had to do that. And we are trying really hard to not have to do that. A good way to save yourself trouble is by being really conservative about what you put in your API to begin with. That's our approach right now, we want users to pull features out of the API. Yes we have the data, we obviously could expose that field, but until a few people are asking us for it, we are not going to put it into the API. ## Thoughts On OpenAPI **Do you like OpenAPI? Does your team maintain an OpenAPI spec?** I'm glad it exists, we publish an open API spec. And it is going to be the foundation of all of the stuff that you and I are talking about right now. We're going to generate our documentation and clients from our OpenAPI spec. That said, I think it's extremely difficult to work with. So, I'm glad that there is a standard, but I wish the standard were better. I think OpenAPI has taken this nice big-tent approach where anyone can describe their API with OpenAPI. But there are some crazy APIs out there, right? And so there are a million features inside OpenAPI. I've been working in the API space for a while and it took me some pretty serious effort to try and understand OpenAPI and how to get started. There are a lot of features you could use, but there's no easy way to separate out the set of features that you should use. One example that I always harp on is null. If I have a nullable parameter, there's at least four ways to represent that in OpenAPI 3.1. But not every library implements the full OpenAPI specification, so the tools and libraries that I want to have consume my spec might only support a certain way to represent null. So while it's all well and good that you can represent null 4 different ways, if you actually use two of them, none of your tooling will work. And that type of opinionated information is extremely hard to pin down. **Do you generate your OpenAPI spec from code?** Yeah, we have this cool library we use internally, I'm pretty proud of it. If I had infinite time, I think there's probably a great little framework that could be pulled out of this. Increase is written in Ruby, and we use [Sorbet](https://sorbet.org/) from Stripe (a type checker for Ruby). We've built a Domain-Specific Language, you might've seen other companies do something similar, where you can write API methods using a declarative syntax. You say, this API takes a parameter called, “name”, and it's a string, and this one takes “age”, it's an integer. And this library then goes and produces a couple of outputs. On the one hand, it gives you an OpenAPI spec. Then on the other, it handles all the shared application concerns around parsing requests: error messages, type suggestions, etc. Everything you don't want to force individual developers at Increase to be thinking about. It will spit out into the application, a parsed, strongly-typed, parameters object. And so, the developer experience is pretty nice for folks at Increase. If you add a parameter, it just shows up in the docs and the SDKs without you having to do anything, which is the dream. It's an all in one generator for artifacts. ## How Does Increase Think About DevEx **You mentioned earlier that one of the guiding principles in your SDK generator development was limiting dependencies. What other principles do you have for SDK development?** We want to make it very easy to write your first request. And to achieve that, the majority of the library should be type definitions. It should list out the API methods and each of those should have a nice type definition that makes it easy to autocomplete when you're working. Then there's the other piece of the SDK, sort of the core, which actually handles making the requests. That should be very tunable, and ultimately, swappable. I worked at Stripe before coming to Increase. And at Stripe, when we were integrating with an external service, we'd rarely use the official SDK, because of all the things, like internal service proxies, that we would need to configure in order to safely get requests out of the stripe infrastructure. It would have been really nice to say, we have our own way of making HTTP requests, and I'm happy to write adapter code to conform to your interface; I'll just kind of ram it into your type definition. That would have been the sweet spot for us, and that experience has influenced our approach at Increase. We have written it to be the kind of SDK we would have wanted to integrate with. If people are interested in this stuff, there's [a really fantastic blog](https://brandur.org/articles) by a developer I used to work with at Stripe, Brandur. He's a prolific writer and often dives deep on the minutiae of good API design. If people haven't read it, they should. **What about DevEx for APIs? What's most important?** There's a lot of different things that go into it. The first piece is documentation, trying to make your system legible to others. Good documentation focuses on the concepts you need to know, without overwhelming you with information. I think at Increase, we do an okay job of this right now, but it's one of the things I most want to improve about our own product. We've got the API reference, which is great - it's the index at the back of the encyclopedia, but it's not enough. It's really important to know the typical path for building an integration with your API and then communicate: “here are the five things you're going to want to go and touch first.” I think that initial communication is more important than almost anything else to me when it comes to the experience of using an API. And again, I'm a major type system enthusiast. And that's because when you get it right with your developer tooling, your documentation can just flow into the developer's text editor. And to me, that's the dream experience. But it takes a lot of work to get there. That's all concerning understanding the API, and doing the initial integration. There's also the ongoing operation of the integration code. And that's about answering questions like: How do I see what I've done? Did I make a mistake? How do I debug my mistake? That's where tools that enable you to see the requests you've made are really useful. It's hard to say what specifically constitutes a great developer experience, but a lot goes into it, and, fortunately for developers, the bar for what great means gets higher every year. Tools are getting better. **Are there other companies that you look to as a north star when building DevEx?** So, obviously Stripe gets a lot of praise for being the first company here. They were so much better than anything else at the time they started. And I think if you look back at the things that they did, a lot of them were really small touches. Things like copy/paste for code examples, right? Small, but really nice. Another one was, if you misspell an API parameter, giving you an error message that suggests the correct spelling. It's not rocket science. But those little things add up into something really nice. I'm obviously really biased because I worked there, but I still think Stripe is the best. I learned a lot from my time there, so it's still the company I model after most. Besides Stripe, I wouldn't say there's one company that is necessarily a North Star. I have a loose list of peer companies. When I'm doing research, it's usually because I'm grappling with the fact there's a lot of under-specified things in building REST APIs and I want to see how others have handled it before I make a decision. I'm not interested in features or clever things that they've done that I want to copy, it's more about checking whether there is consensus on a topic. If there is a consensus, I want to follow the precedent so that it is not surprising to our users. However, I'm usually disappointed. There often isn't consensus on the way to do basic features in REST APIs. Which is funny and sad. Incidentally, that's one of the nice things about GraphQL. They tell you how to do everything. It's very proscriptive. **How is the value of Increase's investment in DevEx measured? Are there metrics you want to see improve?** It's not really obvious, it's much more of a qualitative metric. We open a Slack channel for every new user, and we stay pretty close to them during the integration. We're not quite looking over their shoulder, but if we could, we would. And so, we're pretty sensitive to how that kind of first experience goes. We try to get feedback from pretty much everybody who goes through it. And so, it's just things that we see mainly. Like if everyone is running into a similar stumbling block, we prioritize removing it. It's not like there's a KPIs dashboard on a wall. It's things we see in conversations with users every day. It scales pretty well if the whole team pitches in on working with users. Slack Connect is a pretty great tool. ## Increase's Journey **You guys are a startup, but you've been investing in your API's DevEx from the get go. Was that a conscious decision?** Yeah, again, It's pretty informed by our experiences at Stripe. It's also a consequence of the space we work in. We offer a set of banking APIs, and traditionally banking API integration is pretty laborious. With a traditional bank, it'll be an extended contracting phase, then you get to a signed contract, and finally you'll get this PDF for docs. And then the integration involves sending files back and forth between FTP servers. It's not fun. And so as a startup in the space, our goal is to make the integration timeline as short as possible, and as dev-friendly as possible. Even in the cases where we need a signed contract before a user can go live in production, we enable their development team to build while that's being sorted. **Ya, please expand on that a bit more. As a banking API there's inevitably compliance. How do you guys balance integration speed with compliance?** It depends on the use case - we can get most companies live in production very quickly. And then there are some that require more due diligence. That's where tooling like an API sandbox is helpful. With a sandbox, you can build your whole integration. The dashboard experience looks and feels real, and so you can just build out what you need while the legal stuff is handled. We've learned that it takes a lot of work to make a good sandbox. We have to do a lot of weird things to simulate the real world. For example, in the real world there's several windows throughout the day when the federal government processes ACH transfers and they go through. So if a developer makes an ACH transfer in the sandbox, what do we do? Should we simulate that happening immediately, or wait like the real world. There's not always a right answer. We actually built a simulation API, where you can simulate real world events in all kinds of tunable ways. And so that has been fascinating. It made us re-architect a fair amount of code to get it working. ## Closing **In the longer term, are there any big changes you think are coming to the way people interact with APIs?** Haha I think this question is above my paygrade. It's not quite the lens through which I think about things… But, I guess one thing that is interesting is how many companies are starting to pop up in this API DevEx space. It seems like there were zero people working on this stuff two, three years ago. Now there's a few. Before I joined Increase, I was thinking I might start a company of my own in the space. One of the ideas I was kicking around was a platform for webhook delivery. I've seen a bunch of new startups doing that over the interim 2 years. I think that's cool. The size of the team that maintained these things at Stripe was big. It required a lot of manual work. And so it's cool to see that level of API product quality being democratized a little bit. Like I said, I think the quality bar will continue to rise, and it has risen. But, today, it's still a pain. It still takes a lot of work, you really have to care about it. I'm hoping it becomes a little bit easier to buy off the shelf as time goes on. # api-experts-mathias-vagni Source: https://speakeasy.com/blog/api-experts-mathias-vagni ## TL; DR - Building your API to be public (without private endpoints) pays huge dividends in the form of extensibility for your customers. - GraphQL requires some extra legwork to cover the basics, but comes in handy for supporting more advanced UIs and apps. - The Plain team is not only working on their APIs' DevEx, but is trying to make it easy for customers to build their own API endpoints. - For smaller companies, the qualitative feedback on your developer experience is more useful than tracking metrics. ## Introduction to Plain **To warm up, could you give a brief overview of [Plain](https://plain.com/) and what y'all are building?** Plain is the customer support tool for developer tools. My co-founder Simon and I both found that existing customer service platforms were really hard to integrate with and fundamentally not built for engineering led products. Their APIs were afterthoughts tacked on and dumbed down to be made public. Their data models and workflows assumed that they were the primary store of customer data vs your own databases. These assumptions just didn't make sense, especially in the developer tools vertical. We wanted to build a customer service platform that is incredibly easy for developers to build with. The inspiration came from our experiences at Deliveroo (food delivery) and Echo, an online pharmacy. All of Plain is built API-first, meaning the API we make available to users is identical to the API we use internally. This means that there are no restrictions with what you can do programmatically. Anything you can do in Plain, you can do via the API. By dog-fooding our API this way, we end up constantly working on making it easier to build with and integrate Plain into your own systems. ## Architecture of the Plain API **How does being API-first impact product development? Move fast and break things doesn't work so well for APIs right?** Yeah, we have virtually no private surface area, which is a challenge since it means that everything we build is exposed. Things that are traditionally quite easy are harder, for example deprecating an endpoint, but the rewards are massive. You have to move a bit slower at the beginning, especially when you're conceiving a new feature. It forces you to think quite carefully as to where you put logic and where you ‘encode' your opinions if that makes any sense. For example, [our data model](https://docs.plain.com/data-model) is something that is integral and is set in the API. A less clear cut case is certain opinions around how you should work as someone providing support to users. We do our best to make sure that opinions are more in our UI and the Plain app, and the API remains more generic. As a result of this, we definitely have more in depth conversation around API design than you would normally see at an early stage startup. The payoff though is huge. When we onboard customers, and our platform is missing certain features, they are able to extend and just build the features themselves. As an example, we had one customer using Discord to manage their community. We didn't offer a Discord integration. So they built it. It's super cool, now they're able to talk to users in Discord and sync it to Plain. That's where you reap the benefits of an API first approach. **One of the first decisions an API company needs to make is REST or GraphQL, Plain is GraphQL-based. What persuaded you that GraphQL was best?** We realised early on that most companies want to use customer support APIs to automate only small parts of their workflow. For example when they have an issue in their back-end they might want to proactively reach out to that customer and so they might open a ticket. In these early stages of companies, the requirements for customer support tooling are quite simple so we were very tempted to use REST. For simple API calls REST is typically way easier. However at the same time we learnt that many people were looking for a productivity focused, power user friendly, support app. This is especially true for engineers as a demographic. Given this, GraphQL seemed like a much better fit. For building complex applications the schema stitching required by REST can be very painful and it was something we were keen to avoid. Ultimately weighing both of these conflicting requirements we went for GraphQL. We felt like if we start with a GraphQL API, we could always add a REST layer on top later. The reverse would be more difficult to do in a performant way. **I've spoken to some other founders who started with GraphQL, before switching to REST. One of their criticisms was that the ecosystem of GraphQL tooling left a lot to be desired. Yes, What has your experience been?** There are some things that are great. And then there are some things that you expect to be good, but are terrible. For basic apps, where you just want to make some queries and run some mutations, you're going to have a great time. You make some GraphQL files, generate all of your types. It can even generate clients for you. There's lots of libraries that take care of things like caching and normalisation, definitely in the React ecosystem, but also in others. So that's all fine. I think, where you start running into GraphQL weirdness and where the ecosystem leaves a lot to be desired is in terms of some more basic elements like error handling and complex input types. With REST APIs a 401 is an unauthorized request, you don't need to explain that to anyone. And because you are not restricted to a type system you can do things that are just plain awkward in GraphQL (e.g. union input types). **How do you handle errors in GraphQL then?** Unlike REST, GraphQL is multileveled so certain problems become harder. Suddenly, you might be in a situation where the user has top level permissions to get something, but then doesn't have permission for one of the nested elements. The way that you handle that error is DIY. There's no (good) convention to follow. We made some good and bad decisions in our early days. What helped was that very early on, we decided to write our own linting rules. GraphQL has an inbuilt tool that essentially parses the GraphQL schema when a request comes in, and with this, you can write rules to lint your schema. We write our schema first, so the linters enforce convention before any API code is actually written. And it's not just syntactical errors, our linters enforce things like, every mutation must return an error, an error must be of this type, etc. It's served us really well, because it means that we have very few debates on PRs around repeated API design topics. **What's been the client reaction to the GraphQL API?** It's interesting. I think the more complex the use case, the happier users are with GraphQL. There's obviously still a bit of a gap between GraphQL and REST when it comes to awareness, and we do encounter companies who want to use Plain where the engineers have never worked with GraphQL, beyond reading blog posts. It's definitely a barrier, but not insurmountable; it just requires a little bit more hand holding. We help customers through this by giving them code examples and instructions on how to make GraphQL requests, how our errors work, that kind of thing. Overall, we've found that as long as you've put work into developer experience and consistent API design, developers will pick things up quickly. And we are militant about the consistency and experience of our API. As an example, we provide incredibly thorough error messages, which is something that developers love. Once they start building they quickly realise: “Okay, this is solid.” ## Plain's API DevEx **That's a good segue. What additional tooling do you give to users to support API integration? What tooling improvements are you looking to make?** Before we dive in, it's worth knowing that there are two ways you build with Plain. There is the GraphQL API, which we've been talking about, but there's also something we call [Customer Cards](https://docs.plain.com/adding-context/customer-cards). They are really interesting, because they're the inverse of the traditional way that other support tools work. Instead of our customers calling us and syncing data (when the support tool is the primary source of truth), our users provide a URL, which we call to fetch _your_ customer data which is then loaded up within the Plain UI. 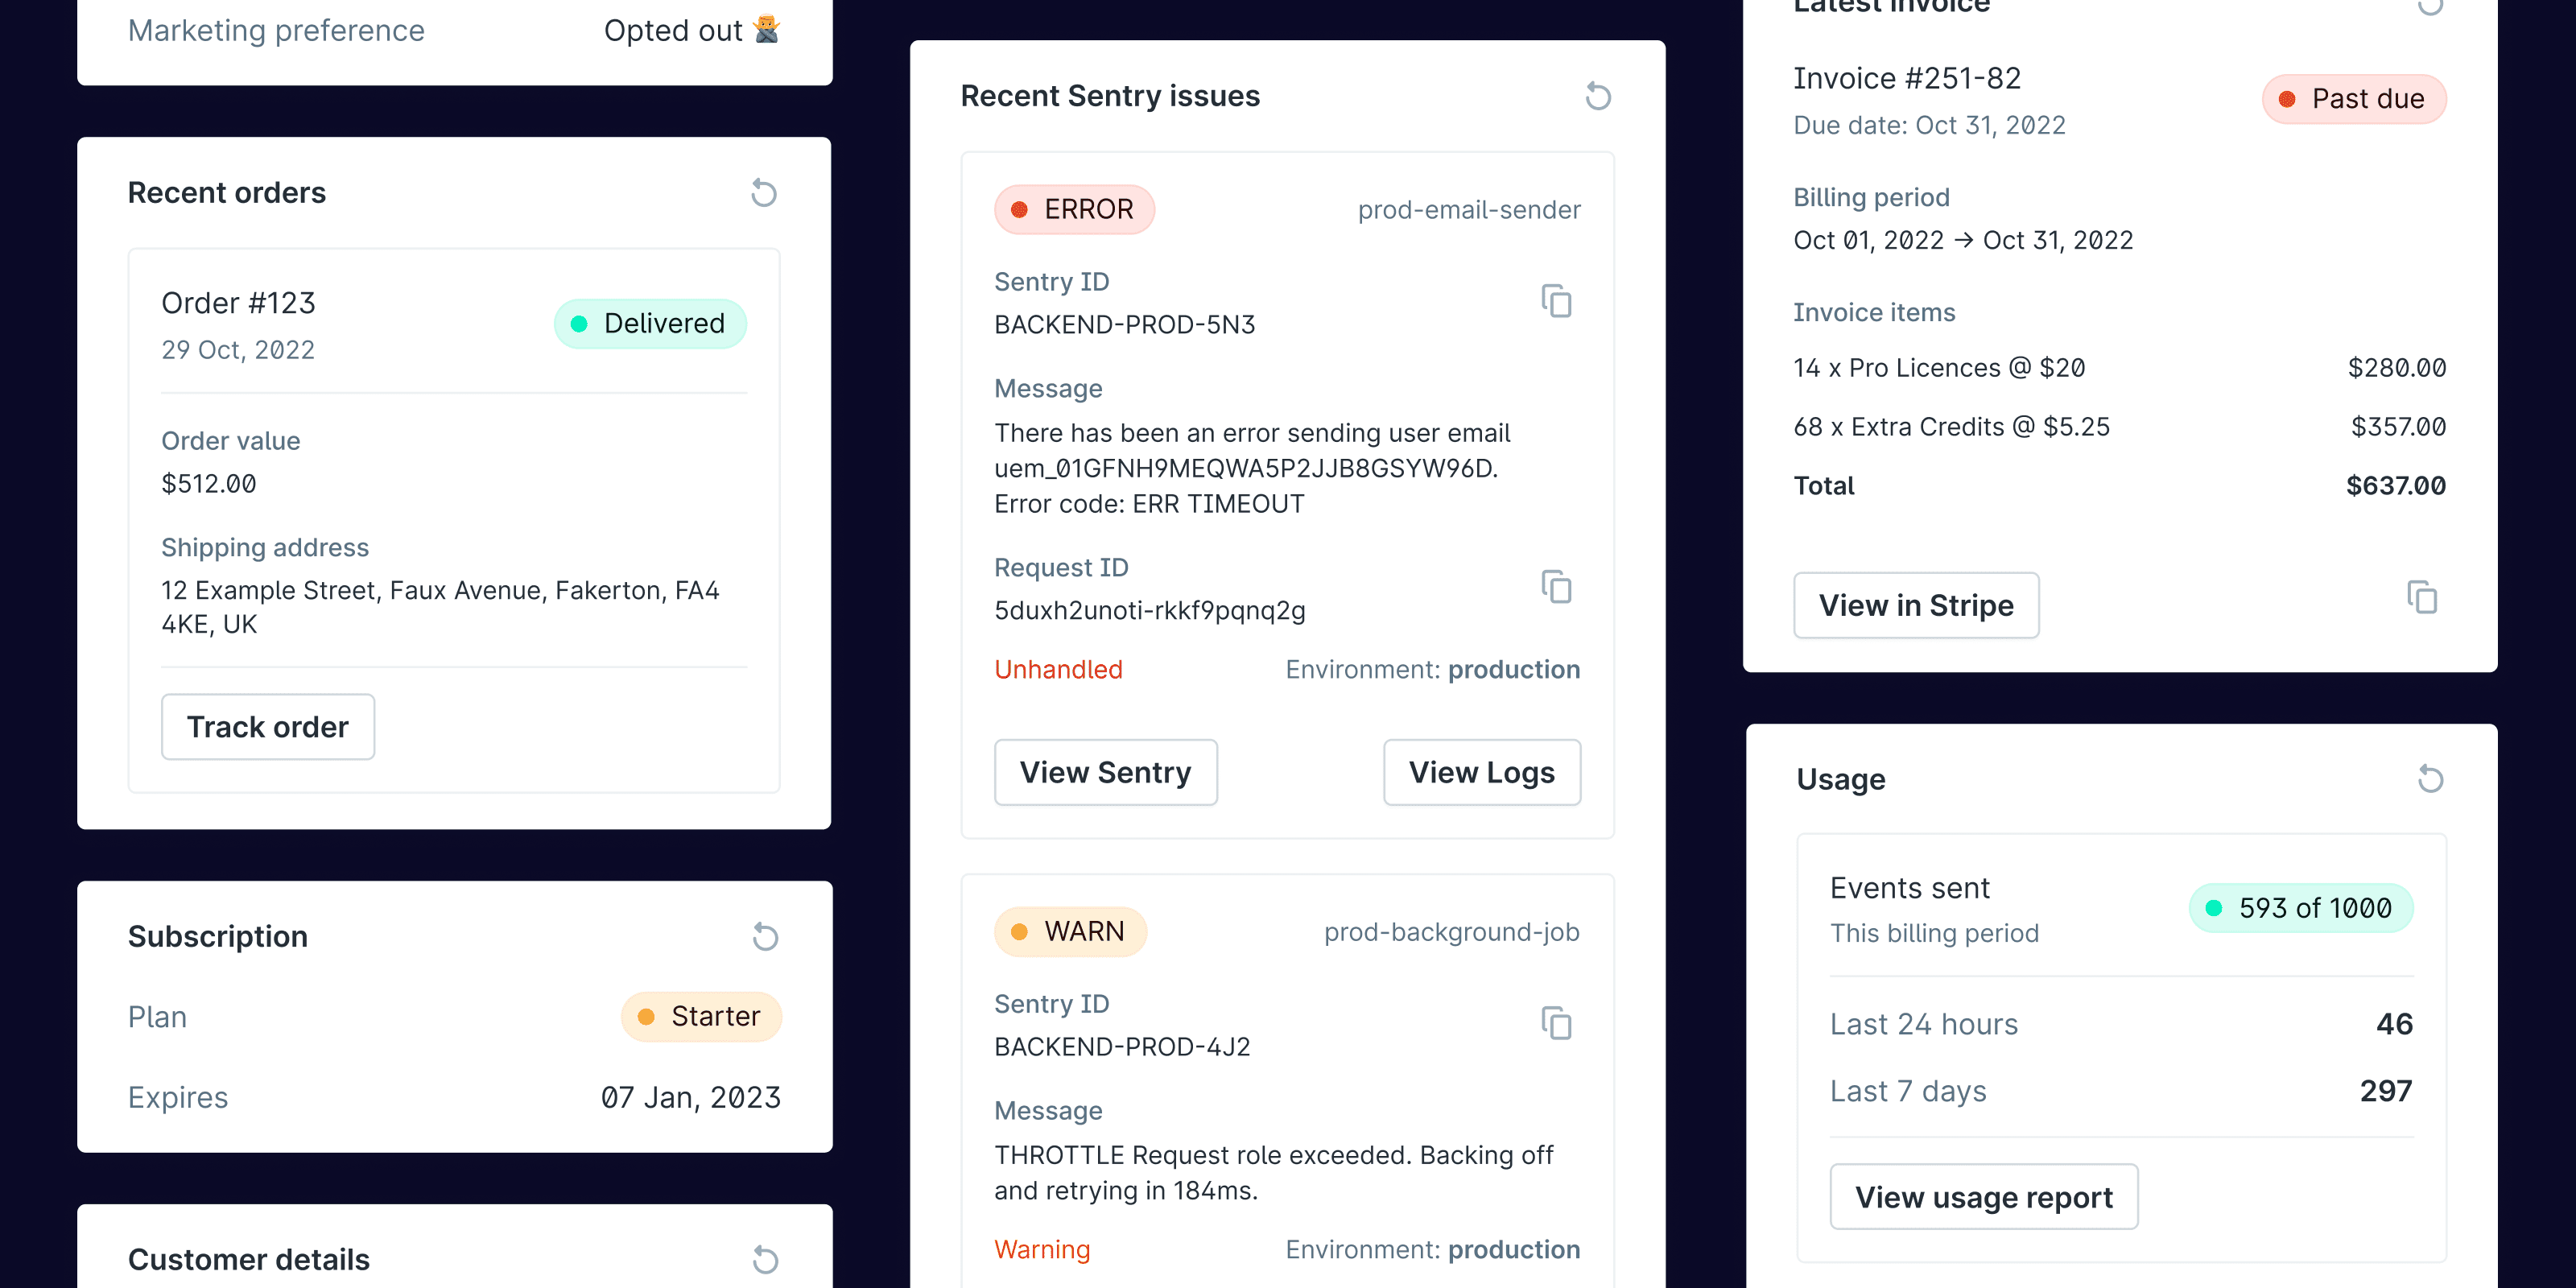 This means that when your support team is helping someone they instantly have access to context from your own systems about the customer they are trying to help. What account tier they are, what their recent activity has been, how much they're paying you every month, etc. We want that data to continue to live in our customers systems, so for the product to work, we need to help our customers construct an API endpoint which we can call. We've put in quite a bit of work into the DX of Customer Cards but I think our developer experience is a work in progress. It's a fairly novel workflow, so it's harder to do well than when trying to document an API. **How have you been trying to solve it so far?** I think we've made some good steps. We've built a playground that can assist users while they're building which is quite nice, but there's definitely more to do. This data transfer is async. It's happening all the time. And so error handling and the developer experience here is actually a lot more challenging than a traditional API. We have to provide a lot more visibility on errors and monitoring. We need to know if you responded with something wrong, and why it was wrong. We then need to notify you that it was wrong and persist it so that you can fix it. The same goes for timeouts and anything else that's unexpected. It's complicated and we've not totally solved this experience. **Do you offer SDKs for the Plain API?** We haven't yet, but we plan on it. We've been relying on every ecosystem having its own stack, for generating GraphQL tooling. But we plan on offering SDKs to make integration easier, and to make errors easier to understand and parse. We really want to get to a place where, for a simple use case, you don't have to deal with GraphQL at all. If you look at how Slack does it, it's very good. No one is actually making raw Slack API calls, right? They're all using the client and the playground provided to visually work out how to construct messages and do things with bots and so on. **Any other DevEx challenges that you're tackling?** I think on the API side, we've covered it, we really just want to make it easier and easier to integrate and use Plain. It's our raison d'être, I don't think we'll ever ‘finish' working on DevEx Outside of our API, we also have [a chat solution](https://docs.plain.com/support-channels/chat/overview), and we've spent a lot of time thinking about the DevEx there. If you're using a React app and you want to embed chat into your product, it's a UI-level integration, and that has its own challenges. If you look at how most support tools or chat providers allow you to embed, it's through a script tag. You add a tag, and a floating button appears on the bottom right. And that's your chat. In our world, we wanted to allow chat to be a bit more embeddable, to essentially look like it's part of your product and deeply look like its native. To do that, we've built a React package. It's been a tough nut to crack. Everyone has such specific expectations of how your embed should behave. And you're confronted with the multitude of different stacks and approaches people take. People do things that are super delightful, but unexpected. And that's where the complexity comes in when you are trying to deliver that seamless Developer Experience. **Are there metrics you track to measure impact of the work on your API's DevEx?** Not yet, we're still so focused on every customer that metrics don't really make sense yet. We track all the feedback we get meticulously. Even slight grievances with our API or our integrations we discuss thoroughly. That's a scale thing, largely. What's also interesting is, by focusing on developer tools as a customer base, the feedback we get is really, really good. You get feedback similar to when an in-house engineer reports a bug. So. much. detail. So yeah, for us, feedback has generally been very, very specific and high quality. ## What's the Plan for 2023 **What're you most excited for in the coming year?** Plain is now in a really cool place where we have moved on from the basics and are now getting really deep into some of the hard problems within customer support. For example, right now we're looking at managing triaging and SLA and complex queue management. It's going to bring with it, a whole host of other API integrations, to enable users to be in control of their support queues and prioritise some customer issues over others, and so on. I really can't wait to share our solution here. We're also going to be growing the team ([we're hiring!](https://plain-public.notion.site/Help-us-power-support-for-the-world-s-best-companies-7ea2f1a4cc084b96a95141a30e136b5b)) and onboard many more customers - it's going to be an exciting year for Plain! # api-key-management Source: https://speakeasy.com/blog/api-key-management You spend your time building the perfect API: the error messages are insightful, the external abstractions are flawless – but before anyone can use your beautiful API, they need the keys. That might mean someone spending a week hacking together a passable API key management system (it can't rotate keys, but we'll get to it next quarter). Or it could also mean the team manually sharing keys via OneTimeSecret with every client that needs onboarding. Neither scenario is great. Or you could let Speakeasy do it for you. We now offer a self-service API key management embed, which can be easily integrated with your API gateway. One less thing you need to worry about when you're launching your new API. ## New Features **API Key Management** - We're working on making the entire API user journey self-serve and that journey starts with enabling key management for your API users. With Speakeasy's key management embed, your users can create and revoke API keys in your developer experience portal. Set up is easy: Speakeasy integrates directly with your API gateway to externalize key management through an OpenAPI Spec extension; it works with any API Gateways that supports OIDC2 workflows and external token sources. This includes Google Cloud Endpoints, Kong, Apigee, AWS API Gateway and more. If there's a gateway not on this list that you'd like to use, reply to this email, or [come talk to us in Slack](https://go.speakeasy.com/slack). ## Incremental Improvements **Dark Mode** - Ensure your users have a consistent developer experience. Speakeasy's dev portal embeds now fit seamlessly into your existing developer portal. All our embeds now respect dark mode settings at the operating system and site level to make sure the developer experience in your portal is consistent, dark, and handsome. # api-landscape Source: https://speakeasy.com/blog/api-landscape Two weeks ago Postman published their [**API Platform Landscape**](https://blog.postman.com/2022-api-platform-landscape-trends-and-challenges/). They've done a great job highlighting some of the organizational challenges faced by companies building APIs. We at Speakeasy wanted to chip in with our own two cents. Specifically, we wanted to highlight the day-to-day challenges facing developers on the ground when they're building and managing APIs. Our thoughts have been shaped after spending a lot of time over the past 6 months talking to developers about their experiences building & managing APIs. To put some numbers behind it, my cofounder Simon and I have spent a combined 70 hours interviewing over 100 developers about their experiences. All of that goes into our work at Speakeasy, and in the spirit of openness, we wanted to share our learnings with everyone else. So, without further ado, here's what we have learned… ## Trends ### Developers want good UX We touched on this in an earlier post, but developers are increasingly demanding that the tools they use have a great UX. Tools should largely abstract away complexity without becoming a black box. This doesn't mean just throwing a GUI in front of the terminal. Developers want tools that are embedded in their existing workflows. This may mean that a tool intended for developers needs to have multiple surface areas. Features may exist as a CLI, VS Code extension, Git Action, Web app, React Embeds, API endpoint, etc. DevEx should prioritize helping the user accomplish their task with minimum friction and deviation from their existing workflows, and be flexible on where/how that feature is exposed to users. ### A “Design-first” approach has limits The “Design-first” approach to APIs is often presented as a virtue, to be contrasted with the dirty sin of a code-first approach (implementing the API without formal design). Most companies will claim they follow a purely design-first approach, however talking to developers on the ground, we found a much more nuanced reality. In fact, it's almost always a mix of the two. Many teams confessed that they felt writing the whole Open API spec was a tedious exercise for little gain. In their weaker moments they would often forgo the full open API standard in the beginning in order to get started faster, then they would go back and generate it later for the purpose of documentation. ### Different API frameworks for different jobs GraphQL, gRPC, Websockets, are all hot on the block, meanwhile RESTful still constitutes the vast majority of APIs (80+%). Although the twitter debates continue to rage and there will always be champions for different paradigms, we see things eventually settling into a comfortable coexistence. Websockets are great for real time applications, gRPC is great for microservice architectures, GraphQL is a great choice when you control both the client and the data source, and REST is great when you are/will be working with external consumers. We expect that in 5 years time it will be very normal for companies to be using all of the above as part of their technical architecture. ### API Platform teams are choosing to build on top of the best Thanks to a tight labor market and the Cambrian explosion in 3rd party dev tools, platform teams have switched tactics when it comes to how they support application developers. In the past, internal teams struggled with the sisyphean mandate of trying to handroll an entire scaffolding to support their companies development. We're seeing a new trend emerge, where lean platform orgs have the mandate to pick the best vendor products available, and stitch them together to create something tailored to their own business's needs. This helps to keep the company's resources focused on the creation of differentiated value for their customers. ## Challenges developers face ### API testing is still limited When it comes to exhaustive testing of an API, there can be a dizzying number of parameter permutations to consider. So, while it's great that developers have tools that let them easily mock an ad hoc API request, creation of a test suite for production APIs can be a major pain point. Similarly, test suites for internal microservices (understandably) don't get the same attention as endpoints used by external clients. However, oftentimes the external endpoints rely on a collection of microservices to work. It can be hard to effectively test the external endpoint if there's no corresponding test suite for the microservices it relies on. If behavior changes is it because something in the external endpoint changed, or one of the underlying microservices? ### API usage is hard to grok Which customers use this API? Can this old version be deprecated? Is anyone still using this parameter? All common questions developers ask, all unnecessarily difficult to answer. The lucky developers have Datadog dashboards and full sets of logs in warehouses. However, many developers lack this sort of reporting infrastructure. [**It's a big up front investment to set up, and an expensive ongoing cost**](https://www.linkedin.com/feed/update/urn:li:activity:6945789783235338240/). Small orgs can't justify the upfront time investment, and even larger orgs often go without for internal endpoints. The result is that developers lack an API-centric view where they could easily get a real understanding of how their API is being used in the wild. This makes it difficult for new developers to quickly grok how the API endpoints are used by consumers, how they work internally, and what to consider when working to evolve the API. ### APIs are stuck on v1 When companies roll out an API, they will confidently put v1 in the API path. This is to highlight that in the future, they will be evolving the API and rolling out a new version, v1.1 or maybe even a v2 someday. Often though, the API never moves past v1. Now, this could be because the developers who built the API were oracles with perfect foresight and the API has never needed to be changed. In that case, hats off. More commonly though, the APIs failure to ever evolve is a byproduct of a broken platform behind the scenes. In conversations we heard devs say over and over, “We know it's going to be painful down the road, we're trying not to think about it.” Without a robust platform providing scaffolding, versioning APIs is a near impossible task. Teams opt to live with the pain of never updating their APIs. In cases where the team gets really desperate, they may change the behavior of the v1 API and brace themselves for the storm of angry client emails. ### Every problem with APIs is exacerbated for internal APIs It's been 20 years since [**Jeff Bezos's (in)famous platformization memo**](https://chrislaing.net/blog/the-memo/). At this point, most software companies have formally adopted a microservice architecture mandate; there's no doubt that companies are chock-a-block with services. The problem is that microservices tend to get micro-resource allocation when it comes to their tooling. All the problems we discussed: grokking usage, exhaustive testing, service evolution, are exacerbated for internal APIs. This leads to stale documentation, unintended breaking changes, and unexpected behavior. Left to fester, it can create a culture where developers become reluctant to trust that a service works as described. They will spend time interfacing with internal teams to make sure that the service works as they expect. Loss of trust in reliability has real costs in terms of developer's productivity. ### Developers lack support from the wider org APIs are an inherently technical product. They are built by developers, and they are consumed by developers. It's therefore understandable why organizations have siloed all aspects of managing APIs to their development teams. But if you consider that APIs are a product line for many businesses, that is foolish. APIs require customer support, and product marketing and all the same resources as a conventional software product. When API development teams are left to handle all these aspects of product development on their own, they either: 1) do it poorly because it's not their expertise, or 2) don't have time to develop new features, because their time is sucked up by other management concerns. # api-linting-postman-generation Source: https://speakeasy.com/blog/api-linting-postman-generation import { Callout, ReactPlayer } from "@/lib/mdx/components"; Two exciting new features are coming to Speakeasy this week: API Linting and Postman Collection Generation. Let's get into it 👇We now provide you with a single, stable URL that automatically displays up-to-date SDK code examples. Simply paste this URL into your documentation platform once, and we'll ensure your code samples stay synchronized with your latest API changes. 🔄 **Overlay Management in Speakeasy Studio**
You can now edit your OpenAPI specifications directly within Speakeasy Studio, with every change automatically preserved as an overlay. This means you can freely modify your specs in a familiar environment while keeping your source files unchanged. ## Automated Code Sample URLs Automated Code Sample URLs give you a stable, auto-updating link for SDK code samples. All you have to do is drop that link into your docs platform, and your code examples will stay in sync with your API. Behind the scenes, we dynamically generate SDK-specific code snippets using the x-codeSamples extension in your OpenAPI spec, ensuring your documentation always shows the latest, most accurate examples for your developers. #### What's New? - **Automated SDK Code Samples:** Generate and apply SDK usage examples to your OpenAPI specs effortlessly. - **Seamless Integration:** Supported by popular documentation platforms, including Scalar, Bump.sh, Mintlify, Redocly and ReadMe. - **Always Up-to-Date:** Automatically syncs with your latest SDK updates, ensuring accurate and consistent code snippets. #### How It Works Speakeasy tracks your base OpenAPI document and overlays containing SDK code samples. When you generate an SDK via GitHub Actions and merge the changes to the main branch, Speakeasy automatically creates a Combined Spec that includes all OpenAPI operations along with the generated `x-codeSamples` extensions. These overlays ensure your API documentation includes accurate, language-specific examples tailored to each operation ID. 📖 [Learn more about Automated Code Sample URLs](/docs/automated-code-sample-urls) --- ## Overlay Management in Speakeasy Studio We've made managing OpenAPI specs in Speakeasy Studio simpler and more intuitive. Now you can edit your API specs directly in the Studio, and your changes are automatically saved as overlays—no manual overlay creation needed. This means you can modify your specs without affecting the source, all while staying in the Studio. Here's a quick look at how it works:
{/* TODO: add review card */}
{/*
{/* TODO: add review card */}
{/*
{/* TODO: add review card */}
{/*

#### One special feature: standalone API client
What truly sets Scalar apart is that its API client isn't just embedded in the documentation—developers can download it as a standalone application for local development. It's like Postman++, transforming documentation from mere reference material into an actual development tool that supports the entire workflow. This creates a unique bridge between documentation and active development that other platforms don't offer.
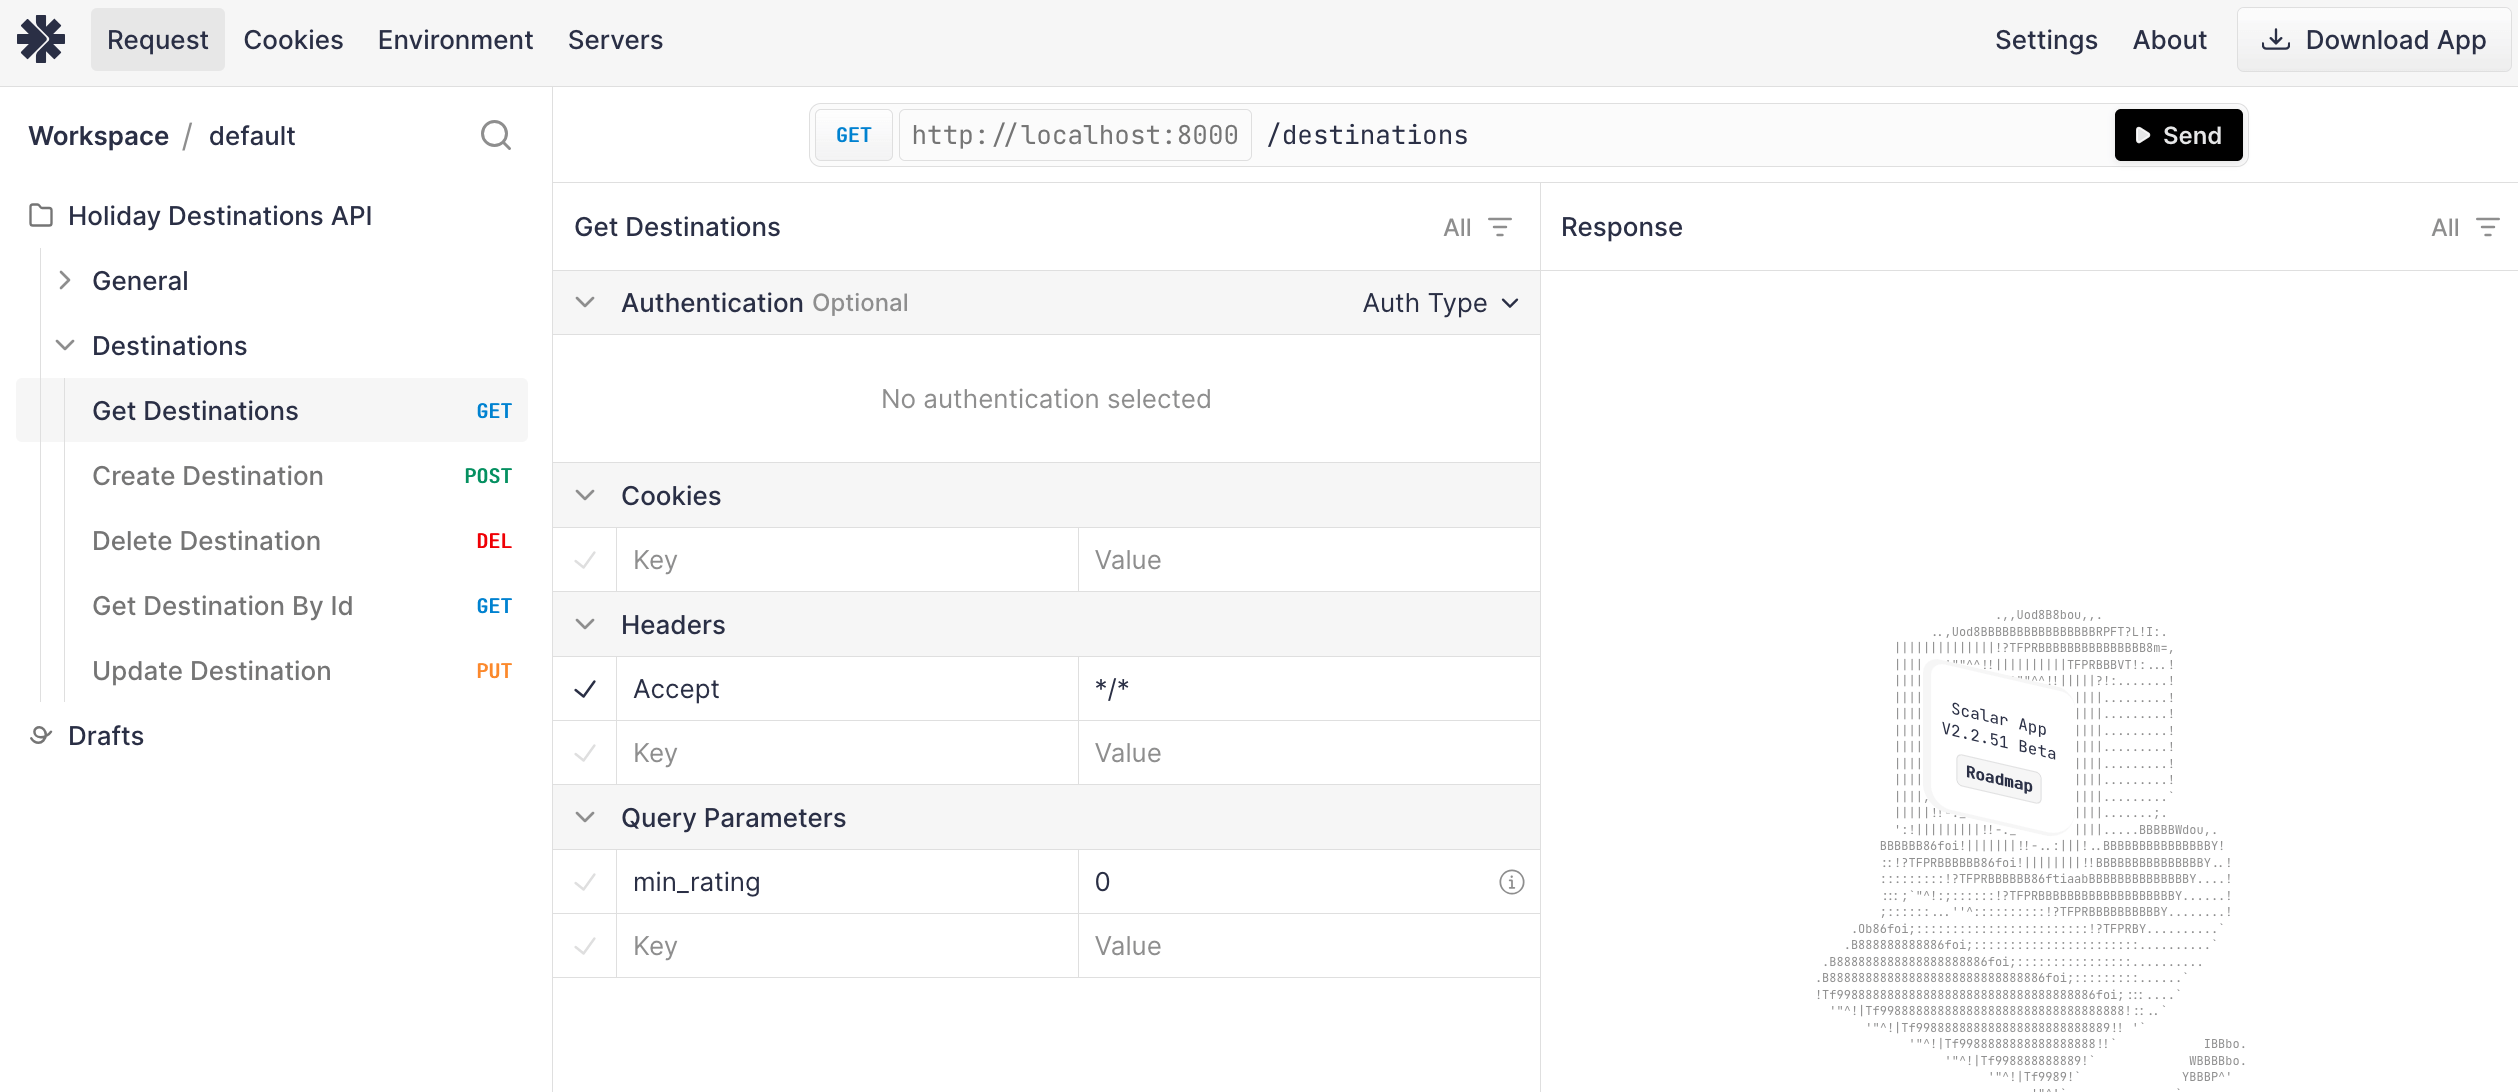
#### Ease of Use
Setup is straightforward with a simple "New Project" flow and WYSIWYG editor. The platform automatically processes OpenAPI documents to generate an interactive reference without requiring additional configuration.
#### Theming & customization
Scalar offers a set of clean unpinionated default themes with customization available to create branded documentation. Users can also upload their own custom CSS and JavaScript files to fully customize the look and feel of their documentation. The only major limitation is the lack of support for MDX for those companies that want to embed custom components within their documentation.
#### Developer experience
One thing that really sets Scalar apart is its array of API framework integrations. For code-first organizations that use frameworks like Django, FastAPI, and Express, Scalar provides seamless integration. Developers can generate documentation directly from their codebase with little additional configuration. If you host your OpenAPI spec at a static URL, Scalar also has automatic updates via URL fetching that makes updates frictionless.
Scalar now offers robust CI/CD integration through the [Scalar Registry](https://guides.scalar.com/scalar/scalar-registry), supporting popular platforms like GitLab, GitHub Actions, and other continuous integration tools. This makes it easy to automatically deploy and version your documentation as part of your development workflow.
#### Support and pricing
You won't find better in terms of product for the price. Scalar offers three subscription tiers:
- **Free:** Full features for public APIs
- **Team ($12/user/month):** Private docs, team features, upcoming Speakeasy integration
- **Enterprise (custom pricing):** Advanced security and support
---
### Mintlify: Seriously beautiful docs
#### One Special Feature: AI-ready
Mintlify is the provider best equipped to make your API accessible to LLMs. They generate vanilla `.md` files for every documentation page, and automatically generate an `llms.txt`. That makes it easy for LLMs to parse and understand your API documentation.
#### Ease of Use
Onboarding is exceptionally smooth, with a guided process from signup to repository creation. The local development workflow using the Mintlify CLI provides immediate feedback through localhost previews.
Mintlify's OpenAPI integration is less robust than other documentation tools, with some opaque error messages, and incorrect validation failures. But these can usually be worked through. IN part this is because Mintlify is a comprehensive docs solution first, and an API reference solution second.
#### Theming & customization
This is where Mintlify shines. It has sleek default themes, but also offers extensive customization options for:
- Styling (primary colors, theming)
- Navigation structure
- Content layouts
Plus, it supports MDX. That means that you can create custom components and embed them directly into your documentation.
#### Developer Experience
Mintlify embraces developer-friendly workflows with:
- Git-based content management
- Local development with live previews
- Integration with external services (analytics, SDK generators,etc.)
Mintlify also offers a great developer experience for teams creating narrative-based documentation in addition to references.
#### Support and pricing
Mintlify is a more expensive offering with three subscription tiers:
- **Free:** For individual hobbyists
- **Pro: $150/month** - For small teams and startups
- **Growth: $550/month** - For growing companies
- **Enterprise: custom pricing** - Custom built packages based on your needs
---
### Bump: Built for scale

#### One Special Feature: Performance at Scale
Bump's exceptional handling of massive API specifications sets it apart from competitors. Our evaluation includes a real-world test with Twilio's OpenAPI document containing over 900 endpoints and 2000+ schema definitions. While other platforms "struggled or crashed with this spec, Bump loaded it in under three seconds and maintained smooth scrolling and instant search results." While not relevant to most companies,this performance advantage becomes valuable as APIs grow in complexity, offering a solution that doesn't degrade with scale.
#### Ease of Use
Setup is simple, with a streamlined process that jumps straight to API documentation without templates or complex configuration. OpenAPI parsing is very thorough and accurate, we didn't encounter any unexpected issues. From a styling perspective, it doesn't take you as close to "production-ready" as some of the other platforms, but it also doesn't require extensive customization or configuration before you see output.
#### Theming & customization
Some would argue that clarity is better than polish when it comes to docs. And that's true, but why not have both? Compared with Mintlify & Scalar, docs made on Bump are sinply not as "sexy". You can do the basics like: logo & brand colors, custom CSS, navbar. But docs tend to retain a very Bump-like feel to them. Appearance is a nice to have compared with performance, which is why Bump is still the best choice for companies with huge API surface areas.
#### Developer experience
Bump lacks some of the slick polish that Mintlify and Scalar offer. But the core functionality is undoubtably solid.
And one place where Bump outperforms is when it comes to versioning. Bump allows you to create multiple versions of your API documentation, making it easy to manage changes and updates. Again, a feature that shines for enterprise's with gnarly API surface areas.
#### Support and pricing
Bump has a slightly steep payment model:
- **Basic: free:** - 1 user
- **Standard: $265/month** - For small teams
- **Enterprise: custom pricing** - SSO, custom branding, custom domain, custom integrations
---
### ReadMe: Simple for Non-Technical Teams, Limited for Developers
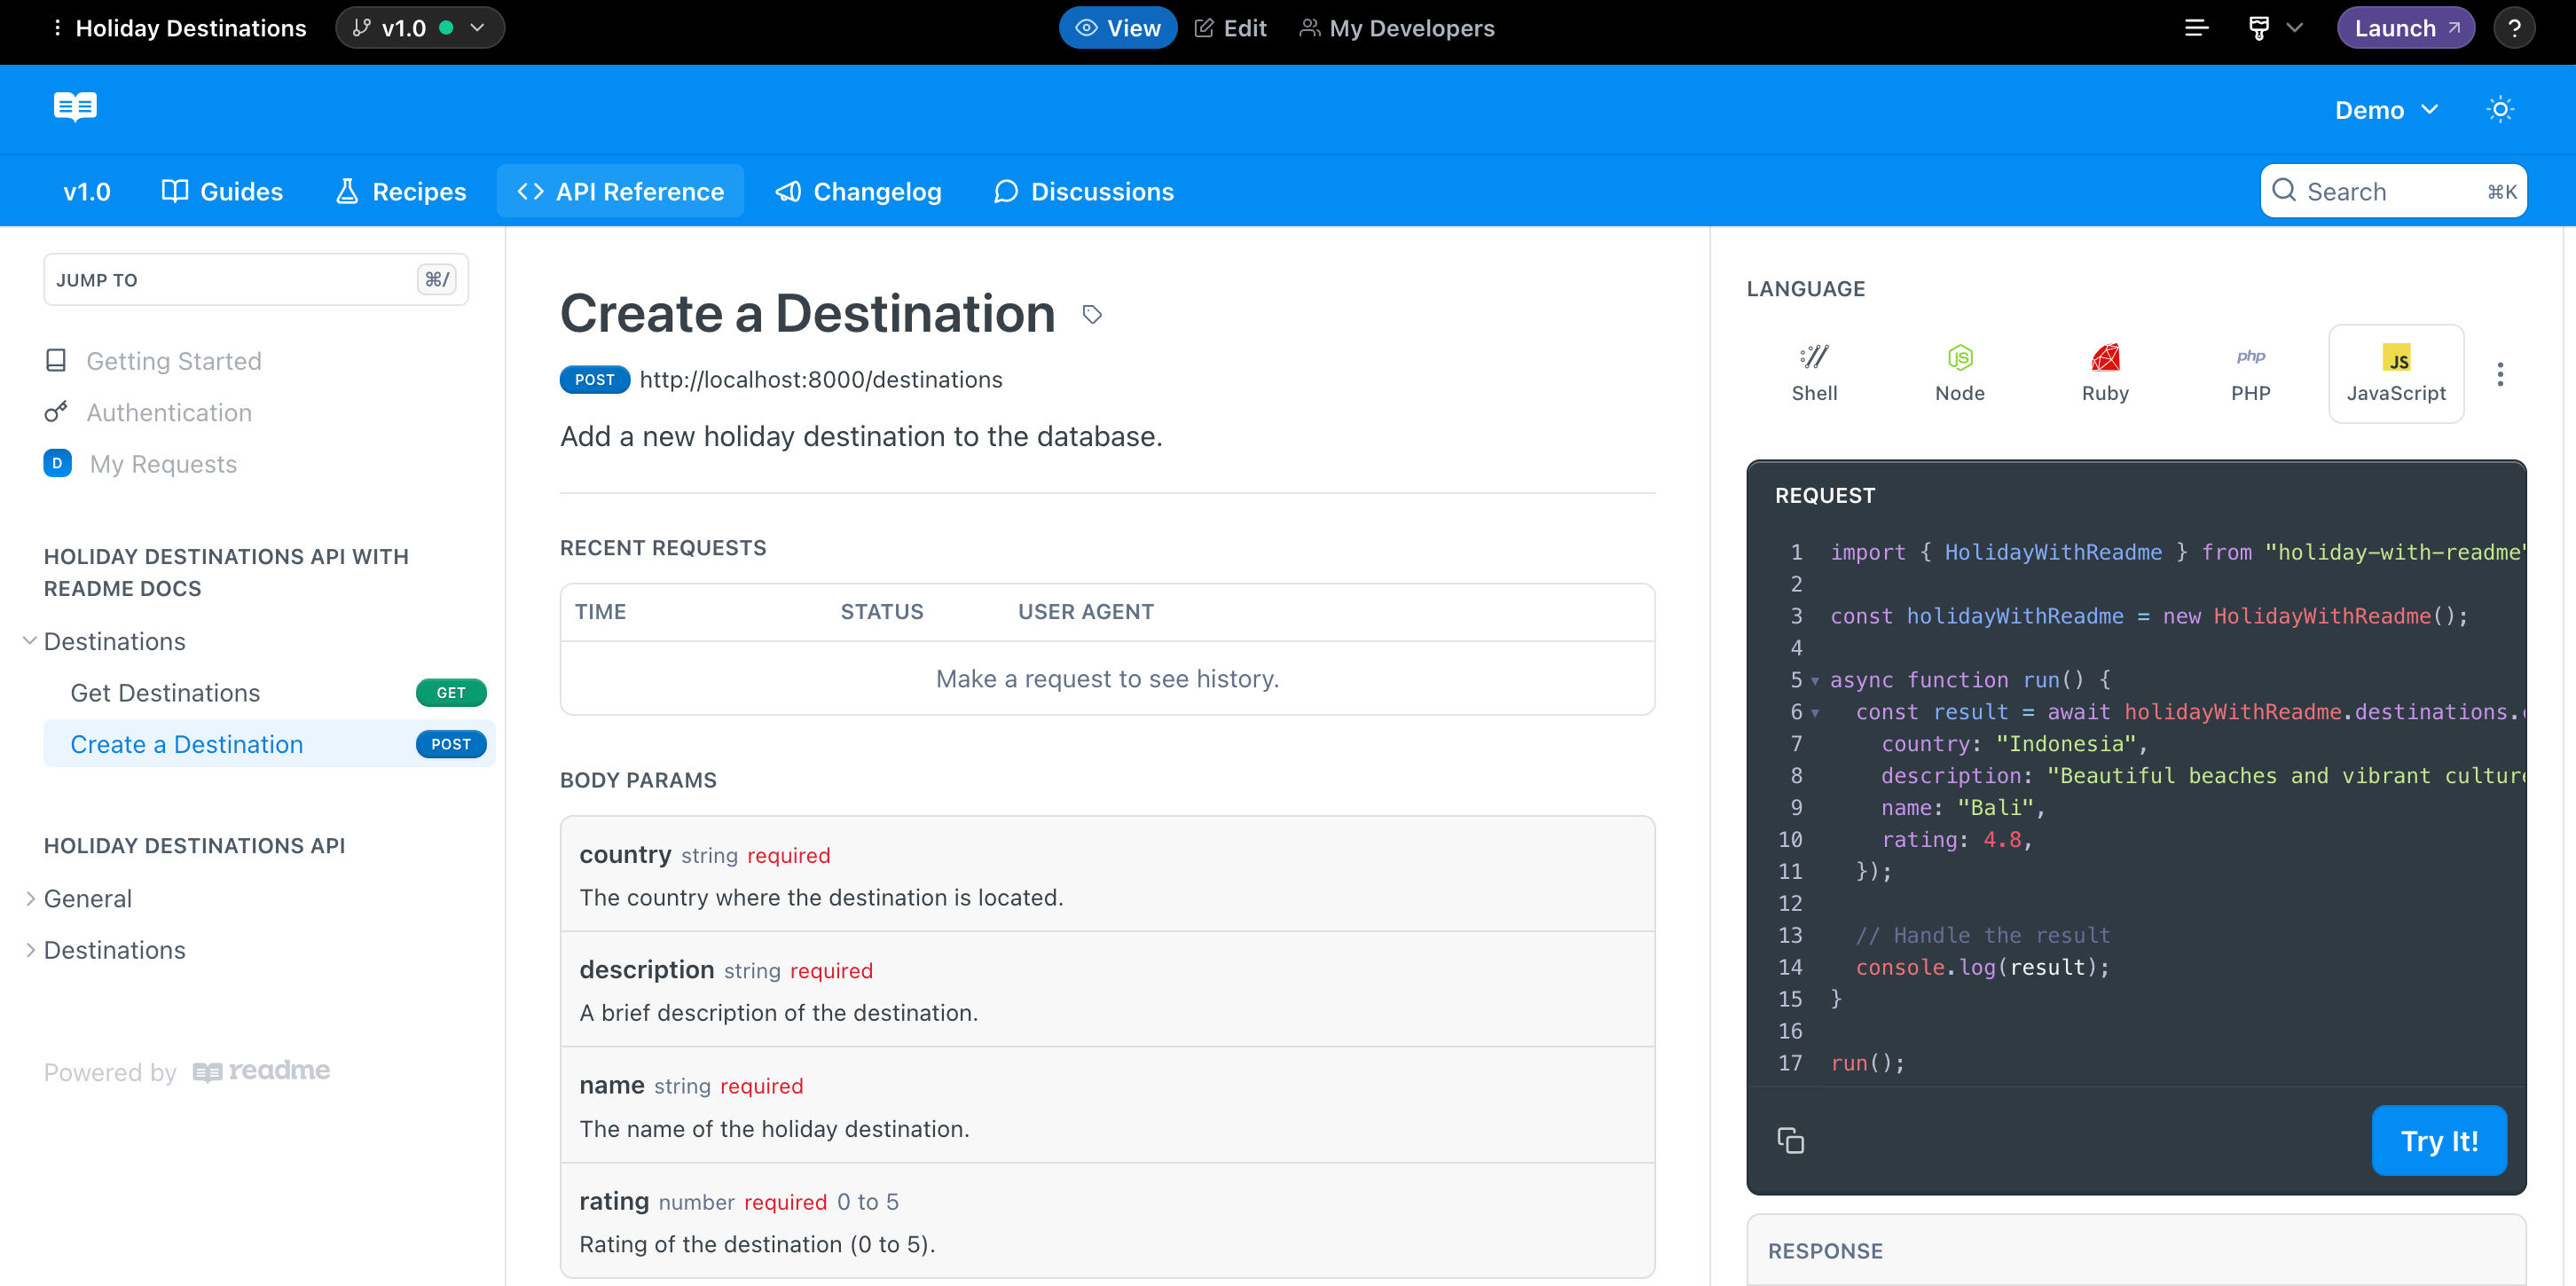
#### One special feature: One tool for the whole team
ReadMe's standout capability being accessible to team members without technical expertise. While other platforms assume users have familiarity with Git, local development environments, or code-based workflows, ReadMe provides a completely web-based experience with visual editing tools that feel familiar to anyone comfortable with basic web interfaces. This empowers non-technical marketing teams, technical writers, or product managers to take ownership of documentation without depending on engineering resources, which can be valuable in organizations where resources are constrained.
However, this feature highlights the fundamental trade-off that ReadMe makes: simplicity and accessibility for non-technical users at the expense of the automation, version control, and workflow integration that developers expect in modern documentation tools. The platform clearly prioritizes lowering the barrier to entry over providing the robust technical features that development teams need for sustainable documentation practices.
#### Theming and customization
ReadMe has been around for a while, so maybe it's not surprising that some of its default themes don't have the sparkle when compared to newer offerings like Scalar and Mintify. But that's largely a result of being a victim of their own success in the docs arena. The pro is that users will be intimately familiar with a Readme docsite, the con is that it's harder to feel unique.
You can add [custom CSS and JavaScript](https://docs.readme.com/main/docs/custom-css-and-javascript) using ReadMe's online editor. This doesn't provide the same level of control as editing the source files directly, but it's a quick way to make small tweaks.
#### Developer experience
As mentioned, ReadMe's most significant weakness is for technical teams. We couldn't find a way to programmatically update the API reference when our OpenAPI document changes. Instead, updated documents need to be manually uploaded each time. This creates a disconnection between code and documentation that introduces multiple risks:
- Documentation easily becomes outdated as APIs evolve
- No integration with continuous integration/deployment pipelines
- Manual processes introduce opportunities for human error
- Potential bottlenecks when documentation updates depend on specific team members with access
For non-technical teams maintaining stable APIs with infrequent changes, this limitation might be acceptable. For development teams working in agile environments with frequent iterations, this manual approach creates substantial maintenance overhead and reliability concerns.
#### Support and pricing
Readme has plans for companies of different sizes:
- **Free:** Create a foundation using your API reference.
- **Startup: $99/month** - For small teams who want to build out their docs and create a community.
- **Business: $399/month** - For multi-role teams who want advanced styling and basic management tools.
- **Enterprise: custom pricing** - For organizations looking to build scalable docs with multi-project management and security needs.
---
### Redocly: Tried & tested

### One special feature: ecosystem
Redoc's standout advantage is its deep integration across the broader API development ecosystem. Unlike newer platforms that require specific adaptations or plugins, Redoc has become something of a standard that many frameworks support natively. Tools like FastAPI, Django, ASP.NET Core, and others often include built-in Redoc support, allowing teams to generate documentation with minimal additional configuration. This widespread adoption means teams can often implement Redoc without disrupting existing workflows or adding new dependencies.
#### Ease of Use
Setting up Redoc feels like returning to a tool you've used before — recognizable but showing its age. The IDE-style dashboard provides an environment that developers will find instantly familiar, with its project structure sidebar, editor pane, and preview panel arrangement. However, this familiarity comes with a dated user experience that lacks the polish of newer competitors.
#### Theming & customization
The familiarity and ecosystem integrations come at a cost. The documentation produced by Redocly tends to have a utilitarian aesthetic that lacks the visual appeal of newer platforms like Mintlify. The interface feels somewhat dated compared to modern web applications, with a functional but not particularly inspiring presentation. For teams prioritizing developer experience and modern design aesthetics, this represents a trade-off.
You can customize nearly everything: typography, spacing, layout, color schemes, code blocks, but you're starting from behind relative to the look and feel of newer platforms. So you'll need to put in more effort to achieve a modern polished look.
#### Developer experience
Redoc's integration with development workflows represents its most enduring strength. The platform offers several approaches to keeping documentation synchronized with code:
- Git integration for automatic rebuilds
- API sync for periodic updates
- CLI workflow for local development
#### Support and pricing
Redocly offers three subscription tiers:
- **Pro: $10/user/month** 1 project
- **Enterprise: $24/user/month** - Advanced security and support
- **Enterprise+ (custom pricing)** - Premium support and advanced features
---
## Wrapping up
Each of the five documentation vendors excels in different areas:
- **Scalar** is a great all-rounder for developer-focused teams who want interactive documentation with powerful testing tools.
- **Bump** optimizes performance for large APIs, making it ideal when reliability and speed are paramount.
- **Mintlify** offers superior customization, making it perfect for projects where visual and functional control is key.
- **ReadMe** remains a solid choice for teams that value a quick and easy setup over deeper automation and customization.
- **ReDoc** is a popular choice for teams that just want a simple, functional documentation platform.
Your choice of docs tool will depend on your team's priorities, but whichever platform you choose, Speakeasy's integration capabilities can enhance your API documentation, keeping it robust and developer-friendly.
# choosing-an-sdk-vendor
Source: https://speakeasy.com/blog/choosing-an-sdk-vendor
import { Callout } from "@/mdx/components";
Without an SDK for your API, your users must handle raw HTTP requests themselves, leading to integration delays, avoidable bugs, and higher support costs. Even with good documentation, not having an SDK can slow adoption, frustrate developers, and increase churn.
A well-designed SDK improves developer experience. It saves time, reduces integration errors, speeds up onboarding, and – importantly – can drive adoption and revenue.
Today, you no longer need to build SDKs manually. Several tools generate SDKs from an OpenAPI document, including [Speakeasy](https://www.speakeasy.com/), [Fern](https://buildwithfern.com/), [Stainless](https://www.stainless.com/), and [OpenAPI Typescript Codegen](https://github.com/ferdikoomen/openapi-typescript-codegen).
But with so many options available, how do you know which will save you the most time? Which generator will create SDKs that are easy to use, extend, and won't break when your API grows? Which will let you focus on building features instead of fixing generated code?
In this article, we compare the main SDK generation options available today. We'll explain their strengths, weaknesses, and differences to help you decide which best suits your needs.
## What to look for in an SDK generator
It's not enough to focus solely on the code produced when evaluating an SDK generator. You also need to consider factors impacting the SDK's developer experience (for internal and external devs) and how well the tool fits your workflow and budget:
- **OpenAPI support:** Does the generator fully support the OpenAPI Specification, including handling schema validation and pagination?
- **OAuth 2.0 support:** Does the generator handle OAuth client credentials properly, including token fetching and refreshing?
- **Webhooks support:** Can the generator validate, parse, and process webhook events securely and reliably?
- **Generated documentation and examples:** Does the generated SDK come with ready-to-use documentation and copy-paste examples for everyday API operations, making it easier for developers to get started quickly?
- **SDK quality and structure:** Is the generated code readable, idiomatic, and easy to navigate? Does the generator produce ready-to-publish packages with minimal dependencies, or does it create bloated, messy code that your team would need to clean up?
- **Streaming support:** Does the generator produce SDKs that properly handle large uploads and downloads using streams?
- **SDK automation and CI/CD integration:** Can the generator integrate into your CI/CD pipeline and automatically regenerate SDKs as your API evolves?
- **SDK customization options:** Does the tool let you customize naming, structure, and the SDK's behavior when necessary?
- **Pricing:** Is the pricing transparent, scalable, and startup-friendly?
Here's a quick comparison of how each SDK generator performs across these criteria.
| **Feature** | **Speakeasy** | **Fern** | **Stainless** | **OpenAPI Typescript Codegen** |
| ------------------------------------------- | --------------------------------------- | --------------------------------- | ------------------------------------------- | ------------------------------- |
| **OpenAPI support** | ✅ Full support for OpenAPI 3.0 and 3.1 | ✅ Supports OpenAPI 3.1 | ⚠️ Limited; best results with custom format | ✅ Supports OpenAPI 2.0 and 3.0 |
| **SDK quality (ready-to-publish packages)** | ✅ Yes | ✅ Yes | ✅ Yes | ⚠️ Basic structure |
| **OAuth 2.0 / runtime validation** | ✅ Built-in schema validation | ✅ Built-in schema validation | ✅ Built-in schema validation | ❌ Not supported |
| **Webhooks support** | ✅ Full support | ⚠️ Helper methods | ❌ Not supported | ❌ Not supported |
| **Streaming support** | ✅ Uploads/downloads via streams | ⚠️ Limited (Fern Definition only) | ⚠️ Enterprise-only | ❌ Not supported |
| **Documentation and examples** | ✅ Autogenerated docs and examples | ⚠️ Basic with OpenAPI | ⚠️ Basic; best with Stainless configuration | ❌ Minimal documentation |
| **SDK automation and CI/CD integration** | ✅ GitHub Action / CI-ready | ✅ CLI / GitHub Action | ⚠️ Manual CLI | ✅ Easy CLI integration |
| **SDK customization options** | ✅ High (OpenAPI extensions, overrides) | ⚠️ High, but via Fern Definition | ⚠️ Requires custom format | ⚠️ Limited (template edits) |
| **Pagination handling** | ✅ Automatic support | ✅ Auto-pagination | ⚠️ Manual configuration needed | ❌ Manual |
| **Retries built-in** | ✅ Yes | ✅ Yes | ✅ Yes | ❌ Manual |
| **Pricing** | Free tier; paid plans from $250/mo | Paid plans from $250/mo | Free tier; paid plans from $250/mo | Free (open source) |
Not sure which tool to pick? Here's how to choose based on your priorities:
- Choose **Speakeasy** if you want the most complete feature set with the least manual work and you're OpenAPI-first.
- Choose **Fern** if you need maximum control over SDK structure and don't mind a more complex setup.
- Choose **OpenAPI Typescript Codegen** if you need a fast, open-source solution for basic TypeScript SDKs.
## Speakeasy
Speakeasy's approach to SDK generation focuses on real-world API usage, offering advanced features and minimizing developer friction. Because Speakeasy uses OpenAPI documents to generate SDKs, it's a compelling choice for API-first teams.
### OpenAPI support
Speakeasy fully supports OpenAPI versions 3.0 and 3.1.
As Speakeasy relies on your [OpenAPI documents](/openapi) to generate SDKs, the quality of those documents directly impacts the results. To help ensure that OpenAPI documents are clean, accurate, and complete, Speakeasy validates them before generation, catching issues like missing required fields in requests or server responses that don't match the documented schema.
For example, when sending a payload, if your OpenAPI document marks a field as required, the SDK will enforce it at the client level:
```js
await sdk.createUser({
email: "user@example.com", // Required
name: "John Doe", // Optional
});
```
If the email field is missing, the SDK throws a validation error without making a request.
Speakeasy also handles [pagination](/openapi/paths/operations/responses#documenting-pagination) patterns natively. Whether your API uses offset, cursor, or custom pagination logic, Speakeasy can generate helper functions that abstract pagination away from the user. For example:
```js
for await (const user of sdk.listUsersPaginated({ pageSize: 50 })) {
console.log(user.name);
}
```
No need to manually manage cursors, tokens, or page offsets.
### SDK quality and structure
Speakeasy-generated SDKs are production-ready by default – idiomatic for each target language, aligned with community best practices, and free of bloated, deeply nested, or unreadable structures.
Each SDK is designed for immediate publishing to registries like npm, PyPI, and Maven Central, with sensible package structure, typed clients, and minimal external dependencies.
### OAuth 2.0 support
Speakeasy supports [OAuth 2.0](/openapi/security/security-schemes/security-oauth2) out of the box. If your OpenAPI document defines an OAuth 2.0 security scheme, Speakeasy automatically detects it and generates SDK code that manages tokens on behalf of your users, including requesting tokens, handling expirations, and refreshing them when needed.
#### Configuring OAuth in your OpenAPI document
Let's take a look at how to define an OAuth 2.0 client credentials flow in an OpenAPI document:
```yaml
components:
securitySchemes:
oauth:
type: oauth2
flows:
clientCredentials:
tokenUrl: https://api.example.com/oauth2/token
scopes:
read: Grants read access
write: Grants write access
security:
- oauth:
- read
```
Once this security scheme is defined in an OpenAPI document, Speakeasy-generated SDKs will prompt SDK users to provide a `clientID` and `clientSecret` when initializing the client:
```js
const sdk = new SDK({
security: {
clientID: "If you're looking for a more comprehensive guide to API design, you can read our REST API Design Guide.
**Old approach: method-based**
```python
sdk = MyAPI(api_key="...")
# Synchronous operations
result = sdk.list_users()
# Asynchronous operations
result = await sdk.list_users_async()
```
**New approach: constructor-based**
```python
# Synchronous client
sync_sdk = MyAPI(api_key="...")
result = sync_sdk.list_users()
# Asynchronous client
async_sdk = AsyncMyAPI(api_key="...")
result = await async_sdk.list_users()
```
Loading...
;
}
if (status === "error") {
return Error: {error.message}
;
}
const { followersCount = "-", followsCount = "-" } = data;
return (
{data.displayName}
{data.handle}
{followersCount} followers
{followsCount} follows
-
{data?.pages.flatMap((page) => {
return page.result.feed.map((entry) => (
-
**Old behavior: union return type**
```typescript
const response = await sdk.chat.completions({
stream: true,
messages: [...]
});
// Type system doesn't know which type was returned
if (response instanceof EventStream) {
// Handle streaming response
} else {
// Handle JSON response
}
```
**New behavior: overloaded methods**
```typescript
const streamResponse = await sdk.chat.completions({
stream: true, // Returns EventStream
messages: [...]
});
// TypeScript knows this is EventStream
const jsonResponse = await sdk.chat.completions({
stream: false, // Returns CompletionResponse
messages: [...]
});
// TypeScript knows this is CompletionResponse
```
**Without flattening: nested access required**
```typescript
for await (const response of stream) {
if (response.event === "message") {
console.log(response.data.content);
} else if (response.event === "error") {
console.error(response.data.message);
}
}
```
**With flattening: direct access**
```typescript
for await (const response of stream) {
if (response.type === "message") {
console.log(response.content); // No .data nesting
} else if (response.type === "error") {
console.error(response.message); // No .data nesting
}
}
```
[Ken Rose](https://www.linkedin.com/in/klprose/) is the CTO and co-founder of [OpsLevel](https://opslevel.com/).
In this episode, Ken shares the founding journey of OpsLevel and lessons from his time at PagerDuty and Shopify. We discuss:
- GraphQL vs REST
- The API metrics that matter
- How LLMs and agentic workflows could reshape developer productivity.
### Listen on
[Apple Podcasts](https://podcasts.apple.com/us/podcast/anthropic-mcp-graphql-vs-rest-and-api-strategies-for/id1801805306?i=1000703080125) | [Spotify](https://open.spotify.com/episode/3gDRkAk1rq0Y4f1PFNL51y?si=_aRaEq7cSlGZ1kZBhWLByw)

## Best Practices for a Great SDK We've talked to hundreds of developers on this topic. While there is always a bit of personal preference, these are the things that every developer wants to see in an SDK: ### 1. Type Safe Type safety might be the most important aspect of SDK creation. By making your API's inputs and outputs explicit, the developers integrating the API into their application can better understand how the API is intended to be used — and massively reduce the amount of incorrect requests being made to your API. Type safety will help developers debug in their IDE as they write the application code, and spare them the frustration of having to comb through the constructed data object to see where/ mistakes occurred. The more that you can include in your type definition, the more feedback developers will have when they are building with your SDK. The below example shows how Speakeasy uses Zod Schemas to define the input and output types for a product object in TypeScript. This allows developers to validate the input and output of the API at runtime, and provides a clear contract for how the API should be used: ```tsx filename="product.ts" export namespace ProductInput$ { export type Inbound = { name: string; price: number; }; export const inboundSchema: z.ZodType
```ts filename="fern-example/createOrder.ts"
/\*\*
- Create an order for a drink.
_/
createOrder(request, requestOptions) {
var \_a;
return \_\_awaiter(this, void 0, void 0, function_ () {
const { callbackUrl, body: \_body } = request;
const \_queryParams = new url_search_params_1.default();
if (callbackUrl != null) {
\_queryParams.append("callback_url", callbackUrl);
}
const \_response = yield core.fetcher({
url: (0, url_join_1.default)((\_a = (yield core.Supplier.get(this.\_options.environment))) !== null && \_a !== void 0 ? \_a : environments.NdimaresApiEnvironment.Default, "order"),
method: "POST",
headers: {
Authorization: yield this.\_getAuthorizationHeader(),
"X-Fern-Language": "JavaScript",
},
contentType: "application/json",
queryParameters: \_queryParams,
body: yield serializers.orders.createOrder.Request.jsonOrThrow(\_body, { unrecognizedObjectKeys: "strip" }),
timeoutMs: (requestOptions === null || requestOptions === void 0 ? void 0 : requestOptions.timeoutInSeconds) != null ? requestOptions.timeoutInSeconds \* 1000 : 60000,
});
if (\_response.ok) {
return yield serializers.Order.parseOrThrow(\_response.body, {
unrecognizedObjectKeys: "passthrough",
allowUnrecognizedUnionMembers: true,
allowUnrecognizedEnumValues: true,
breadcrumbsPrefix: ["response"],
});
}
if (\_response.error.reason === "status-code") {
throw new errors.NdimaresApiError({
statusCode: \_response.error.statusCode,
body: \_response.error.body,
});
}
switch (\_response.error.reason) {
case "non-json":
throw new errors.NdimaresApiError({
statusCode: \_response.error.statusCode,
body: \_response.error.rawBody,
});
case "timeout":
throw new errors.NdimaresApiTimeoutError();
case "unknown":
throw new errors.NdimaresApiError({
message: \_response.error.errorMessage,
});
}
});
}
```
```ts filename="speakeasy-example/createOrder.ts"
/**
* Create an order.
*
* @remarks
* Create an order for a drink.
*/
export async function ordersCreateOrder(
client$: SDKCore,
request: operations.CreateOrderRequest,
options?: RequestOptions
): Promise<
Result<
operations.CreateOrderResponse,
| errors.APIError
| SDKError
| SDKValidationError
| UnexpectedClientError
| InvalidRequestError
| RequestAbortedError
| RequestTimeoutError
| ConnectionError
>
> {
const input$ = request;
const parsed$ = schemas$.safeParse(
input$,
(value$) => operations.CreateOrderRequest$outboundSchema.parse(value$),
"Input validation failed"
);
if (!parsed$.ok) {
return parsed$;
}
const payload$ = parsed$.value;
const body$ = encodeJSON$("body", payload$.RequestBody, { explode: true });
const path$ = pathToFunc("/order")();
const query$ = encodeFormQuery$({
callback_url: payload$.callback_url,
});
const headers$ = new Headers({
"Content-Type": "application/json",
Accept: "application/json",
});
const security$ = await extractSecurity(client$.options$.security);
const context = {
operationID: "createOrder",
oAuth2Scopes: [],
securitySource: client$.options$.security,
};
const securitySettings$ = resolveGlobalSecurity(security$);
const requestRes = client$.createRequest$(
context,
{
security: securitySettings$,
method: "POST",
path: path$,
headers: headers$,
query: query$,
body: body$,
timeoutMs: options?.timeoutMs || client$.options$.timeoutMs || -1,
},
options
);
if (!requestRes.ok) {
return requestRes;
}
const request$ = requestRes.value;
const doResult = await client$.do$(request$, {
context,
errorCodes: ["4XX", "5XX"],
retryConfig: options?.retries || client$.options$.retryConfig,
retryCodes: options?.retryCodes || ["429", "500", "502", "503", "504"],
});
if (!doResult.ok) {
return doResult;
}
const response = doResult.value;
const responseFields$ = {
HttpMeta: { Response: response, Request: request$ },
};
const [result$] = await m$.match<
operations.CreateOrderResponse,
| errors.APIError
| SDKError
| SDKValidationError
| UnexpectedClientError
| InvalidRequestError
| RequestAbortedError
| RequestTimeoutError
| ConnectionError
>(
m$.json(200, operations.CreateOrderResponse$inboundSchema),
m$.fail("4XX"),
m$.jsonErr("5XX", errors.APIError$inboundSchema),
m$.json("default", operations.CreateOrderResponse$inboundSchema)
)(response, { extraFields: responseFields$ });
if (!result$.ok) {
return result$;
}
return result$;
}
```
Loading posts...
; if (status === "error") returnError: {error?.message}
; return (-
{data.map((post) => (
- {post.title} ))}
-
{data?.pages.flatMap((page) => {
return page.result.feed.map((entry) => (
-
```typescript filename="speakeasy-example/webhook.ts"
// techbooks-speakeasy SDK created by Speakeasy
import { TechBooks } from "techbooks-speakeasy";
const bookStore = new TechBooks();
async function handleWebhook(request: Request) {
const secret = "my-webhook-secret";
const res = await bookStore.webhooks.validateWebhook({ request, secret });
if (res.error) {
console.error("Webhook validation failed:", res.error);
throw new Error("Invalid webhook signature");
}
// Speakeasy provides type inference and payload parsing
const { data, inferredType } = res;
switch (data.type) {
case "book.created":
console.log("New Book Created:", data.title);
break;
case "book.deleted":
console.log("Book Deleted:", data.title);
break;
default:
console.warn(`Unhandled event type: ${inferredType}`);
}
}
```
```typescript filename="fern-example/webhook.ts"
// techbooks-fern SDK created by Fern
import FernClient from 'fern-sdk';
const client = new FernClient();
async function handleWebhook(req) {
try {
const payload = client.webhooks.constructEvent({
body: req.body,
signature: req.headers['x-imdb-signature'],
secret: process.env.WEBHOOK_SECRET
});
if (payload.type === "book.created") {
console.log("New Book Created:", payload.title);
} else if (payload.type === "book.deleted") {
console.log("Book Deleted:", payload.title);
} else {
console.warn(`Unhandled event type: ${payload.type}`);
}
} catch (error) {
console.error("Webhook validation failed:", error);
throw new Error("Invalid webhook signature");
}
}
```
```typescript filename="example/techbooks-speakeasy.ts"
import { TechBooks } from "techbooks-speakeasy";
const bookStore = new TechBooks({
security: {
// OAuth 2.0 client credentials
clientID: "",
clientSecret: "",
},
});
async function run() {
// The SDK handles the token lifecycle, retries, and error handling for you
await bookStore.books.addBook({
// Book object
});
}
run();
```
```typescript filename="example/techbooks-fern.ts"
import FernClient from 'fern-sdk';
const client = new FernClient({
clientId: '',
clientSecret: '',
});
async function run() {
await client.books.addBook({
// Book object
});
}
run();
```
#### Speakeasy SDK structure
Speakeasy generates separate folders for models and operations, both in the documentation and in the source folder. This indicates a clear separation of concerns.
We also see separate files for each component and operation, indicating modularity and separation of concerns.
#### liblab SDK structure
liblab generates an SDK that at a glance looks less organized, considering the greater number of configuration files at the root of the project, the lack of a `docs` folder, and the way the `src` folder is structured by OpenAPI tags instead of models and operations.
Loading posts...
; if (status === "error") returnError: {error?.message}
; return (-
{data.map((post) => (
- {post.title} ))}
-
{data?.pages.flatMap((page) => {
return page.result.feed.map((entry) => (
-
### Vercel SDK (Speakeasy)
### Cloudflare SDK (Stainless)
### Vercel SDK (Speakeasy) - Minimal dependencies
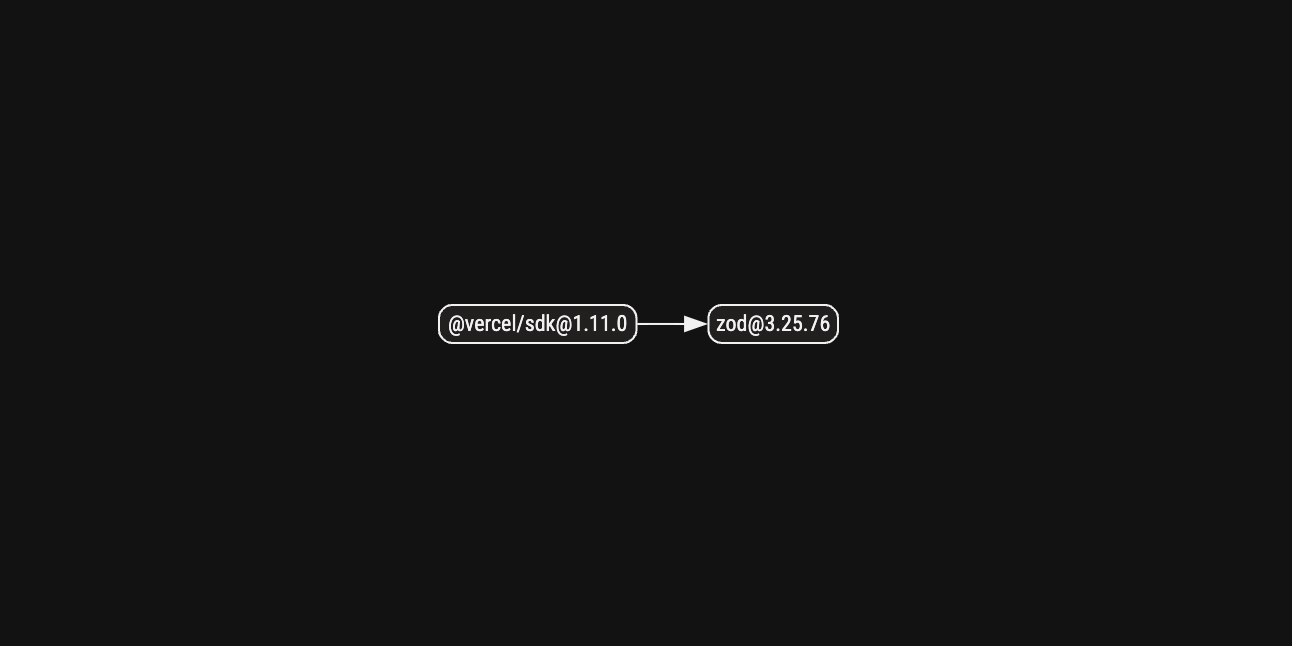
The Vercel SDK has an extremely minimal dependency graph with only **Zod** as its single runtime dependency. This focused approach provides:
- **Reduced attack surface**: Fewer dependencies mean fewer potential security vulnerabilities
- **Predictable updates**: Only one external dependency to monitor and maintain
- **Simplified auditing**: Security teams can easily review the entire dependency chain
- **Faster installation**: Minimal dependencies result in quicker `npm install` times
### Cloudflare SDK (Stainless) - Complex dependency web
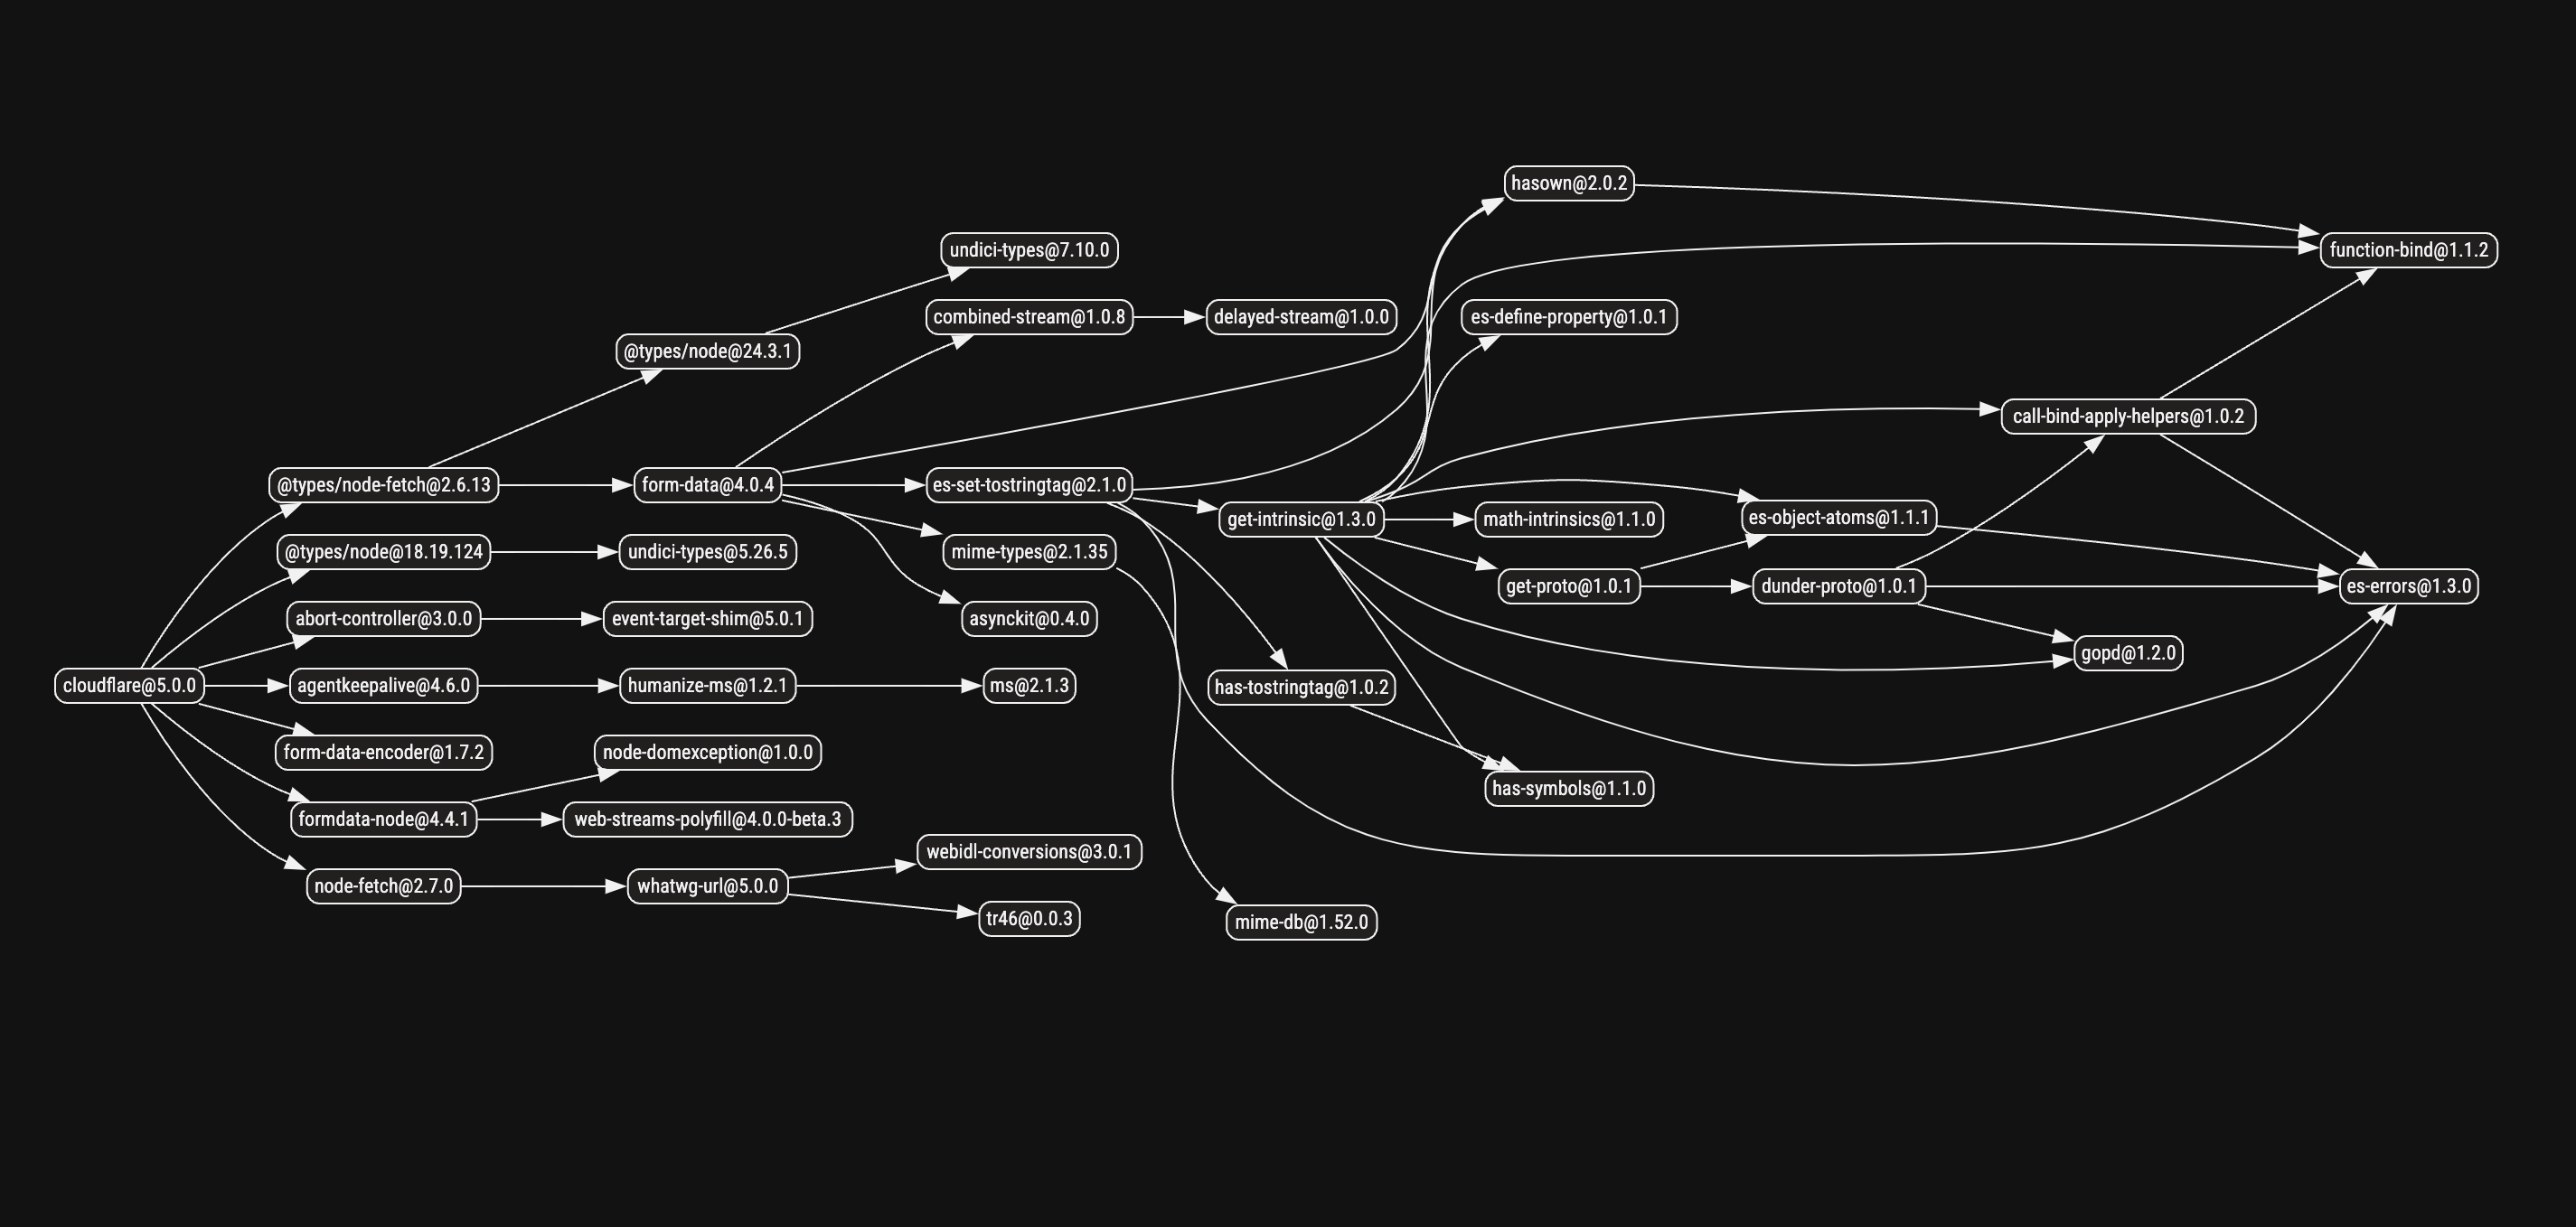
The Cloudflare SDK includes a complex web of **25+ dependencies**, creating a more intricate dependency graph with:
- **Larger attack surface**: More dependencies increase potential security risks
- **Complex maintenance**: Multiple dependencies require ongoing monitoring for vulnerabilities
- **Update complexity**: Changes in any dependency can introduce breaking changes
- **Installation overhead**: More dependencies mean longer installation times
```typescript filename="vercel-sdk-types.ts"
// Vercel SDK (Speakeasy) - with runtime validation
import { Vercel } from "@vercel/sdk";
const vercel = new Vercel({
bearerToken: "your-token"
});
async function createDeployment() {
// Strong typing with runtime validation
const deployment = await vercel.deployments.createDeployment({
// !mark
// !callout[/}/] Zod validates this at runtime and compile time
name: "my-project",
gitSource: {
type: "github",
repo: "user/repo",
ref: "main"
},
// Missing required fields will cause both
// TypeScript errors AND runtime validation errors
});
return deployment;
}
```
```typescript filename="cloudflare-sdk-types.ts"
// Cloudflare SDK (Stainless) - compile-time only
import Cloudflare from "cloudflare";
const cf = new Cloudflare({
apiToken: "your-token"
});
async function createZone() {
// Strong compile-time typing, no runtime validation
const params: Cloudflare.ZoneCreateParams = {
// !mark
// !callout[/}/] Only TypeScript compile-time checking
name: "example.com",
account: {
id: "account-id"
}
// Invalid data might pass TypeScript but fail at runtime
};
const zone = await cf.zones.create(params);
return zone;
}
```
```typescript filename="vercel-runtime-validation.ts"
// Vercel SDK (Speakeasy) - Runtime validation
import { Vercel } from "@vercel/sdk";
const vercel = new Vercel({
bearerToken: "your-token"
});
async function updateProject() {
try {
await vercel.projects.updateProject({
idOrName: "my-project",
requestBody: {
// !mark
// !callout[/:/] Zod validation error: Expected string, received number
name: 12345, // Invalid: should be string
framework: "nextjs"
}
});
} catch (error) {
// Catches validation error immediately
// before making the HTTP request
console.log("Validation failed:", error.message);
}
}
```
```typescript filename="cloudflare-no-validation.ts"
// Cloudflare SDK (Stainless) - No runtime validation
import Cloudflare from "cloudflare";
const cf = new Cloudflare({
apiToken: "your-token"
});
async function updateZone() {
try {
const params: any = { // Bypassing TypeScript
// !mark
// !callout[/:/] No runtime validation - sent to server as-is
name: 12345, // Invalid: should be string
account: { id: "account-id" }
};
await cf.zones.create(params);
} catch (error) {
// Only catches server-side validation errors
// after the HTTP request is made
console.log("Server error:", error.message);
}
}
```
### Speakeasy
### Stainless
Loading books...
; if (status === "error") returnError: {error?.message}
; return (-
{data.map((book) => (
- {book.title} ))}
Project"] SentryCloud -->|"HTTPS API"| SentryMCP["Sentry MCP (SSE)"] SentryMCP -. "SSE / JSON-RPC" .-> VSCode["VS Code (Cline Host)"] VSCode -->|"stdio / JSON-RPC"| GHServer["GitHub MCP (stdio
Docker container)"] GHServer -->|"GitHub REST"| GitHubRepo["GitHub Repo"] %% Optional return arrows for clarity SentryMCP -. "list_issues" .-> VSCode GHServer -->|"create_issue / comment / PR"| VSCode ``` _A buggy Cloudflare Worker reports exceptions to Sentry, which surface through the hosted Sentry MCP (SSE) into Cline within VS Code. The same session then flows down to a local GitHub MCP (stdio) that is running in Docker, allowing the agent to file an issue, add comments, and push a pull request to the GitHub repository - all under human oversight._ ## Setup walkthrough Let's set up our stack.
Setup requirements
} You'll need the following:Bootstrap the buggy worker
} In the terminal, run: ```bash filename="Terminal" npx -y wrangler init bug-demo ``` When prompted, select the following options: ```text filename="Terminal" ╭ Create an application with Cloudflare Step 1 of 3 │ ├ In which directory do you want to create your application? │ dir ./bug-demo │ ├ What would you like to start with? │ category Hello World example │ ├ Which template would you like to use? │ type Worker only │ ├ Which language do you want to use? │ lang TypeScript │ ├ Copying template files │ files copied to project directory │ ├ Updating name in `package.json` │ updated `package.json` │ ├ Installing dependencies │ installed via `npm install` │ ╰ Application created ╭ Configuring your application for Cloudflare Step 2 of 3 │ ├ Installing wrangler A command line tool for building Cloudflare Workers │ installed via `npm install wrangler --save-dev` │ ├ Installing @cloudflare/workers-types │ installed via npm │ ├ Adding latest types to `tsconfig.json` │ added @cloudflare/workers-types/2023-07-01 │ ├ Retrieving current workerd compatibility date │ compatibility date 2025-04-26 │ ├ Do you want to use git for version control? │ yes git │ ├ Initializing git repo │ initialized git │ ├ Committing new files │ git commit │ ╰ Application configured ╭ Deploy with Cloudflare Step 3 of 3 │ ├ Do you want to deploy your application? │ no deploy via `npm run deploy` │ ╰ Done ``` Enter your new project: ```bash filename="Terminal" cd bug-demo ``` Install the Sentry SDK npm package: ```bash filename="Terminal" npm install @sentry/cloudflare --save ``` Open your project in VS Code: ```bash filename="Terminal" code . ``` Edit `wrangler.jsonc` and add the `compatibility_flags` array with one item, `nodejs_compat`: ```json filename="wrangler.jsonc" "compatibility_flags": [ "nodejs_compat" ] ``` Visit the [Sentry setup guide for Cloudflare Workers](https://docs.sentry.io/platforms/javascript/guides/cloudflare/#setup-cloudflare-workers) and copy the example code. Paste it in `src/index.ts` and then add the intentional bug in the `fetch()` method. Edit `src/index.ts`: ```typescript filename="src/index.ts" // !mark(10:11) import * as Sentry from "@sentry/cloudflare"; export default Sentry.withSentry( (env) => ({ dsn: "https://[SENTRY_KEY]@[SENTRY_HOSTNAME].ingest.us.sentry.io/[SENTRY_PROJECT_ID]", tracesSampleRate: 1.0, }), { async fetch(request, env, ctx) { // ❌ intentional bug undefined.call(); return new Response("Hello World!"); }, } satisfies ExportedHandlerSet up the Sentry MCP Server in Cline
} In VS Code, with Cline installed, follow the steps below:Set up the GitHub MCP Server in Cline
} Generate a GitHub personal access token: 1. In GitHub, click your profile picture to open the right sidebar. 2. Click **Settings** in the sidebar. 3. Click **Developer settings** at the bottom of the left sidebar. 4. Expand **Personal access tokens** in the left sidebar. 5. Click **Fine-grained tokens**. 6. Press the **Generate new token** button. 7. Enter any name for your token, and select **All repositories**. 8. Select the following permissions: - Administration: Read and Write - Contents: Read and Write - Issues: Read and Write - Pull requests: Read and Write 9. Click **Generate token** and save your token for the next step. Now that we have a GitHub token, let's add the GitHub MCP Server. 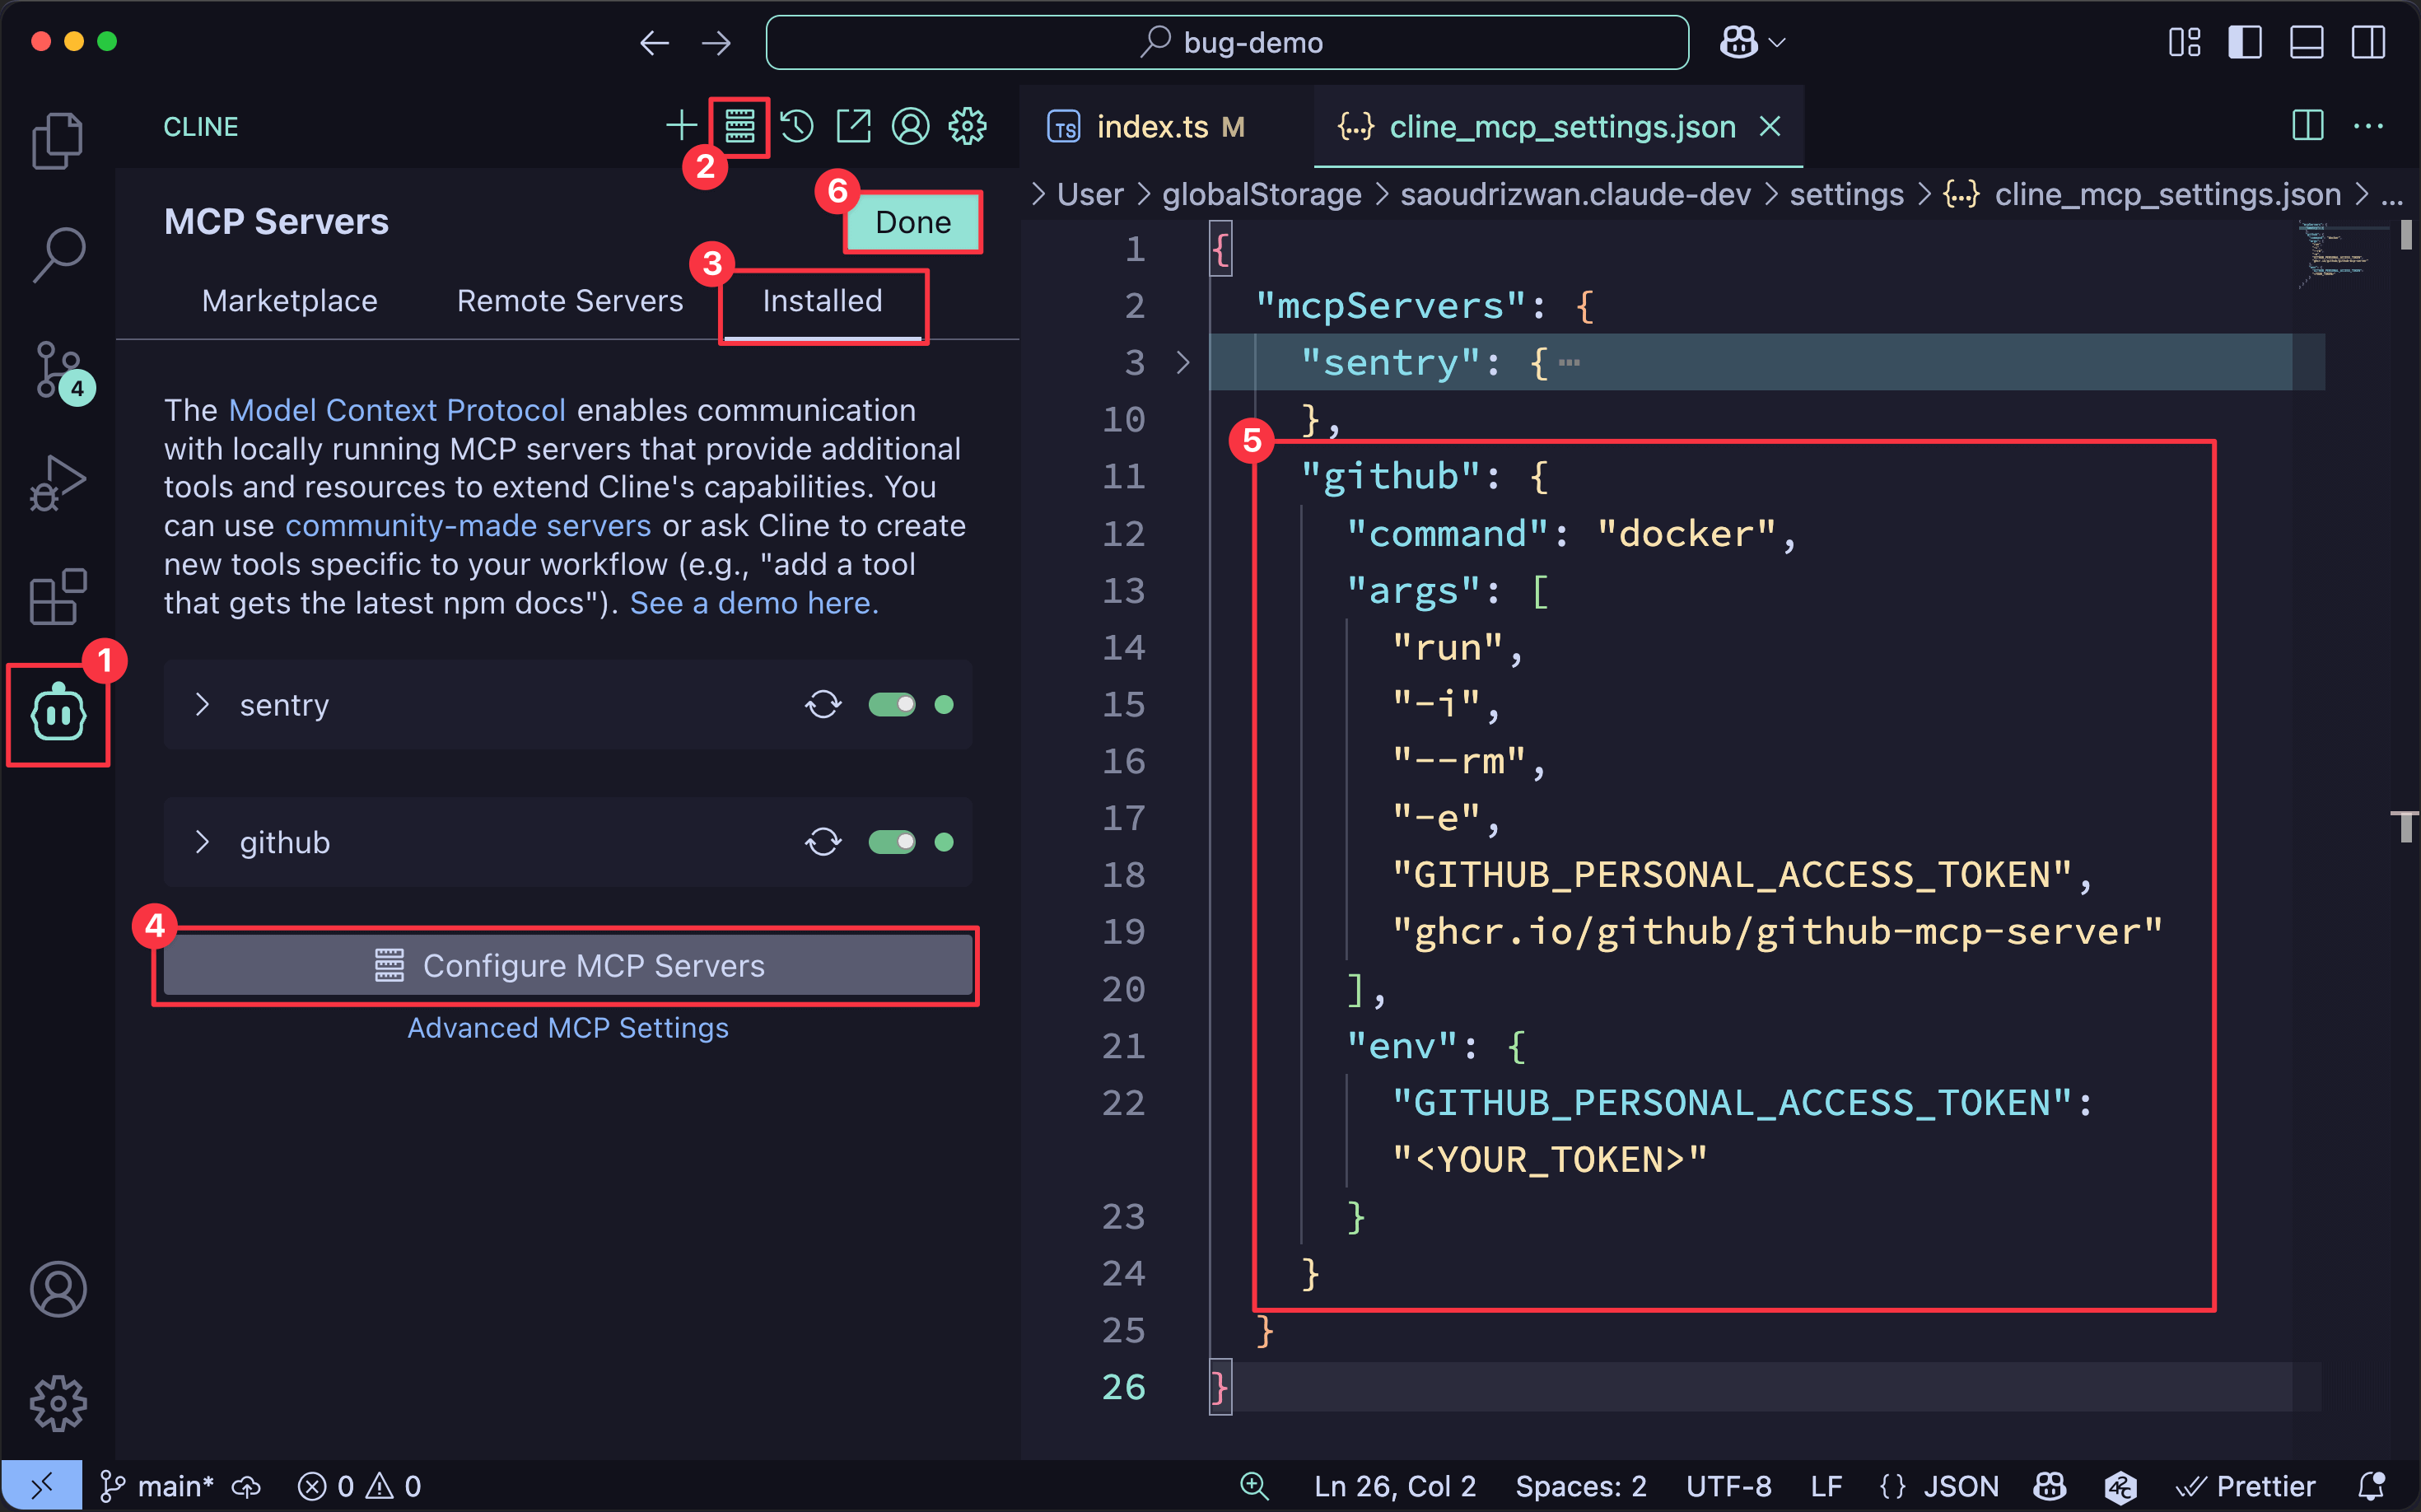 1. Click the **Cline (robot)** icon in the VS Code sidebar. 2. Click the **MCP Servers** toolbar button at the top of the Cline panel. 3. Select the **Installed** tab. 4. Press **Configure MCP Servers**. 5. Paste the GitHub MCP Server config JSON that runs `docker run -it --rm -e GITHUB_PERSONAL_ACCESS_TOKEN=$GITHUB_PERSONAL_ACCESS_TOKEN ghcr.io/github/github-mcp-server` in the window, then press `Cmd + s` to save. ```json filename="cline_mcp_settings.json" { "mcpServers": { "sentry": {...}, "github": { "command": "docker", "args": [ "run", "-i", "--rm", "-e", "GITHUB_PERSONAL_ACCESS_TOKEN", "ghcr.io/github/github-mcp-server" ], "env": { "GITHUB_PERSONAL_ACCESS_TOKEN": "System prompt with tools and task
} Cline sent a completion request to the LLM. The request contained our prompt, a list of tools, and the tool schemas. You can see how Cline built this prompt in the Cline repository at [`src/core/prompts/system-prompt`](https://github.com/cline/cline/tree/main/src/core/prompts/system-prompt). ```mermaid sequenceDiagram participant Human participant Cline participant LLM Human->>Cline: "Add this repository to GitHub as a private repo" Cline->>LLM: Sends prompt + available tools + schemas Note over Cline,LLM: Cline constructs a system promptcontaining all available tools ``` {
LLM generates a tool call
} The LLM generates a tool call based on the prompt and the tools available. The tool call is a structured XML object that contains the name of the MCP server, the name of the tool to be called, and the arguments to be passed to it. ```mermaid %%{init: { 'sequence': {'noteAlign': 'left', 'noteFontFamily': 'Monospace' } }}%% sequenceDiagram participant Human participant Cline participant LLM LLM->>Cline: Returns XML tool call Note over LLM,Cline:"name": "bug-demo",
"private": true
}
Cline sends the tool call to the MCP server
} Cline sends the tool call to the GitHub MCP Server using the `stdio` transport. ```mermaid %%{init: { 'sequence': {'noteAlign': 'left', 'noteFontFamily': 'Monospace' } }}%% sequenceDiagram participant Human participant Cline participant LLM participant GHMCP as GitHub MCP LLM->>Cline: Requests to create repository Cline->>Human: Asks for approval to use create_repository Human->>Cline: Approves repository creation Cline->>GHMCP: Sends JSON-RPC request via stdio Note over Cline,GHMCP: {#160;#160;"jsonrpc": "2.0",
#160;#160;"id": "42",
#160;#160;"method": "create_repository",
#160;#160;"params": {
#160;#160;#160;#160;"name": "bug-demo",
#160;#160;#160;#160;"private": true
#160;#160;}
} ``` ```json filename="stdio" { "jsonrpc": "2.0", "id": "42", "method": "create_repository", "params": { "name": "bug-demo", "private": true } } ``` - The message is sent over the already-open `stdio` pipe as a single UTF-8 line, typically terminated by `\n`, so the server can parse it line by line. - The `id` is an opaque request identifier chosen by Cline; the server will echo it in its response to let the client match replies to calls. - All MCP tool invocations follow the same structure - only the method and parameters change. {
GitHub MCP Server processes the request
} The GitHub MCP Server receives the tool call and processes it. It calls the GitHub API to create a new repository with the specified name and privacy settings, then parses the response from the API. ```mermaid sequenceDiagram participant GHMCP as GitHub MCP participant GHAPI as GitHub API GHMCP->>GHAPI: Makes API call to create repository Note over GHMCP,GHAPI: GitHub MCP Server translatesJSON-RPC to GitHub REST API call ``` {
GitHub MCP Server sends the response back to Cline
} The GitHub MCP Server sends the response back to Cline over the `stdio` transport. ```mermaid %%{init: { 'sequence': {'noteAlign': 'left', 'noteFontFamily': 'Monospace' } }}%% sequenceDiagram participant Human participant Cline participant LLM participant GHMCP as GitHub MCP participant GHAPI as GitHub API GHAPI->>GHMCP: Returns API response GHMCP->>Cline: Sends JSON-RPC response via stdio Note over GHMCP,Cline: {#160;#160;"jsonrpc": "2.0",
#160;#160;"id": "42",
#160;#160;"result": {
#160;#160;#160;#160;"id": 123456789,
#160;#160;#160;#160;"name": "bug-demo",
#160;#160;#160;#160;...
#160;#160;}
} Cline->>Human: Shows result for verification ``` ```json filename="stdio" { "jsonrpc": "2.0", "id": "42", "result": { "id": 123456789, "name": "bug-demo", "visibility": "private", "default_branch": "main", "git_url": "git://github.com/speakeasy/bug-demo.git", "etc": "..." } } ``` - The response contains the `id` of the request and the result of the tool call. - The result is a JSON object that contains the details of the newly created repository. - Cline receives the response and displays it in the UI. - The response is also passed to the LLM for further processing and is now available in the context for the next prompt. {
Cline displays the result
} Cline displays the result of the tool call in the UI, and the LLM can use it in subsequent prompts. ```mermaid sequenceDiagram participant Human participant Cline participant LLM Cline->>Human: Displays repository creation result Cline->>LLM: Passes repository info into context Note over Cline,Human: Cline UI shows successfulrepository creation details ``` ```json { "id": 123456789, "name": "bug-demo", "visibility": "private", "default_branch": "main", "git_url": "git://github.com/speakeasy/bug-demo.git", "etc": "..." } ``` {
Cline pushes the repository to GitHub
} Cline pushes the new repository to GitHub using the `git` command. ```mermaid %%{init: { 'sequence': {'noteAlign': 'left', 'noteFontFamily': 'Monospace' } }}%% sequenceDiagram participant Human participant Cline participant LLM participant GHMCP as GitHub MCP participant GHAPI as GitHub API LLM->>Cline: Request git command execution Cline->>Human: Asks for approval to run git command Human->>Cline: Approves command execution Cline->>GHAPI: Executes git command to push repository Note over Cline,GHAPI: git remote add origin git@github.com:speakeasy/bug-demo.gitgit push -u origin main Human->>Cline: Confirms successful push ``` ```bash filename="Terminal" git remote add origin git@github.com:speakeasy/bug-demo.git && \ git push -u origin main ```
Giving Cline a task
} In Cline, we asked: ```text filename="Cline" 1. Fetch the latest issue from Sentry. 2. Create a new GitHub issue with a link back to the Sentry issue and a description. 3. Fix the bug based on the issue from Sentry. 4. Commit your changes in a new branch with an appropriate message and reference to both Sentry and the GitHub issues. 5. Push new branch to GitHub. 6. Open a PR with reference to the GitHub issue. ``` {Cline sends the request to the LLM
} Cline sends the request to the LLM, which generates a tool call to the Sentry MCP Server to fetch the latest issue. ```mermaid %%{init: { 'sequence': {'noteAlign': 'left', 'noteFontFamily': 'Monospace' } }}%% sequenceDiagram participant Human participant Cline participant LLM participant SentryMCP as Sentry MCP Human->>Cline: Requests to fix bug using MCP Cline->>LLM: Sends multi-step task request LLM->>Cline: Returns tool call for list_issues Cline->>Human: Asks for approval to run tool Human->>Cline: Approves tool call Cline->>SentryMCP: Sends JSON-RPC request via SSE Note over Cline,SentryMCP: {#160;#160;"jsonrpc": "2.0",
#160;#160;"id": "42",
#160;#160;"method": "list_issues",
#160;#160;"params": {
#160;#160;#160;#160;"sortBy": "last_seen"
#160;#160;}
} ``` The JSON-RPC request sent to the Sentry MCP Server looks like this: ```json filename="stdio" { "jsonrpc": "2.0", "id": "42", "method": "list_issues", "params": { "sortBy": "last_seen" } } ``` {
Sentry MCP Server processes the request
} The Sentry MCP Server processes the request and calls the Sentry API to fetch the latest issue. It returns the result to Cline. ```mermaid sequenceDiagram participant Cline participant LLM participant SentryMCP as Sentry MCP participant SentryAPI as Sentry API SentryMCP->>SentryAPI: Queries for latest issues SentryAPI->>SentryMCP: Returns issue list SentryMCP->>Cline: Sends formatted issue data via SSE Note over SentryMCP,Cline: Response contains formattedissue summary with error details ``` ```json filename="stdio" { "jsonrpc": "2.0", "id": "42", "result": { "content": [ { "type": "text", "text": "# Issues in **speakeasy**\n\n## NODE-CLOUDFLARE-WORKERS-1\n\n**Description**: TypeError: Cannot read properties of undefined (reading 'call')\n**Culprit**: Object.fetch(index)\n**First Seen**: 2025-04-21T14:21:10.000Z\n**Last Seen**: 2025-04-21T15:05:33.000Z\n**URL**: https://speakeasy.sentry.io/issues/NODE-CLOUDFLARE-WORKERS-1\n\n# Using this information\n\n- You can reference the Issue ID in commit messages (e.g. `Fixes
Cline analyzes the Sentry issue
} After receiving the issue from Sentry, Cline requests additional details to understand the stack trace: ```mermaid %%{init: { 'sequence': {'noteAlign': 'left', 'noteFontFamily': 'Monospace' } }}%% sequenceDiagram participant Human participant Cline participant LLM participant SentryMCP as Sentry MCP participant SentryAPI as Sentry API Cline->>LLM: Provides initial issue data LLM->>Cline: Requests more detailed information Cline->>Human: Asks for approval to run get_issue_details Human->>Cline: Approves tool call Cline->>SentryMCP: Calls get_issue_details Note over Cline,SentryMCP: {#160;#160;"jsonrpc": "2.0",
#160;#160;"id": "43",
#160;#160;"method": "get_issue_details",
#160;#160;"params": {
#160;#160;#160;#160;"organizationSlug": "speakeasy",
#160;#160;#160;#160;"issueId": "NODE-CLOUDFLARE-WORKERS-1"
#160;#160;}
} SentryMCP->>SentryAPI: Retrieves detailed issue information SentryAPI->>SentryMCP: Returns stack trace and details SentryMCP->>Cline: Sends comprehensive error data Cline->>LLM: Provides complete error context Note over LLM,Cline: LLM analyzes stack trace to
identify exact error location ``` ```json filename="stdio" { "jsonrpc": "2.0", "id": "43", "method": "get_issue_details", "params": { "organizationSlug": "speakeasy", "issueId": "NODE-CLOUDFLARE-WORKERS-1" } } ``` The Sentry MCP Server returns error details: ```text filename="response" **Description**: TypeError: Cannot read properties of undefined (reading 'call') **Culprit**: Object.fetch(index) **First Seen**: 2025-04-21T14:21:10.756Z **Last Seen**: 2025-04-21T15:05:33.000Z **URL**: https://speakeasy.sentry.io/issues/NODE-CLOUDFLARE-WORKERS-1 ## Event Specifics **Occurred At**: 2025-04-21T15:05:33.000Z **Error:** ``` TypeError: Cannot read properties of undefined (reading 'call') ``` **Stacktrace:** ``` index.js:6633:25 (Object.withScope) index.js:6634:14 index.js:3129:12 index.js:3371:21 index.js:3140:14 index.js:2250:26 (handleCallbackErrors) index.js:3141:15 (handleCallbackErrors.status.status) index.js:6996:33 index.js:7021:79 index.js:7090:16 (Object.fetch) ``` Using this information: - You can reference the IssueID in commit messages (for example, `Fixes NODE-CLOUDFLARE-WORKERS-1`) to automatically close the issue when the commit is merged. - The stack trace includes both first-party application code as well as third-party code, so it's important to triage to first-party code. ``` The stack trace reveals the exact nature and location of the bug: It's due to the `(undefined).call()` in `src/index.ts` on line 12. 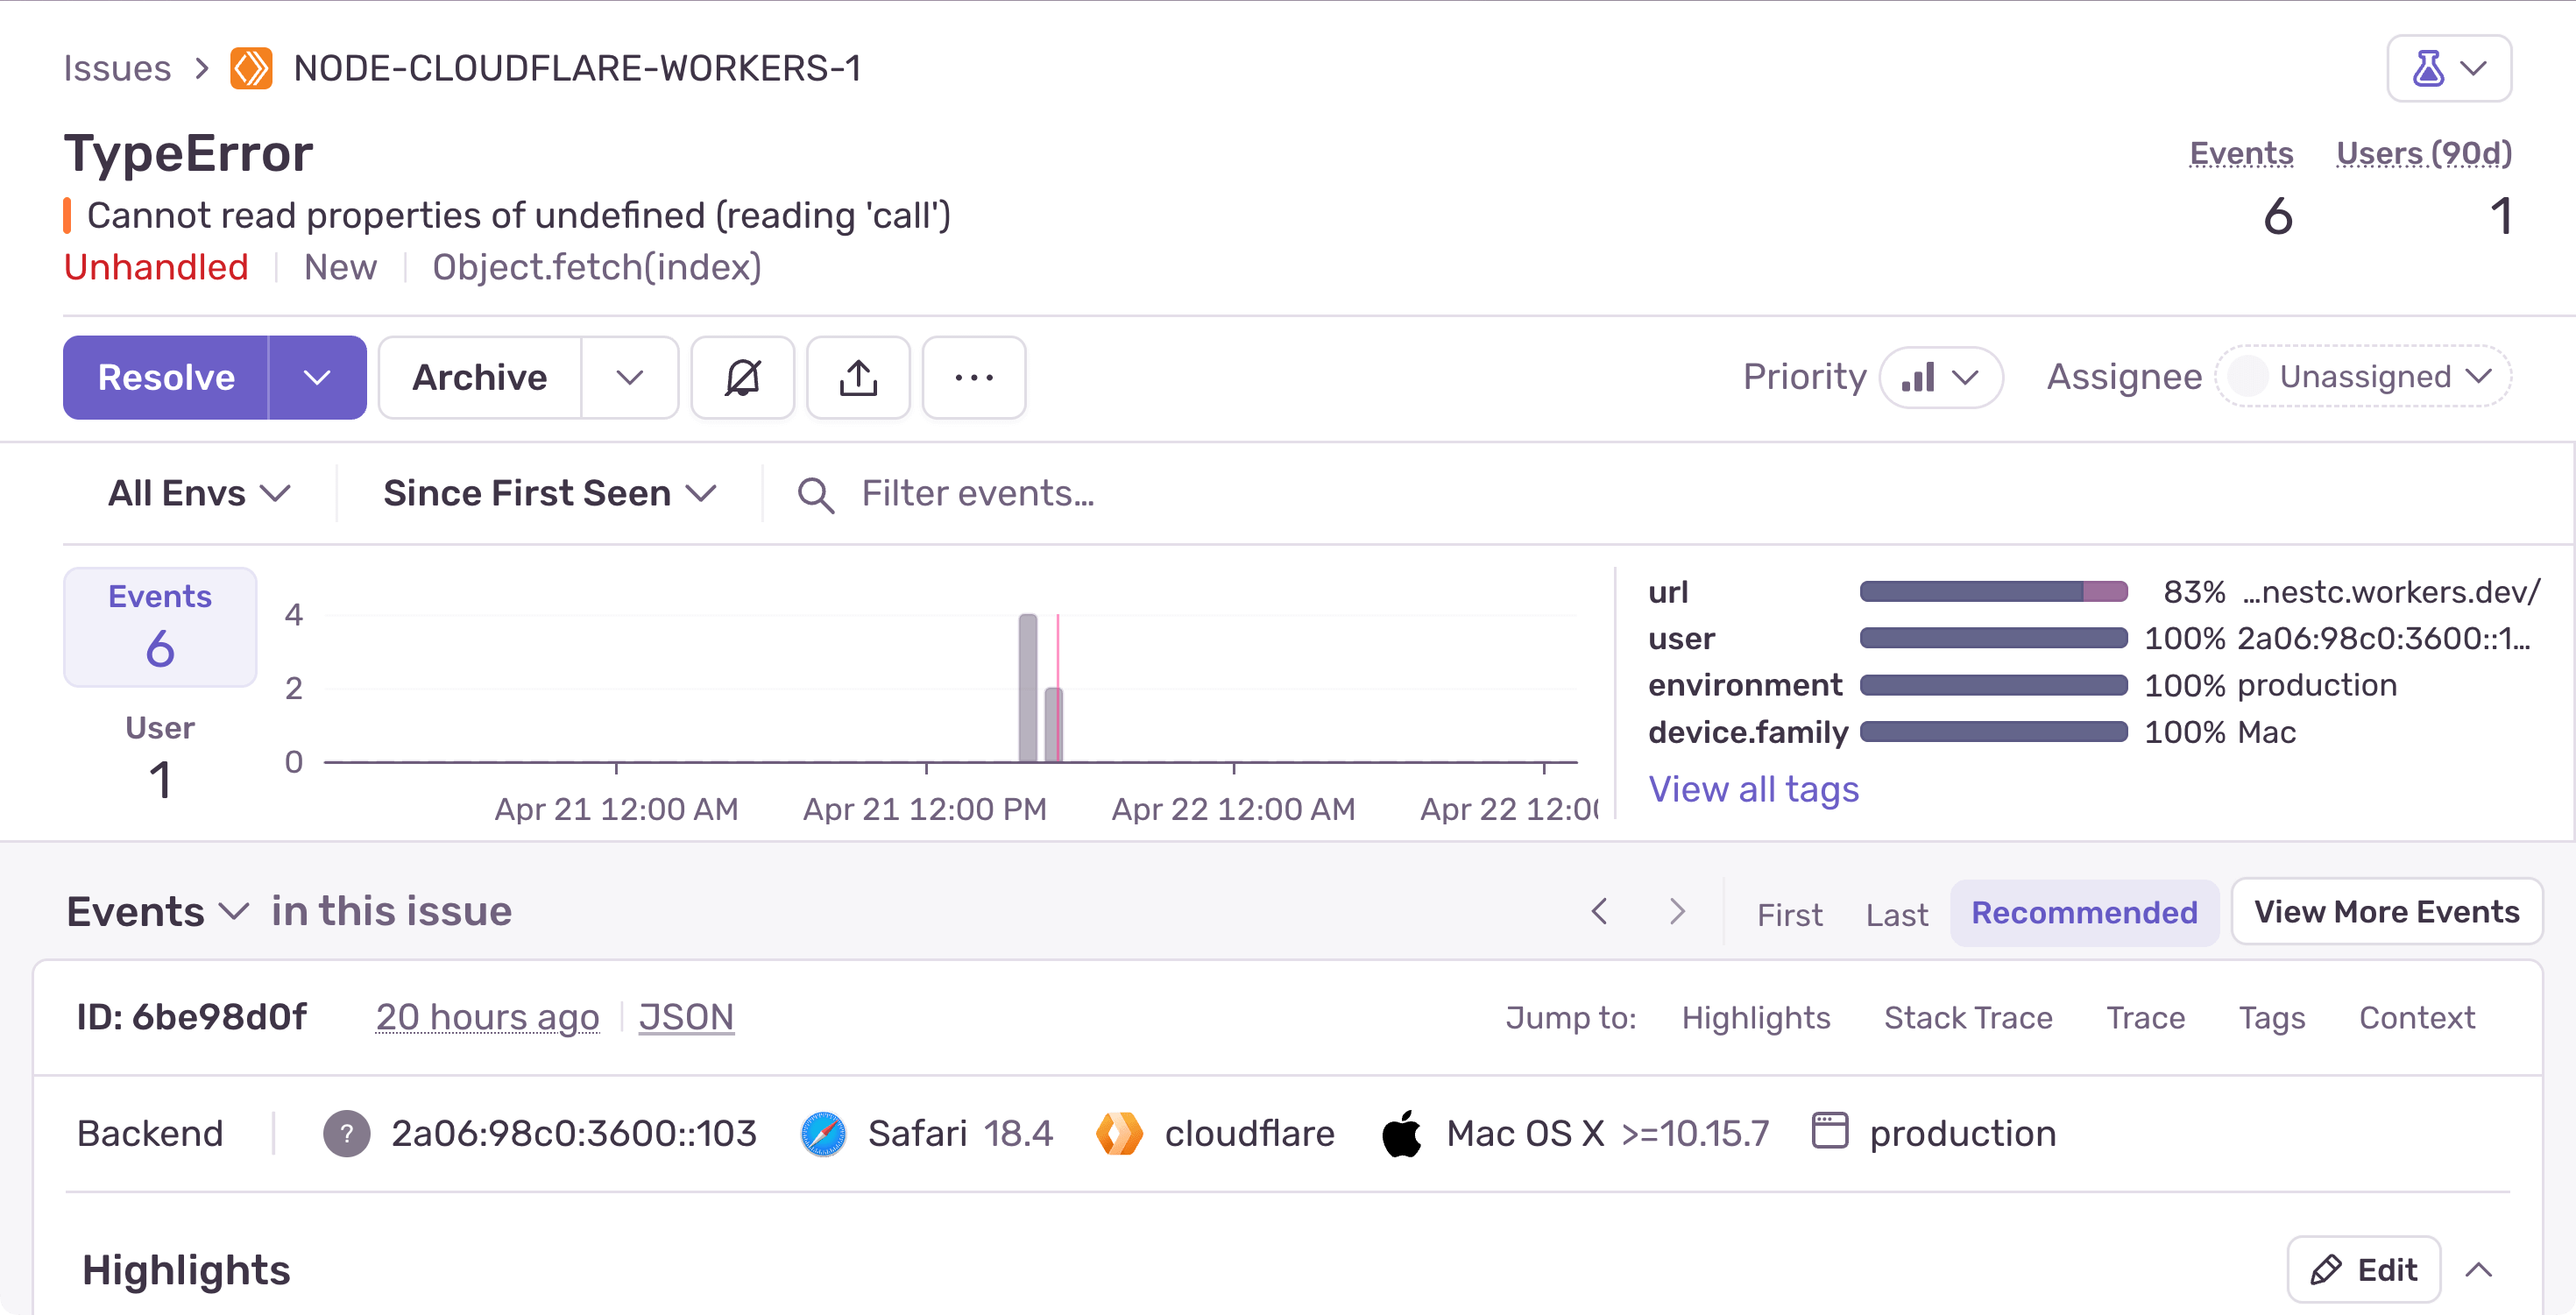 This response is passed to the LLM, which uses it to generate the next tool call. {
Cline creates a GitHub issue
} Next, at the request of the LLM, Cline uses the GitHub MCP Server to create an issue documenting the bug: ```mermaid %%{init: { 'sequence': {'noteAlign': 'left', 'noteFontFamily': 'Monospace' } }}%% sequenceDiagram participant Human participant Cline participant LLM participant GHMCP as GitHub MCP participant GHAPI as GitHub API LLM->>Cline: Decides to create GitHub issue Cline->>Human: Asks for approval to use create_issue Human->>Cline: Approves issue creation Cline->>GHMCP: Sends create_issue request Note over Cline,GHMCP: {#160;#160;"jsonrpc": "2.0",
#160;#160;"id": "44",
#160;#160;"method": "create_issue",
#160;#160;"params": {
#160;#160;#160;#160;"owner": "speakeasy",
#160;#160;#160;#160;"repo": "bug-demo",
#160;#160;#160;#160;"title": "Fix bug in index.ts",
#160;#160;#160;#160;"body": "This issue addresses the bug described in the Sentry issue: https://speakeasy.sentry.io/issues/NODE-CLOUDFLARE-WORKERS-1"
#160;#160;}
} GHMCP->>GHAPI: Creates issue via GitHub API GHAPI->>GHMCP: Returns issue creation confirmation GHMCP->>Cline: Sends issue creation result Cline->>LLM: Provides issue details for next steps Cline->>Human: Shows GitHub issue creation success ``` ```json filename="stdio" { "jsonrpc": "2.0", "id": "44", "method": "create_issue", "params": { "owner": "speakeasy", "repo": "bug-demo", "title": "Fix bug in index.ts", "body": "This issue addresses the bug described in the Sentry issue: https://speakeasy.sentry.io/issues/NODE-CLOUDFLARE-WORKERS-1" } } ``` The GitHub MCP Server confirms that the issue has been created: ```json filename="stdio" { "jsonrpc": "2.0", "id": "44", "result": { "id": 1, "number": 1, "state": "open", "locked": false, "title": "Fix bug in index.ts", "body": "This issue addresses the bug described in the Sentry issue: https://speakeasy.sentry.io/issues/NODE-CLOUDFLARE-WORKERS-1", "etc": "..." } } ```  {
Cline examines the codebase
} To fix the bug, the LLM needs to have the code in context. The LLM initiates a tool call to read the source code of the Cloudflare Worker. ```mermaid %%{init: { 'sequence': {'noteAlign': 'left', 'noteFontFamily': 'Monospace' } }}%% sequenceDiagram participant Human participant Cline participant LLM participant VSCodeFS as VS Code File System LLM->>Cline: Requests source code Cline->>Human: Asks for approval to read file Human->>Cline: Approves file read Cline->>VSCodeFS: Uses read_file tool Note over Cline,VSCodeFS:the bug: (undefined).call() ``` Since we're working directly in the VS Code editor, Cline uses the `read_file` tool: ```xml filename="Tool Call"
The LLM generates the fix and Cline applies it
} ```mermaid %%{init: { 'sequence': {'noteAlign': 'left', 'noteFontFamily': 'Monospace' } }}%% sequenceDiagram participant Human participant Cline participant LLM participant VSCodeFS as VS Code File System LLM->>Cline: Generates fix to remove buggy code Note over LLM,Cline: #60;replace_in_file#62;#60;path#62;src/index.ts#60;/path#62;
#60;diff#62;
#60;#60;#60;#60;#60;#60;#60; SEARCH
#160;#160;#160;#160;(undefined).call()#59;
=======
>>>>>> REPLACE
#60;/diff#62;
#60;/replace_in_file#62; Cline->>Human: Shows proposed file change for approval Human->>Cline: Approves code change Cline->>VSCodeFS: Applies the fix by removing the buggy line VSCodeFS->>Cline: Confirms file update Cline->>LLM: Reports successful code change Note over Cline,LLM: LLM can now proceed with
creating branch and committing fix ``` The LLM generates a fix for the bug, which is then sent to Cline: ```xml
Cline creates a new branch and commits the fix
} ```mermaid %%{init: { 'sequence': {'noteAlign': 'left', 'noteFontFamily': 'Monospace' } }}%% sequenceDiagram participant Human participant Cline participant LLM participant GHAPI as GitHub API LLM->>Cline: Requests to create a new branch Cline->>Human: Asks for approval to run git command Note over Cline,Human:and GitHub issue IDs for auto-linking Human->>Cline: Approves commit LLM->>Cline: Requests to push branch to GitHub Cline->>Human: Asks for approval to push Human->>Cline: Approves push Cline->>GHAPI: Pushes branch to GitHub repository ``` Cline creates a new branch for the fix: ```xml
Cline opens a PR
} ```mermaid %%{init: { 'sequence': {'noteAlign': 'left', 'noteFontFamily': 'Monospace' } }}%% sequenceDiagram participant Human participant Cline participant LLM participant GHMCP as GitHub MCP participant GHAPI as GitHub API LLM->>Cline: Requests to create a pull request Cline->>Human: Asks for approval to use create_pull_request Human->>Cline: Approves PR creation Cline->>GHMCP: Sends create_pull_request request Note over Cline,GHMCP: {#160;#160;"jsonrpc": "2.0",
#160;#160;"id": "47",
#160;#160;"method": "create_pull_request",
#160;#160;"params": {
#160;#160;#160;#160;"owner": "speakeasy",
#160;#160;#160;#160;"repo": "bug-demo",
#160;#160;#160;#160;"title": "Fix bug in index.ts",
#160;#160;#160;#160;"head": "fix-bug-NODE-CLOUDFLARE-WORKERS-1",
#160;#160;#160;#160;"base": "main",
#160;#160;#160;#160;"body": "This PR fixes the bug described in the Sentry issue..."
#160;#160;}
} GHMCP->>GHAPI: Creates PR via GitHub API GHAPI->>GHMCP: Returns PR creation confirmation GHMCP->>Cline: Sends PR creation result Cline->>LLM: Provides PR details Cline->>Human: Shows GitHub PR creation success ``` Finally, Cline creates a pull request (PR) with the fix: ```json filename="stdio" { "jsonrpc": "2.0", "id": "47", "method": "create_pull_request", "params": { "owner": "speakeasy", "repo": "bug-demo", "title": "Fix bug in index.ts", "head": "fix-bug-NODE-CLOUDFLARE-WORKERS-1", "base": "main", "body": "This PR fixes the bug described in the Sentry issue: https://speakeasy.sentry.io/issues/NODE-CLOUDFLARE-WORKERS-1 and closes #1" } } ``` The GitHub MCP Server confirms the PR creation. 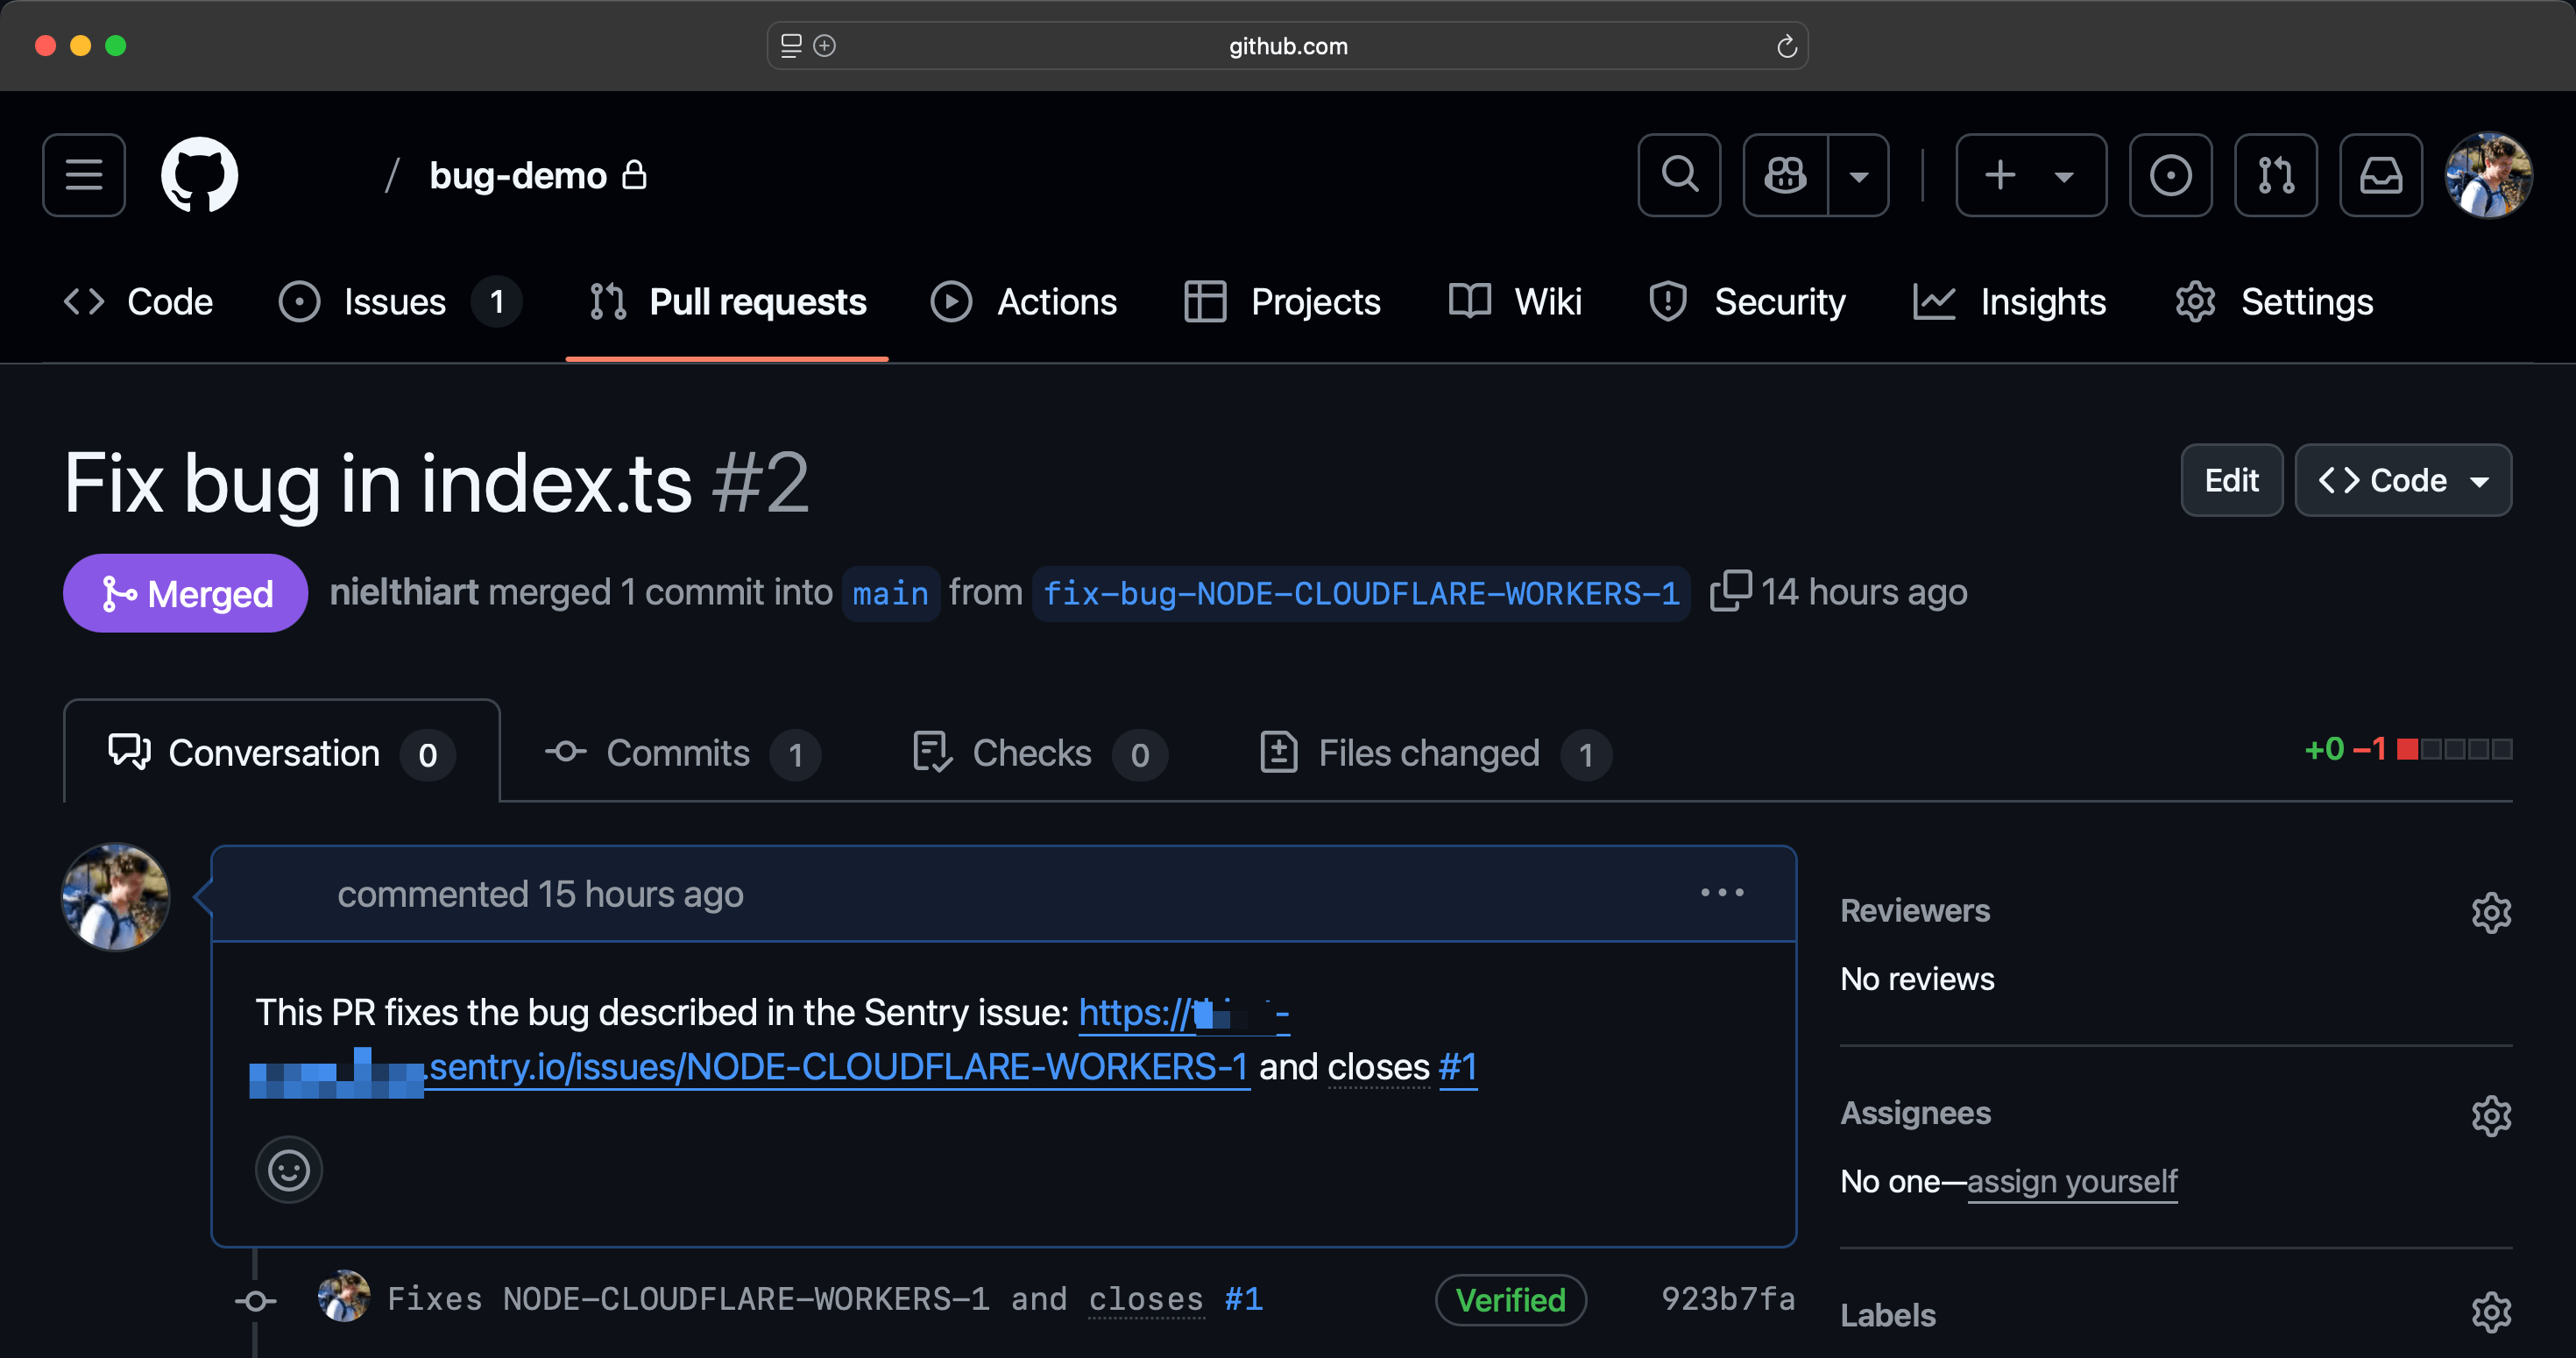 {
Human approval and deployment
} The final step requires human approval. The developer reviews the PR, approves the changes, merges the PR, and deploys: ```bash filename="Terminal" npm run deploy ``` A quick visit to the Cloudflare Worker URL confirms the fix is working, and Sentry shows no new errors. \+ Using Babel
\*\* Includes inline workspace support At Speakeasy, we've tried both Jest and Vitest, and ultimately chose Vitest – even without Vite in our setup. We decided to document our experience and dive deeper into both Vitest and Jest, comparing the two testing frameworks in terms of their features, performance, and developer experience to further help you decide which is best for your use case. We'll also share our experience of migrating from Jest to Vitest for our TypeScript SDK and how we're using Vitest for our new automated API testing feature, which is currently in beta, for Speakeasy-created SDKs. ## Jest's beginnings: From Facebook to open source Back in 2011, no JavaScript testing framework existed that met the Facebook (now Meta) team's testing needs, so they built Jest. Jest was open-sourced in 2014, shortly after React was open-sourced, and as React rapidly gained in popularity, so did Jest. Popular React project starter [Create React App](https://create-react-app.dev/) integrated Jest as its default testing framework in 2016 and Jest soon became the go-to testing tool for React developers. When Next.js, the most popular React framework, included built-in Jest configuration in version 12, Jest's dominance in the React ecosystem was secured. Ownership of Jest was transferred to the [OpenJS Foundation](https://engineering.fb.com/2022/05/11/open-source/jest-openjs-foundation/) in 2022 and the framework is currently maintained by a core group of contributors external to Meta. ## Jest features Jest's popularity is in part thanks to the extensive Jest API that handles a variety of testing needs, including snapshots, mocking, and code coverage, making it suitable for most unit testing situations. Jest works with Node.js and frontend frameworks like React, Angular, and Vue, and can be used with TypeScript using Babel or the `ts-jest` library to transpile TypeScript to JavaScript. Consider the following example snapshot test: ```javascript filename="link.test.js.snap" test("Checkout link renders correctly", () => { const tree = renderer .create(Go to checkout) .toJSON(); expect(tree).toMatchSnapshot(); }); ``` The [`test`](https://jestjs.io/docs/api#testname-fn-timeout) method runs a test. The Jest [`expect` API](https://jestjs.io/docs/expect) provides modifier and matcher (assertion) methods that simplify checking whether a value is what you expect it to be. Among the matcher methods available are: - `toBe()` - `toHaveProperty()` - `toMatchSnapshot()` Jest's extensive set of modifiers and matchers makes error messages more detailed, helping you pinpoint why a test fails. The [jest-extended](https://github.com/jest-community/jest-extended) library, maintained by the Jest community, provides additional matchers to expand testing functionality. You can use Jest's [mock functions](https://jestjs.io/docs/mock-functions) to mock objects, function calls, and even npm modules for faster testing without relying on external systems. This is especially useful for avoiding expensive function calls like calling a credit card charging API in the checkout process of an app. To run code before and after tests run, Jest provides handy [setup and teardown functions](https://jestjs.io/docs/setup-teardown): `beforeEach`, `afterEach`, `beforeAll`, and `afterAll`. ```javascript filename="cityDb.test.js" beforeAll(() => { return initializeCityDatabase(); }); afterAll(() => { return clearCityDatabase(); }); ``` ```javascript filename="cityDb.test.js" beforeEach(() => { initializeCityDatabase(); }); afterEach(() => { clearCityDatabase(); }); test("city database has Vienna", () => { expect(isCity("Vienna")).toBeTruthy(); }); test("city database has San Juan", () => { expect(isCity("San Juan")).toBeTruthy(); }); ``` When running tests, you can add the `--watch` flag to only run tests related to changed files. ```shell jest --watch ``` While Vitest doesn't have Jest's [Interactive Snapshot Mode](https://jestjs.io/docs/snapshot-testing#interactive-snapshot-mode), which enables you to update failed snapshots interactively in watch mode, this feature has been [added to Vitest's TODO list](https://github.com/vitest-dev/vitest/issues/2229). Jest also has a multi-project runner for running tests across multiple projects, each with their own setup and configuration, using a single instance of Jest. ## Getting started with Jest To set up a basic test, install Jest as a development dependency: ```shell npm install --save-dev jest ``` Create a test file with `.test` in its name, for example, `sum.test.js`: ```javascript filename="sum.test.js" const sum = require("./sum"); test("adds 1 + 2 to equal 3", () => { expect(sum(1, 2)).toBe(3); }); ``` This code imports a `sum` function that adds two numbers and then checks that `1` and `2` have been correctly added. Add the following script to your `package.json` file: ```json filename="package.json" { "scripts": { "test": "jest" } } ``` Run the test using the following command: ```shell npm run test ``` Jest finds the test files and runs them. Jest will print the following message in your terminal if the test passes: ```shell PASS ./sum.test.js ✓ adds 1 + 2 to equal 3 (5ms) ``` ## The origin of Vitest: The need for a Vite-native test runner The introduction of in-browser ES modules support led to the creation of the popular JavaScript bundler and development server Vite, which uses ES modules to simplify and speed up bundling during development. While it's possible to use Jest with Vite, this approach creates separate pipelines for testing and development. Among other factors, Jest requires separate configuration to transpile ES modules to CommonJS using Babel. A test runner that supports ES modules would integrate better with Vite and simplify testing. Enter Vitest. Developed by core Vite team member, Anthony Fu, Vitest is built on top of Vite, but you can use it in projects that don't use Vite. Vite's rise in popularity can be attributed to its simplicity and performance. Unlike traditional JavaScript bundlers that can be slow when running development servers for large projects, the Vite development server loads fast, as no bundling is required. Instead, Vite transforms and serves source code as ES modules to the browser on demand, functionality that allows for fast Hot Module Replacement (HMR) - the updating of modules while an app is running without a full reload - even for large applications. In development, the main advantages of using Vitest with Vite are their performance during development, ease of integration, and shared configuration. Vitest's growing adoption is partly driven by the widespread success of Vite. ## Vitest features Vitest has built-in ES module, TypeScript, JSX, and PostCSS support and many of the same features as Jest, like the `expect` API, snapshots, and code coverage. Vitest's Jest-compatible API makes migrating from Jest easy. Take a look at the differences between the frameworks in the [migrating from Jest guide](https://vitest.dev/guide/migration.html#migrating-from-jest) in the Vitest docs. With Vitest 3, several features have been enhanced. The code coverage functionality now automatically excludes test files by default, providing cleaner coverage reports. The mocking capabilities have also been expanded, with the new version including spy reuse for already mocked methods, reducing test boilerplate, and adding powerful new matchers like `toHaveBeenCalledExactlyOnceWith`: ```javascript test('vitest mocking example', () => { const mock = vi.fn(); mock('hello'); // New matcher for more precise assertions expect(mock).toHaveBeenCalledExactlyOnceWith('hello'); // Spy reuse example const obj = { method: () => {} }; const spy = vi.spyOn(obj, 'method'); // Spy is automatically reused if spyOn is called again const sameSpy = vi.spyOn(obj, 'method'); expect(spy === sameSpy).toBe(true); }); ``` In contrast to Jest, Vitest uses watch mode by default for a better developer experience. Vitest searches the ES module graph and only reruns affected tests when you modify your source code, similar to how Vite's HMR works in the browser. This makes test reruns fast - so fast that Vitest adds a delay before displaying test results in the terminal so that developers can see that the tests were rerun. Vitest supports [Happy DOM](https://github.com/capricorn86/happy-dom) and [jsdom](https://github.com/jsdom/jsdom) for DOM mocking. While Happy DOM is more performant than jsdom, which is used by Jest, jsdom is a more mature package with a more extensive API that closely emulates the browser environment. When running tests, Vitest runs a Vite dev server that provides a UI for managing your tests. Vitest 3 significantly improves the UI experience with several new features: - Run individual tests or test suites right from the UI for easier debugging. - Quickly spot and fix issues with automatic scrolling to failed tests. - Get a clearer view of your test dependencies with toggleable `node_modules` visibility. - Better organize your tests with improved filtering, search, and management controls. To view the UI, install `@vitest/ui` and pass the `--ui` flag to the Vitest run command: ```shell vitest --ui ```  Take a look at the StackBlitz [Vitest Basic Example](https://stackblitz.com/fork/github/vitest-dev/vitest/tree/main/examples/basic?initialPath=__vitest__/) for a live demo of the Vitest UI. At Speakeasy, we've found Vitest's UI to be a valuable tool for debugging. Vitest also has Rust-like [in-source testing](https://vitest.dev/guide/in-source) that lets you run tests in your source code: ```javascript filename="add.ts" export function add(...args: number[]) { return args.reduce((a, b) => a + b, 0) } // in-source test suites if (import.meta.vitest) { const { it, expect } = import.meta.vitest it('add', () => { expect(add()).toBe(0) expect(add(1)).toBe(1) expect(add(1, 2, 3)).toBe(6) }) } ``` While using separate test files is recommended for more complex tests, in-source testing is suitable for unit testing small functions and prototyping, making it especially useful for writing tests for JavaScript libraries. Vitest's recent experimental [browser mode](https://vitest.dev/guide/browser/) feature allows you to run tests in the browser, instead of simulating them in Node.js. [WebdriverIO](https://webdriver.io/) is used for running tests, but you can use other providers. You can also browse in headless mode using WebdriverIO or [Playwright](https://playwright.dev/). Vitest developed browser mode to improve test accuracy by using a real browser environment and streamline test workflows, but you may find browser mode slower than using a simulated environment as it needs to launch a browser, handle page rendering, and interact with browser APIs. Vitest 3 introduces powerful new CLI features that upgrade test execution flexibility. You can now exclude specific projects using patterns with `--project=!pattern`, making it easier to manage test runs in monorepos or large projects. The new line-number-based test filtering allows you to run specific tests by their location in the file: ```shell vitest path/to/test.ts:42 # Exclude all projects matching the pattern vitest --project=!packages/internal-* ``` Other experimental features include [type testing](https://vitest.dev/guide/features.html#type-testing) and [benchmarking](https://vitest.dev/guide/features.html#benchmarking). ## Getting started with Vitest The set up and execution of a basic test in Vitest is similar to Jest. First, install Vitest as a development dependency: ```shell npm install --save-dev vitest ``` Create a test file with `.test` or `.spec` in its name, for example, `sum.test.js`: ```javascript filename="sum.test.js" import { expect, test } from "vitest"; import { sum } from "./sum.js"; test("adds 1 + 2 to equal 3", () => { expect(sum(1, 2)).toBe(3); }); ``` This code imports a `sum` function that adds two numbers and then checks that `1` and `2` have been correctly added. Compared to Jest, this basic test is a little different. Vitest uses ES module imports, and for the sake of explicitness, it does not provide global APIs like `expect` and `test` by default. You can configure Vitest to provide [global APIs](https://vitest.dev/config/#globals) if you prefer or are migrating from Jest. Add the following script to your `package.json` file: ```json filename="package.json" { "scripts": { "test": "vitest" } } ``` Run the test using the following command: ```shell npm run test ``` Vitest finds the files and runs them, and will print the following message in your terminal if the test passes: ```shell ✓ sum.test.js (1) ✓ adds 1 + 2 to equal 3 Test Files 1 passed (1) Tests 1 passed (1) Start at 02:15:44 Duration 311ms ``` Note that Vitest starts in watch mode by default in a development environment. ## Choosing between Vitest and Jest Let's compare the two testing frameworks in terms of performance, developer experience, community and ecosystem, and their usage with Vite. ### Performance Performance comparisons of Vitest and Jest have delivered conflicting results, as the outcome depends on what you're testing and how you configure the testing tool. One blog post reports that [Jest is faster than Vitest](https://bradgarropy.com/blog/jest-over-vitest) when running all the tests for the author's blog website. [Another comparison](https://dev.to/mbarzeev/from-jest-to-vitest-migration-and-benchmark-23pl), which performed 1,256 unit tests on a production web app that uses Vite and Vue, found that Vitest was faster than Jest in most tests. [Yet another comparison](https://uglow.medium.com/vitest-is-not-ready-to-replace-jest-and-may-never-be-5ae264e0e24a) found Jest to be almost twice as fast as Vitest for testing a production app. Even if your benchmarking finds Jest is faster than Vitest, there are ways to improve Vitest's performance, as explained in the [improving performance guide](https://vitest.dev/guide/improving-performance.html#improving-performance) in the Vitest docs. For example, you can disable test [isolation](https://vitest.dev/config/#isolate) for projects that don't rely on side effects and properly clean up their state, which is often the case for projects in a `node` environment. Vitest 3 introduces significant performance enhancements with several key changes. The test runner now supports better concurrent execution with suite-level test shuffling for improved parallelism. Snapshot handling has been optimized to reset state properly during retries and repeats, reducing test flakiness. The new version also improves memory usage through smarter spy handling, automatically reusing mocks for methods that have already been spied on instead of creating new ones. In watch mode, Vitest often outperforms Jest when rerunning tests, as it only reruns tests affected by code changes. While Jest also only reruns changed tests in watch mode, it relies on checking uncommitted Git files, which can be less precise, as not all detected changes may be relevant to the tests you're running. ### Developer experience Both Jest and Vitest have comprehensive, well-organized, and easy-to-search documentation. The Jest docs include guides for specific types of tests such as [timer mocks](https://jestjs.io/docs/timer-mocks) and using Jest with other libraries, databases, web frameworks, and React Native. Vitest's [getting started guide](https://vitest.dev/guide/) sets it apart. It includes StackBlitz examples that you can use to try Vitest in the browser without setting up a code example yourself. The getting started guide also has example GitHub repos and StackBlitz playgrounds for using Vitest with different web frameworks. Vitest's ES module support gives it a significant advantage over Jest, which only offers [experimental support for ES modules](https://jestjs.io/docs/ecmascript-modules). Jest uses [Babel](https://babeljs.io/) to transpile JavaScript ES Modules to CommonJS, using the [`@babel/plugin-transform-modules-commonjs`](https://babeljs.io/docs/babel-plugin-transform-modules-commonjs) plugin. By default, Babel excludes Node.js modules from transformation, which may be an issue if you use an [ES-module-only library](https://gist.github.com/sindresorhus/a39789f98801d908bbc7ff3ecc99d99c) like [`react-markdown`](https://remarkjs.github.io/react-markdown/), in which case you'll get this commonly seen error message: ```javascript SyntaxError: Unexpected token 'export' ``` To fix this issue, use the [`transformIgnorePatterns`](https://jestjs.io/docs/configuration#transformignorepatterns-arraystring) option in your `jest.config.js` file to specify that the Node module is an ES module package that needs to be transpiled by Babel: ```javascript filename="jest.config.js" /** @type {import('jest').Config} */ const config = { ... "transformIgnorePatterns": [ "node_modules/(?!(react-markdown)/)" ], }; module.exports = config; ``` Jest supports TypeScript using Babel, which requires some [configuration](https://jestjs.io/docs/getting-started#using-typescript). Overall, Jest requires some configuration to work with ES modules and TypeScript, which work out of the box with Vitest. Less configuration means happier developers. [RedwoodJS](https://redwoodjs.com/), the full-stack, open-source web framework, [is in the process of migrating from Jest to Vitest](https://www.youtube.com/watch?v=zVY4Nv104Vk&t=271). The RedwoodJS team found Vitest much better suited to working with ES modules compared to Jest. ### Community and ecosystem While [npm stats](https://tanstack.com/stats/npm?packageGroups=%5B%7B%22packages%22%3A%5B%7B%22name%22%3A%22vitest%22%7D%5D%7D%2C%7B%22packages%22%3A%5B%7B%22name%22%3A%22jest%22%7D%5D%7D%5D&range=365-days&transform=none&binType=weekly&showDataMode=complete&height=400) shows that Jest is downloaded more frequently than Vitest, Vitest usage is rapidly increasing, outpacing Jest in growth. 
Watch Fivetran's MCP-based connector creation in action
## Speakeasy Creates and Maintains Multiple SDKs For Unified.to Through Speakeasy, Unified.to was able to offer SDKs in six different languages — in just one week, and without needing to hire additional engineering resources.
Idiomatic SDKs

### Sources
A source is one or more OpenAPI documents and OpenAPI overlays merged to create a single OpenAPI document.
- **OpenAPI specification (OAS)** is a widely accepted REST specification for building APIs. An OpenAPI document is a JSON or YAML file that defines the structure of an API. The Speakeasy platform uses OpenAPI documents as the source for generating SDKs and other code.
- **OpenAPI overlay** is a JSON or YAML file used to specify additions, removals, or modifications to an OpenAPI document. Overlays enable users to alter an OpenAPI document without making changes to the original document.
### Targets
A target refers to an SDK, agent tool, docs, or other code generated from sources.
- **[SDKs](/docs/sdks/create-client-sdks)** are available in 8 languages (and growing). Language experts developed each SDK generator to ensure a high level of idiomatic code generation. For the full details on the design and implementation of generation for each language, see the [SDK design documentation](/docs/languages/philosophy).
- **[Agent tools](/docs/standalone-mcp/build-server)** are a new surface for interacting with APIs. They provide a way for LLMs and other agentic platforms to interact with APIs. We support [MCP server generation](/docs/standalone-mcp/build-server) with other tools on the way.
- **[Documentation](/docs/sdk-docs/code-samples/generate-code-samples)** is available in the form of an API reference. Generated docs will include with SDK code snippets for every API method. Code snippets can also be embedded into an existing documentation site.
- **[Terraform providers](/docs/create-terraform)** can be generated from an annotated OpenAPI document. Terraform providers do not map 1:1 with APIs and so annotations are required to specify the Terraform entities and their methods.
### Workflow file syntax
The `workflow.yaml` workflow file is a YAML file that defines the steps of a workflow. The file is broken down into the following sections:
```yaml
workflowVersion: 1.0.0
speakeasyVersion: latest
sources:
my-source:
inputs:
- location: ./openapi.yaml
- location: ./overlay.yaml
- location: ./another-openapi.yaml
- location: ./another-overlay.yaml
# .... more openapi documents and overlays can be added here
# more inputs can be added here through `speakeasy configure sources` command
# ....
# ....
targets:
python-sdk:
target: python
source: my-source
# more inputs can be added here through `speakeasy configure targets` command
# ....
# ....
```
The workflow file syntax allows for 1:1, 1:N, or N:N mapping of `sources` to `targets`. A common use case for 1:N mapping is setting up a monorepo of SDKs. See our [monorepo guide](/guides/sdks/creating-a-monorepo) for details.
### Workflow steps
#### Validation
Validation is the process of checking whether an OpenAPI document is ready for code generation. The Speakeasy platform defines the default validation rules used to validate an OpenAPI document. Validation is done using the `speakeasy validate` command, and validation rules are defined in the `lint.yaml` file.
By default the `validate` CLI command will use the `speakeasy-default` linting ruleset if custom rules are not defined.
#### Linting
Linting is the process of checking an OpenAPI document for errors and style issues. The Speakeasy platform defines the default linting rules used to validate an OpenAPI document. Linting is done using the `speakeasy lint` command, and linting rules are defined in the `lint.yaml` file.
#### Testing
Testing is the process of checking a generated target for errors. The Speakeasy platform generates a test suite for each target, which can be run using the `speakeasy test` command. A test will be created for each operation in the API.
#### Release and versioning
Speakeasy automatically creates releases and versions for your target artifacts. The release and version are defined in the `gen.yaml` file and used to track the state of a generation and create a release on the target repository. [Releases](https://docs.github.com/en/repositories/releasing-projects-on-github/about-releases) are used synonymously with GitHub releases, the primary way Speakeasy distributes artifacts. For more information on how to manage versioning, see our [versioning reference](/docs/manage/versioning).
#### Publishing
Publishing is the process of making a generated target available to the public. The Speakeasy platform generates a package for each target, which can be pushed to the relevant package manager.
# Generate SDKs from OpenAPI
Source: https://speakeasy.com/docs/sdks/create-client-sdks
import {
Button,
Callout,
CardGrid,
CodeWithTabs,
Screenshot,
Table,
} from "@/mdx/components";
import { supportedLanguages } from "@/lib/data/docs/languages";
This page documents using the Speakeasy CLI to generate SDKs from OpenAPI / Swagger specs.
For a more UI-based experience, use the Speakeasy app:
Last pristine generation] --> D[3-Way Merge] B[Current
Modified version on disk] --> D C[New
Latest generation] --> D D --> E[Result
Merged output] ``` The merge process: 1. **Base**: The pristine version from the last generation (stored in Git objects) 2. **Current**: The version on disk (potentially with custom changes) 3. **New**: The newly generated version from Speakeasy If changes do not overlap, the merge completes automatically. When changes overlap, Speakeasy writes conflict markers to the file and stages the conflict in Git's index using three-stage entries (base, ours, theirs). This ensures `git status`, IDEs, and other Git tools recognize the conflict and prompt for resolution. ## File tracking and move detection ### Generated file headers Each generated file contains a tracking header: ```typescript // Code generated by Speakeasy (https://speakeasy.com). DO NOT EDIT. // @generated-id: a1b2c3d4e5f6 ``` The `@generated-id` is a deterministic hash based on the file's original path. This allows Speakeasy to detect when files are moved: 1. File generated at `src/models/user.ts` gets ID based on that path 2. File is moved to `src/entities/user.ts` 3. Next generation, Speakeasy scans for the ID and finds it at the new location 4. Updates are applied to the moved file ### Lockfile structure The `.speakeasy/gen.lock` file tracks generation state: ```json { "generationVersion": "2.500.0", "persistentEdits": { "generation_id": "abc-123", "pristine_commit_hash": "deadbeef123", "pristine_tree_hash": "cafebabe456" }, "trackedFiles": { "src/models/user.ts": { "id": "a1b2c3d4e5f6", "last_write_checksum": "sha1:7890abcdef", "pristine_git_object": "blobhash123", "moved_to": "src/entities/user.ts" } } } ``` Fields explained: - `generation_id`: Unique ID for this generation - `pristine_commit_hash`: Git commit storing pristine generated code - `pristine_tree_hash`: Git tree hash for no-op detection - `trackedFiles`: Per-file tracking information - `id`: File's generated ID for move detection - `last_write_checksum`: Checksum when last written (dirty detection) - `pristine_git_object`: Git blob hash of pristine version - `moved_to`: New location if file was moved ## Git integration details ### Object storage Custom code stores pristine generated code using Git's object database: 1. **Blob objects**: Each generated file is stored as a blob 2. **Tree objects**: Directory structure is stored as trees 3. **Commit objects**: Each generation creates a commit These objects live in `.git/objects` but are not referenced by any branch. ### Git refs Generation snapshots are stored at: ``` refs/speakeasy/gen/
-
*
- {@code java.lang.String} *
- {@code long} *
- {@code pet.store.simple.models.shared.Pet} *
Use {@code instanceof} to determine what type is returned. For example: * *
* if (obj.value() instanceof String) {
* String answer = (String) obj.value();
* System.out.println("answer=" + answer);
* }
*
*
* @return value of oneOf type
**/
public java.lang.Object value() {
return value.value();
}
@Override
public boolean equals(java.lang.Object o) {
if (this == o) {
return true;
}
if (o == null || getClass() != o.getClass()) {
return false;
}
FetchPetRequestBody other = (FetchPetRequestBody) o;
return Objects.deepEquals(this.value.value(), other.value.value());
}
@Override
public int hashCode() {
return Objects.hash(value.value());
}
@SuppressWarnings("serial")
public static final class _Deserializer extends OneOfDeserializer